
|
|
Forum Index : Microcontroller and PC projects : CMM2:V5.05.06exp - Gui support with cursor callback to Basic
| Page 1 of 4 |
|||||
| Author | Message | ||||
| matherp Guru Joined: 11/12/2012 Location: United KingdomPosts: 11097 |
Watch the video 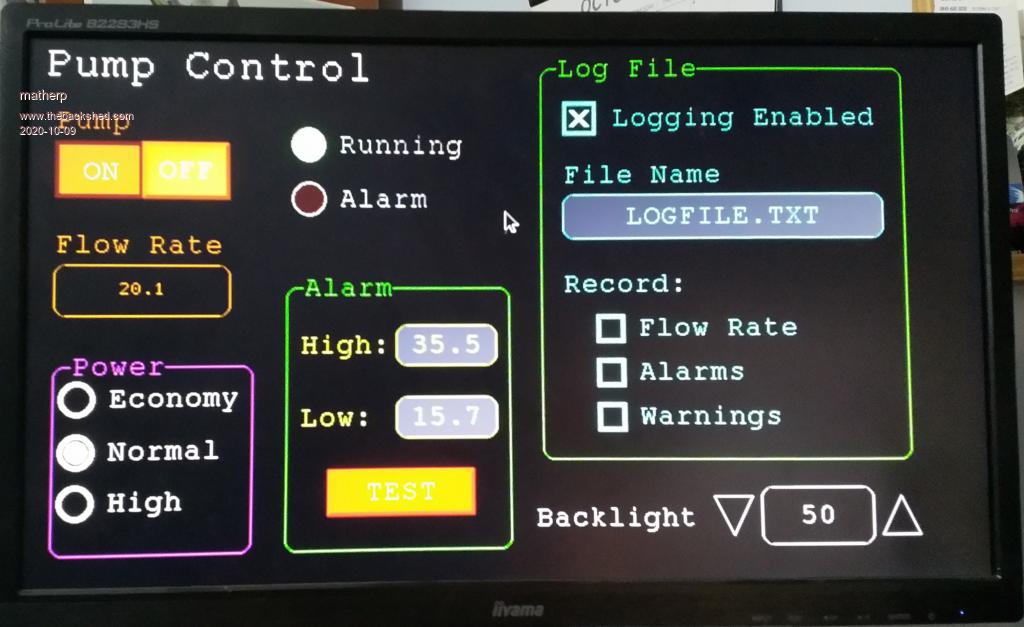 I've integrated Geoff's GUI functionality from the Micromite Plus into and experimental release of the CMM2. When using this with the Micromite Plus the functionality is tightly integrated with the LCD screen and Touch I/F. However, we have neither available on the CMM2 so I have implemented the cursor control and the "beep" as callbacks from the firmware to user supplied Basic subroutines. GUI functionality should be exactly the same as the MM+ with the exception that the PAGE command is replaced with GUI PAGE. Two Basic routines are required for full functionality Function MM.CURSOR and subroutine MM.BEEP MM.BEEP takes a single parameter which is the time in microseconds that the beep should last. The subroutine pro-forma is sub MM.BEEP beeptime as integer and I have implemented this as: sub mm.beep beeptime as integer �if beeptime and mm.info(sound)="OFF" then play tone 600,600,beeptime end sub Pretty simple �  The Function MM.CURSOR is more complicated function MM.CURSOR( request as integer) as integer There are 6 requests that it needs to satisfy: Request 1: Update the Basic programs values of X-coordinate, Y-coordinate and activation (e.g. keypress, or mouse button), if applicable any sprite used to display a cursor must be hidden when receiving this request. Finally this request should return the status of the activation (1=active e.g. mouse button pressed, 0=inactive) Request 2: Return the current value of the X-coordinate Request 3: Return the current value of the Y-coordinate Request 4: Return the current value of the activation (1=active e.g. mouse button pressed, 0=inactive) Request 5: Show any sprite used for a cursor at the current coordinates X, Y Request 6: Update the Basic programs values of X-coordinate, Y-coordinate and activation (e.g. keypress, or mouse button), Move any sprite to the new coordinates, Return the current value of the activation (1=active e.g. mouse button pressed, 0=inactive) My version using the HobbyTronics USB mouse I/F as in the video is as follows: sub initmouse �i2c open 100,1000 �i2c write 41,0,3,20,int(mm.hres \ 256),int(mm.hres mod 256) �i2c write 41,0,3,22,int(mm.vres \ 256),int(mm.vres mod 256) �i2c write 41,0,3,24,int(mm.hres \ 512),int((mm.hres\2) mod 256) �i2c write 41,0,3,26,int(mm.vres \ 512),int((mm.vres\2) mod 256) �i2c write 41,0,2,28,10 end sub ' function MM.CURSOR( t as integer) as integer �MM.CURSOR=-1 �if t=1 then � �readtouch � �MM.CURSOR=lb � �if sprite(x,1)<>10000 then sprite hide 1 �elseif t=2 then � �if lb then MM.CURSOR=x �elseif t=3 then � �if lb then MM.CURSOR=y �elseif t=4 then � �MM.CURSOR=lb �elseif t=5 then � �sprite show 1,x,y,1 �else � �readtouch � �MM.CURSOR=lb � �sprite show 1,x,y,1 �endif end function ' sub readtouch local s$ �do � �i2c write 41,1,1,0 � �i2c read 41,0,10,s$ � �x=str2bin(uint16,left$(s$,2),big) � �y=str2bin(uint16,mid$(s$,3,2),big) � �lb=asc(mid$(s$,5,1)) �loop until x>=0 and x<MM.hres and y>=0 and y< mm.vres end sub ' sub mm.beep beeptime as integer �if beeptime and mm.info(sound)="OFF" then play tone 600,600,beeptime end sub The experimental binary for the CMM2 is attached: CMM2V1.5.zip If you are feeling adventurous try creating versions of MM.CURSOR for the Wii Classic, Nunchuk, or just the USB keyboard using arrow keys and the space bar Full example code based on Geoff's MM+ example ''''''''''''''''''''''''''''''''''''''''''''''''''''''''''''''''' ' Demonstration program for the Micromite+ ' It does not do anything useful except demo the various controls ' ' Geoff Graham, October 2015 ''''''''''''''''''''''''''''''''''''''''''''''''''''''''''''''''' Option Explicit Dim ledsY 'mode 10 option console serial Colour RGB(white), RGB(black) ' reference numbers for the controls are defined as constants Const c_head = 1, c_pmp = 2, sw_pmp = 3, c_flow = 4, tb_flow = 5 Const led_run = 6, led_alarm = 7 Const frm_alarm = 20, nbr_hi = 21, nbr_lo = 22, pb_test =23 Const c_hi = 24, c_lo = 25 Const frm_pump = 30, r_econ = 31, r_norm = 32, r_hi = 33 Const frm_log = 40, cb_enabled = 41, c_fname = 42, tb_fname = 43 Const c_log = 44, cb_flow = 45, cb_pwr = 46, cb_warn = 47 Const cb_alarm = 48, c_bright = 49, sb_bright = 50 ' now draw the "Pump Control" display 'CLS dim integer x, y, lb, rb, sb, xs, ys, cs, ss initmouse sprite load "mouse.spr",1 GUI Interrupt TouchDown, TouchUp ' display the heading Font 2,2 : GUI Caption c_head, "Pump Control", 10, 0 Font 3 : GUI Caption c_pmp, "Pump", 20, 60, , RGB(brown) ' now, define and display the controls ' first GUI Switch sw_pmp, "ON|OFF", 20, 90, 150, 50, RGB(white),RGB(brown) CtrlVal(sw_pmp) = 1 ' the flow rate display box Font 3 : GUI Caption c_flow, "Flow Rate", 20, 170,, RGB(brown),0 Font 4 : GUI Displaybox tb_flow, 20, 200, 150, 45 CtrlVal(tb_flow) = "20.1" ' the radio buttons and their frame Font 3 : GUI Frame frm_pump, "Power", 20, 290, 170, 163,RGB(200,20,255) GUI Radio r_econ, "Economy", 40, 318, 15, RGB(230, 230, 255) GUI Radio r_norm, "Normal", 40, 364 GUI Radio r_hi, "High", 40, 408 CtrlVal(r_norm) = 1 ' start with the "normal" button selected ' the alarm frame with two number boxes and a push button switch Font 3 : GUI Frame frm_alarm, "Alarm", 220, 220, 200, 233,RGB(green) GUI Caption c_hi, "High:", 232, 260, LT, RGB(yellow) GUI Numberbox nbr_hi, 318,MM.info(VPos)-6,90,MM.info(FontHeight)+12,RGB(yellow),RGB(64,64,64) GUI Caption c_lo, "Low:", 232, 325, LT, RGB(yellow),0 GUI Numberbox nbr_lo, 318,MM.info(VPos)-6,90,MM.info(FontHeight)+12,RGB(yellow),RGB(64,64,64) GUI Button pb_test, "TEST", 257, 383, 130, 40,RGB(yellow), RGB(red) CtrlVal(nbr_lo) = 15.7 : CtrlVal(nbr_hi) = 35.5 ' draw the two LEDs Const ledsX = 240, coff = 50 ' define their position ledsY = 90 : GUI LED led_run, "Running", ledsX, ledsY, 15, RGB(green) ledsY = ledsY+49 : GUI LED led_alarm, "Alarm", ledsX, ledsY, 15, RGB(red) CtrlVal(led_run) = 1 ' the switch defaults to on so set the LED on ' the logging frame with check boxes and a text box Colour RGB(cyan), 0 GUI Frame frm_log, "Log File", 450, 20, 330, 355, RGB(green) GUI Checkbox cb_enabled, "Logging Enabled", 470, 50, 30, RGB(cyan) GUI Caption c_fname, "File Name", 470, 105 GUI Textbox tb_fname, 470, 135, 290, 40, RGB(cyan), RGB(64,64,64) GUI Caption c_log, "Record:", 470, 205, , RGB(cyan), 0 GUI Checkbox cb_flow, "Flow Rate", 500, 245, 25 GUI Checkbox cb_alarm, "Alarms", 500, 285, 25 GUI Checkbox cb_warn, "Warnings", 500, 325, 25 CtrlVal(cb_enabled) = 1 CtrlVal(tb_fname) = "LOGFILE.TXT" ' define and display the spinbox for controlling the backlight GUI Caption c_bright, "Backlight", 442, 415,,RGB(200,200,255),0 GUI Spinbox sb_bright, MM.info(HPos) + 8, 400, 200, 50,,,10, 10, 100 CtrlVal(sb_bright) = 50 ' All the controls have been defined and displayed. At this point ' the program could do some real work but because this is just a ' demo there is nothing to do. So it just sits in a loop. Do Loop ' the interrupt routine for touch down ' using a select case command it has a different process for each ' control Sub TouchDown �local integer mbox ' �print "down" �Select Case Touch(REF) ' find out the control touched �Case cb_enabled ' the enable check box � �If CtrlVal(cb_enabled) Then � � �GUI Restore c_fname, tb_fname, c_log, cb_flow, cb_alarm, cb_warn � �Else � � �mbox=MsgBox("Are you sure?", "YES","CANCEL") ' � � �print mbox � � �if mbox=1 then � � � �GUI Disable c_fname, tb_fname, c_log, cb_flow, cb_alarm, cb_warn � � �else � � � �CtrlVal(cb_enabled)=1 � � �endif � �EndIf �Case sb_bright ' the brightness spin box ' � �BackLight CtrlVal(sb_bright) �Case sw_pmp ' the pump on/off switch � �CtrlVal(led_run) = CtrlVal(sw_pmp) � �CtrlVal(tb_flow) = Str$(CtrlVal(sw_pmp) * 20.1) � �CtrlVal(r_norm) = 1 �Case pb_test ' the alarm test button � �CtrlVal(led_alarm) = 1 � �GUI beep 250 �Case r_econ ' the economy radio button � �CtrlVal(tb_flow) = Str$(CtrlVal(sw_pmp) * 18.3) �Case r_norm ' the normal radio button � �CtrlVal(tb_flow) = Str$(CtrlVal(sw_pmp) * 20.1) �Case r_hi ' the high radio button � �CtrlVal(tb_flow) = Str$(CtrlVal(sw_pmp) * 23.7) �End Select End Sub ' interrupt routine when the touch is removed Sub TouchUp �Select Case Touch(LASTREF) ' use the last reference �Case pb_test ' was it the test button � �CtrlVal(led_alarm) = 0 ' turn off the LED �End Select End Sub sub initmouse �i2c open 100,1000 �i2c write 41,0,3,20,int(mm.hres \ 256),int(mm.hres mod 256) �i2c write 41,0,3,22,int(mm.vres \ 256),int(mm.vres mod 256) �i2c write 41,0,3,24,int(mm.hres \ 512),int((mm.hres\2) mod 256) �i2c write 41,0,3,26,int(mm.vres \ 512),int((mm.vres\2) mod 256) �i2c write 41,0,2,28,10 end sub ' function MM.CURSOR( t as integer) as integer �MM.CURSOR=-1 �if t=1 then � �readtouch � �MM.CURSOR=lb � �if sprite(x,1)<>10000 then sprite hide 1 �elseif t=2 then � �if lb then MM.CURSOR=x �elseif t=3 then � �if lb then MM.CURSOR=y �elseif t=4 then � �MM.CURSOR=lb �elseif t=5 then � �sprite show 1,x,y,1 �else � �readtouch � �MM.CURSOR=lb � �sprite show 1,x,y,1 �endif end function ' sub readtouch local s$ �do � �i2c write 41,1,1,0 � �i2c read 41,0,10,s$ � �x=str2bin(uint16,left$(s$,2),big) � �y=str2bin(uint16,mid$(s$,3,2),big) � �lb=asc(mid$(s$,5,1)) �loop until x>=0 and x<MM.hres and y>=0 and y< mm.vres end sub ' sub mm.beep beeptime as integer �if beeptime and mm.info(sound)="OFF" then play tone 600,600,beeptime end sub Edited 2020-10-09 04:16 by matherp |
||||
CircuitGizmos Guru Joined: 08/09/2011 Location: United StatesPosts: 1427 |
This is a great addition to the CMM2. Will the controls also accept keyboard input or only on-screen "keyboard"? Micromites and Maximites! - Beginning Maximite |
||||
mclout999 Guru Joined: 05/07/2020 Location: United StatesPosts: 502 |
Is there a US source for this device? HobbyTronics USB mouse I/F. They call me Shai-Hulud (The maker) |
||||
| Sasquatch Guru Joined: 08/05/2020 Location: United StatesPosts: 384 |
Not sure about a US source, but I ordered from HobbyTronics using PayPal and they shipped the next day by Air Mail. I should have them in a few more days. -Carl |
||||
| vegipete Guru Joined: 29/01/2013 Location: CanadaPosts: 1167 |
Cool Stuff! But this is getting into dangerous areas with non-standard custom hardware. Without an official mouse interface, fragmentation will occur. TassyJim is putting a PS/2 mouse on a comm port (maybe I2C too,) using an easily available Arduino. You (matherp) are using a somewhat difficult to obtain custom programmed PIC chip to put a USB mouse on I2C. I'm programming a cheap PIC chip to put a PS/2 mouse into the acceleration parameters of an emulated Nunchuk, later to be changed to using a USB mouse. (Mine does PC style joystick too.) At least the Hobbytronics comm protocol is open, so I could reproduce it with my hardware/firmware. I respectfully suggest the CMM2 design committee needs to select an official mouse interface, because us grunt users (speaking only for myself) really really want a mouse.  Visit Vegipete's *Mite Library for cool programs. |
||||
| matherp Guru Joined: 11/12/2012 Location: United KingdomPosts: 11097 |
The whole point of this approach is that it doesn't rely on any specific H/W. Anything can be used by any user as long as they implement the MM.CURSOR function to meet the 6 request requirements. I just happened to use the Hobbytronics device as my test H/W. I could equally have use a Wii Nunchuk |
||||
TassyJim Guru Joined: 07/08/2011 Location: AustraliaPosts: 6496 |
Peter has shown us some easy to follow user defined subs to interface with. I should have no trouble creating subs/functions to suit my mouse using either the serial or the Wii Classic emulation. The Wii Classic protocol is my preferred emulation for this type of interface. I need to do a few non-maximite things today but will find time to play later, hopefully. It's spring time over here so the weeds are calling. By using user defined functions for the interface, experimentation is not curtailed. Jim VK7JH MMedit |
||||
| CircuitGizmos Guru Joined: 08/09/2011 Location: United StatesPosts: 1427 |
The real impressive way to do this would be to support one single hub (one tier from the usb host) and allow for USB keyboard and USB mouse. I thought I saw USB hub support for the F4 chip. Edited 2020-10-09 08:08 by CircuitGizmos Micromites and Maximites! - Beginning Maximite |
||||
bigmik Guru Joined: 20/06/2011 Location: AustraliaPosts: 2979 |
Hi all, This is interesting. Whilst I laud the PS2 mouse project, the fact is they are not easy to obtain these days and are usually old and well used as they have been lying in dusty cupboards for years. The USB mouse though is readily obtainable as new and is cheap. If the interface is I2C then it can be plugged into the NunChuk connector. A simple Y adapter can be made so both the mouse and NunChuck can be used as presumably they will have different addresses. A cheap way to buy the NunChuk connector is to buy an extension cable (costs around $5AU ~ $3US).. It is a pity that the Silicon Chip project elected for Serial only.. Going further, probably direct this to Peter and Geoff, would it be possible to allocate some of the unused pins of the ARM chip for Mouse support? This will be fairly easy to do on the Wavshare version CMM2 and much more difficult , but not impossible, on the All-In-One version CMM2. Kind Regards, Mick EDIT**** I visualise that with a USB mouse, it is possible to have the hardware and mouse transceiver mounted inside the case so no external case modification is required. Of course that means Wireless mouse but these are dirt cheap. Mik Edited 2020-10-09 10:13 by bigmik Mick's uMite Stuff can be found >>> HERE (Kindly hosted by Dontronics) <<< |
||||
| mkopack73 Senior Member Joined: 03/07/2020 Location: United StatesPosts: 261 |
Should be pretty easy to write an equivalent "mouse driver" inc (1 each for the various mouse interface approaches). So the user just maybe copies the right one in for their interface to (for example) "MOUSE.INC" which implements the MM.CURSOR specific for the interface you're using. Again, this is where having some standardized library approach would be helpful... Peter has given us the API to implement, we write the implementations for our hardware setup and it becomes transparent to the person programming the UI... LOVE where this is going guys! |
||||
| Sasquatch Guru Joined: 08/05/2020 Location: United StatesPosts: 384 |
I had the thought that since we don't have the source code for the HobbyTronic module, perhaps the Arduino project could be modified to send the data in the same format as the HobbyTronic? I also like the Wii Classic interface but we can't change the HobbyTronic module to output Wii format. Could the CMM2 interface be "standardized" even if the hardware interface is implemented differently? USB or PS2, HobbyTronic SC or Arduino or whatever doesn't matter, as long as it "looks" the same to the CMM2 The software interface is also a valid approach but requires more fiddling by each user. It would be good to avoid the Windows style software driver complications. -Carl |
||||
| TassyJim Guru Joined: 07/08/2011 Location: AustraliaPosts: 6496 |
The good news: It works well with my serial mouse interface. Haven't tried it with the Wii option yet. The not so good news: If I remove the rem from the last SPRITE SHOW command in the MM.CURSOR function, I get a Buffer not in use error. function MM.CURSOR( t as integer) as integer �MM.CURSOR=-1 �if t=1 then � �readtouch � �MM.CURSOR=lb � �if sprite(x,1)<>10000 then sprite hide 1 �elseif t=2 then � �if lb then MM.CURSOR=x �elseif t=3 then � �if lb then MM.CURSOR=y �elseif t=4 then � �MM.CURSOR=lb �elseif t=5 then � �sprite show 1,x,y,1 �else � �readtouch � �MM.CURSOR=lb � �'sprite show 1,x,y,1 ' this line causes an "Error: Buffer not in use" �endif end function With the rem in place, the cursor flickers rapidly but seems to be in the correct location at all times. Mouse speed is smooth and 'just right' Clicking works as expected as does the keypads for text and number entry. Jim Edit: The function MM.CURSOR is being called before there is time to set everything up. I can put a 5 second delay after SPRITE LOAD and the error still occurs immediately the program starts. Edit again. A crude but effective way the stop SPRITE SHOW being called too early. function MM.CURSOR( t as integer) as integer static spriteready ' flag to prevent early call to SPRITE SHOW MM.CURSOR=-1 if t=1 then readtouch MM.CURSOR=lb if sprite(x,1)<>10000 then sprite hide 1 spriteready = 1 endif elseif t=2 then if lb then MM.CURSOR=x elseif t=3 then if lb then MM.CURSOR=y elseif t=4 then MM.CURSOR=lb elseif t=5 then sprite show 1,x,y,1 else readtouch MM.CURSOR=lb if spriteready then sprite show 1,x,y,1 ' this line causes an "Error: Buffer not in use" endif end function Now the cursor looks better. Edited 2020-10-09 17:01 by TassyJim VK7JH MMedit |
||||
| matherp Guru Joined: 11/12/2012 Location: United KingdomPosts: 11097 |
Jim Try the attached. I've blocked calling the routines until after the first GUI call so as long as the sprite is set up before the first GUI object then it should be OK CMM2V1.5.zip All: please could you try this version and run as many existing programs as possible to ensure I haven't broken anything Edited 2020-10-09 17:17 by matherp |
||||
| TassyJim Guru Joined: 07/08/2011 Location: AustraliaPosts: 6496 |
Much better thank you. I have been looking at the USB mouse interface you are using and have ordered one to play with. I will have a go at emulating it with my Arduino setup. Having the x y positions stored in the interface will reduce the size of my interrupt routines. It might wait until my device arrive but that could take a while. Thanks again, Jim VK7JH MMedit |
||||
| matherp Guru Joined: 11/12/2012 Location: United KingdomPosts: 11097 |
Yes, the other nice thing is that the screen resolution can be programmed into the chip so, as in my code, the response becomes independent of screen resolution. Of course the mouse would need re-initialising if you change screen mode |
||||
| matherp Guru Joined: 11/12/2012 Location: United KingdomPosts: 11097 |
Here is a version that works using the keyboard to position the cursor. Arrow keys to move and space to activate a control. This demonstrates the H/W independence of the callback mechanism. You can use any device you want to move the cursor - just follow the rules for MM.CURSOR and it should work. ''''''''''''''''''''''''''''''''''''''''''''''''''''''''''''''''' ' Demonstration program for the Micromite+ ' It does not do anything useful except demo the various controls ' ' Geoff Graham, October 2015 ''''''''''''''''''''''''''''''''''''''''''''''''''''''''''''''''' Option Explicit Dim ledsY option console serial Colour RGB(white), RGB(black) ' reference numbers for the controls are defined as constants const left=130, right=131, down=129, up=128, button=32 Const c_head = 1, c_pmp = 2, sw_pmp = 3, c_flow = 4, tb_flow = 5 Const led_run = 6, led_alarm = 7 Const frm_alarm = 20, nbr_hi = 21, nbr_lo = 22, pb_test =23 Const c_hi = 24, c_lo = 25 Const frm_pump = 30, r_econ = 31, r_norm = 32, r_hi = 33 Const frm_log = 40, cb_enabled = 41, c_fname = 42, tb_fname = 43 Const c_log = 44, cb_flow = 45, cb_pwr = 46, cb_warn = 47 Const cb_alarm = 48, c_bright = 49, sb_bright = 50 ' now draw the "Pump Control" display 'CLS dim integer x=mm.hres\2, y=mm.vres\2, lb=0 sprite load "mouse.spr",1 settick 20,keyscan GUI Interrupt TouchDown, TouchUp ' display the heading Font 2,2 : GUI Caption c_head, "Pump Control", 10, 0 Font 3 : GUI Caption c_pmp, "Pump", 20, 60, , RGB(brown) ' now, define and display the controls ' first GUI Switch sw_pmp, "ON|OFF", 20, 90, 150, 50, RGB(white),RGB(brown) CtrlVal(sw_pmp) = 1 ' the flow rate display box Font 3 : GUI Caption c_flow, "Flow Rate", 20, 170,, RGB(brown),0 Font 4 : GUI Displaybox tb_flow, 20, 200, 150, 45 CtrlVal(tb_flow) = "20.1" ' the radio buttons and their frame Font 3 : GUI Frame frm_pump, "Power", 20, 290, 170, 163,RGB(200,20,255) GUI Radio r_econ, "Economy", 40, 318, 15, RGB(230, 230, 255) GUI Radio r_norm, "Normal", 40, 364 GUI Radio r_hi, "High", 40, 408 CtrlVal(r_norm) = 1 ' start with the "normal" button selected ' the alarm frame with two number boxes and a push button switch Font 3 : GUI Frame frm_alarm, "Alarm", 220, 220, 200, 233,RGB(green) GUI Caption c_hi, "High:", 232, 260, LT, RGB(yellow) GUI Numberbox nbr_hi, 318,MM.info(VPos)-6,90,MM.info(FontHeight)+12,RGB(yellow),RGB(64,64,64) GUI Caption c_lo, "Low:", 232, 325, LT, RGB(yellow),0 GUI Numberbox nbr_lo, 318,MM.info(VPos)-6,90,MM.info(FontHeight)+12,RGB(yellow),RGB(64,64,64) GUI Button pb_test, "TEST", 257, 383, 130, 40,RGB(yellow), RGB(red) CtrlVal(nbr_lo) = 15.7 : CtrlVal(nbr_hi) = 35.5 ' draw the two LEDs Const ledsX = 240, coff = 50 ' define their position ledsY = 90 : GUI LED led_run, "Running", ledsX, ledsY, 15, RGB(green) ledsY = ledsY+49 : GUI LED led_alarm, "Alarm", ledsX, ledsY, 15, RGB(red) CtrlVal(led_run) = 1 ' the switch defaults to on so set the LED on ' the logging frame with check boxes and a text box Colour RGB(cyan), 0 GUI Frame frm_log, "Log File", 450, 20, 330, 355, RGB(green) GUI Checkbox cb_enabled, "Logging Enabled", 470, 50, 30, RGB(cyan) GUI Caption c_fname, "File Name", 470, 105 GUI Textbox tb_fname, 470, 135, 290, 40, RGB(cyan), RGB(64,64,64) GUI Caption c_log, "Record:", 470, 205, , RGB(cyan), 0 GUI Checkbox cb_flow, "Flow Rate", 500, 245, 25 GUI Checkbox cb_alarm, "Alarms", 500, 285, 25 GUI Checkbox cb_warn, "Warnings", 500, 325, 25 CtrlVal(cb_enabled) = 1 CtrlVal(tb_fname) = "LOGFILE.TXT" ' define and display the spinbox for controlling the backlight GUI Caption c_bright, "Backlight", 442, 415,,RGB(200,200,255),0 GUI Spinbox sb_bright, MM.info(HPos) + 8, 400, 200, 50,,,10, 10, 100 CtrlVal(sb_bright) = 50 ' All the controls have been defined and displayed. At this point ' the program could do some real work but because this is just a ' demo there is nothing to do. So it just sits in a loop. Do Loop ' the interrupt routine for touch down ' using a select case command it has a different process for each ' control Sub TouchDown �local integer mbox ' �print "down" �Select Case Touch(REF) ' find out the control touched �Case cb_enabled ' the enable check box � �If CtrlVal(cb_enabled) Then � � �GUI Restore c_fname, tb_fname, c_log, cb_flow, cb_alarm, cb_warn � �Else � � �mbox=MsgBox("Are you sure?", "YES","CANCEL") ' � � �print mbox � � �if mbox=1 then � � � �GUI Disable c_fname, tb_fname, c_log, cb_flow, cb_alarm, cb_warn � � �else � � � �CtrlVal(cb_enabled)=1 � � �endif � �EndIf �Case sb_bright ' the brightness spin box ' � �BackLight CtrlVal(sb_bright) �Case sw_pmp ' the pump on/off switch � �CtrlVal(led_run) = CtrlVal(sw_pmp) � �CtrlVal(tb_flow) = Str$(CtrlVal(sw_pmp) * 20.1) � �CtrlVal(r_norm) = 1 �Case pb_test ' the alarm test button � �CtrlVal(led_alarm) = 1 � �GUI beep 250 �Case r_econ ' the economy radio button � �CtrlVal(tb_flow) = Str$(CtrlVal(sw_pmp) * 18.3) �Case r_norm ' the normal radio button � �CtrlVal(tb_flow) = Str$(CtrlVal(sw_pmp) * 20.1) �Case r_hi ' the high radio button � �CtrlVal(tb_flow) = Str$(CtrlVal(sw_pmp) * 23.7) �End Select End Sub ' interrupt routine when the touch is removed Sub TouchUp �Select Case Touch(LASTREF) ' use the last reference �Case pb_test ' was it the test button � �CtrlVal(led_alarm) = 0 ' turn off the LED �End Select End Sub ' function MM.CURSOR( t as integer) as integer �MM.CURSOR=-1 �if t=1 then � �MM.CURSOR=lb � �if sprite(x,1)<>10000 then sprite hide 1 �elseif t=2 then � �if lb then MM.CURSOR=x �elseif t=3 then � �if lb then MM.CURSOR=y �elseif t=4 then � �MM.CURSOR=lb �elseif t=5 then � �sprite show 1,x,y,1 �else � �MM.CURSOR=lb � �sprite show 1,x,y,1 �endif end function ' sub mm.beep beeptime as integer �if beeptime and mm.info(sound)="OFF" then play tone 600,600,beeptime end sub ' sub keyscan local integer i,n �static integer currkeys(6) �static float keyspeed(6)=(1,1,1,1,1,1,1) �lb=0 �n=keydown(0) �for i= 1 to n � �if currkeys(i)=keydown(i) then � � �keyspeed(i)=keyspeed(i)+0.1 � � �if keyspeed(i)>5 then keyspeed(i)=5 � �else � � �keyspeed(i)=1 � �endif � �currkeys(i)=keydown(i) �next i �for i= 1 to n � if currkeys(i)=left then � � �x=x-keyspeed(i) � � �if x<0 then x=0 � �endif � �if currkeys(i)=right then � � �x=x+keyspeed(i) � � �if x>=MM.HRES then x=MM.HRES-1 � �endif � �if currkeys(i)=up then � � �y=y-keyspeed(i) � � �if y<0 then y=0 � �endif � �if currkeys(i)=down then � � �y=y+keyspeed(i) � � �if Y>= MM.VRES then y=MM.VRES-1 � �endif � �if currkeys(i)=button then � � �lb=1 � �endif �next i end sub Edited 2020-10-10 04:50 by matherp |
||||
| TassyJim Guru Joined: 07/08/2011 Location: AustraliaPosts: 6496 |
I came across an issue with my mouse. In the SUB readtouch, you have a DO LOOP to wait for the x and y to get on screen. Ocasionally, that SUB seems to get called halfway through my mouse sub, before I have had a chance to put the x and y back on screen. Because the program gets stuck in your loop, my sub never gets a chance to do it's thing. I solved it in two ways. Firstly, in my sub, I put the range limiting all on one line. mouseX = min(max(0,mouseX + deltaX),mm.hres-1) mouseY = min(max(0,mouseY - deltaY),mm.vres-1) That seems to fix it by stopping the mm.cursor sub interrupting. I also tried removing the DO LOOP from the SUB readtouch as an alternative and that worked also. That is probably the best place to do the fix. x = max(min(x,mm.hres-1),0) y = max(min(y,mm.vres-1),0) Either method seems to fix the problem. I noticed that the calls to mm.cursor continue even after a GUI DELETE ALL. That will be handy sometimes but a GUI STOP | START to turn off the calls would make it even handier. Jim VK7JH MMedit |
||||
| TassyJim Guru Joined: 07/08/2011 Location: AustraliaPosts: 6496 |
Another observation. The mm.cursor sub gets called about every 250uS The sub, in my case takes 120uS so half the time is spend in the mm.cursor sub. The nunchuk routines are run every ~16mS and I think that that would be a better timeframe for the mm.cursor as well. Jim VK7JH MMedit |
||||
| matherp Guru Joined: 11/12/2012 Location: United KingdomPosts: 11097 |
Jim This stuff is quite difficult and took many iterations to get working. Code run as part of MM.CURSOR is not interrupted. However, code run outside it can have a MM.CURSOR call actioned at any time between statements (including code in MMBasic interrupts). That is why in my example readtouch is called from within MM.CURSOR. In the keyboard version X, Y and LB are always valid so there is no issue. Basically the rule is that X,Y and LB must always be valid at the end of any single Basic statement except during a single call to the MM.CURSOR routine. The loop in readtouch was because sometimes the Hobbytronic I2C calls gave invalid data so I had to filter them out. Don't know if the above makes sense but...... |
||||
| TassyJim Guru Joined: 07/08/2011 Location: AustraliaPosts: 6496 |
Yes, that is the conclusion I had come to. It all makes sense and provide we are aware of the process, it is easy enough to cater for. Jim VK7JH MMedit |
||||
| Page 1 of 4 |
|||||
| The Back Shed's forum code is written, and hosted, in Australia. | © JAQ Software 2026 |
