
|
|
Forum Index : Microcontroller and PC projects : CMM2:V5.05.06exp - Gui support with cursor callback to Basic
| Author | Message | ||||
TassyJim Guru Joined: 07/08/2011 Location: AustraliaPosts: 5913 |
THis version uses a Wii Classic. Uses the left joystick and left button. ''''''''''''''''''''''''''''''''''''''''''''''''''''''''''''''''' ' Demonstration program for the Micromite+ ' It does not do anything useful except demo the various controls ' ' Geoff Graham, October 2015 ''''''''''''''''''''''''''''''''''''''''''''''''''''''''''''''''' Option Explicit Dim ledsY 'mode 10 option console serial Colour RGB(white), RGB(black) ' reference numbers for the controls are defined as constants Const c_head = 1, c_pmp = 2, sw_pmp = 3, c_flow = 4, tb_flow = 5 Const led_run = 6, led_alarm = 7 Const frm_alarm = 20, nbr_hi = 21, nbr_lo = 22, pb_test =23 Const c_hi = 24, c_lo = 25 Const frm_pump = 30, r_econ = 31, r_norm = 32, r_hi = 33 Const frm_log = 40, cb_enabled = 41, c_fname = 42, tb_fname = 43 Const c_log = 44, cb_flow = 45, cb_pwr = 46, cb_warn = 47 Const cb_alarm = 48, c_bright = 49, sb_bright = 50 ' now draw the "Pump Control" display CLS dim integer x, y, lb, rb, sb, xs, ys, cs, ss dim integer wiiX, wiiY, wiiB, wiiL, wiiM, wiiR, wiiPort = 3 ' wii classic open wiiPort, checkWii wiiX = MM.HRES/2 wiiY = MM.VRES/2 settick 100, checkWii ' we need to periodically check the xy values as interrupt only triggers for button change 'setpin 40, dout ' used for timing with the CRO sprite load "mouse.spr",1 GUI Interrupt TouchDown, TouchUp ' display the heading Font 2,2 : GUI Caption c_head, "Pump Control", 10, 0 Font 3 : GUI Caption c_pmp, "Pump", 20, 60, , RGB(brown) ' now, define and display the controls ' first GUI Switch sw_pmp, "ON|OFF", 20, 90, 150, 50, RGB(white),RGB(brown) CtrlVal(sw_pmp) = 1 ' the flow rate display box Font 3 : GUI Caption c_flow, "Flow Rate", 20, 170,, RGB(brown),0 Font 4 : GUI Displaybox tb_flow, 20, 200, 150, 45 CtrlVal(tb_flow) = "20.1" ' the radio buttons and their frame Font 3 : GUI Frame frm_pump, "Power", 20, 290, 170, 163,RGB(200,20,255) GUI Radio r_econ, "Economy", 40, 318, 15, RGB(230, 230, 255) GUI Radio r_norm, "Normal", 40, 364 GUI Radio r_hi, "High", 40, 408 CtrlVal(r_norm) = 1 ' start with the "normal" button selected ' the alarm frame with two number boxes and a push button switch Font 3 : GUI Frame frm_alarm, "Alarm", 220, 220, 200, 233,RGB(green) GUI Caption c_hi, "High:", 232, 260, LT, RGB(yellow) GUI Numberbox nbr_hi, 318,MM.info(VPos)-6,90,MM.info(FontHeight)+12,RGB(yellow),RGB(64,64,64) GUI Caption c_lo, "Low:", 232, 325, LT, RGB(yellow),0 GUI Numberbox nbr_lo, 318,MM.info(VPos)-6,90,MM.info(FontHeight)+12,RGB(yellow),RGB(64,64,64) GUI Button pb_test, "TEST", 257, 383, 130, 40,RGB(yellow), RGB(red) CtrlVal(nbr_lo) = 15.7 : CtrlVal(nbr_hi) = 35.5 ' draw the two LEDs Const ledsX = 240, coff = 50 ' define their position ledsY = 90 : GUI LED led_run, "Running", ledsX, ledsY, 15, RGB(green) ledsY = ledsY+49 : GUI LED led_alarm, "Alarm", ledsX, ledsY, 15, RGB(red) CtrlVal(led_run) = 1 ' the switch defaults to on so set the LED on ' the logging frame with check boxes and a text box Colour RGB(cyan), 0 GUI Frame frm_log, "Log File", 450, 20, 330, 355, RGB(green) GUI Checkbox cb_enabled, "Logging Enabled", 470, 50, 30, RGB(cyan) GUI Caption c_fname, "File Name", 470, 105 GUI Textbox tb_fname, 470, 135, 290, 40, RGB(cyan), RGB(64,64,64) GUI Caption c_log, "Record:", 470, 205, , RGB(cyan), 0 GUI Checkbox cb_flow, "Flow Rate", 500, 245, 25 GUI Checkbox cb_alarm, "Alarms", 500, 285, 25 GUI Checkbox cb_warn, "Warnings", 500, 325, 25 CtrlVal(cb_enabled) = 1 CtrlVal(tb_fname) = "LOGFILE.TXT" ' define and display the spinbox for controlling the backlight GUI Caption c_bright, "Backlight", 442, 415,,RGB(200,200,255),0 GUI Spinbox sb_bright, MM.info(HPos) + 8, 400, 200, 50,,,10, 10, 100 CtrlVal(sb_bright) = 50 ' All the controls have been defined and displayed. At this point ' the program could do some real work but because this is just a ' demo there is nothing to do. So it just sits in a loop. Do Loop ' the interrupt routine for touch down ' using a select case command it has a different process for each ' control Sub TouchDown local integer mbox 'print "down" Select Case Touch(REF) ' find out the control touched Case cb_enabled ' the enable check box If CtrlVal(cb_enabled) Then GUI Restore c_fname, tb_fname, c_log, cb_flow, cb_alarm, cb_warn Else mbox=MsgBox("Are you sure?", "YES","CANCEL") ' print mbox if mbox=1 then GUI Disable c_fname, tb_fname, c_log, cb_flow, cb_alarm, cb_warn else CtrlVal(cb_enabled)=1 endif EndIf Case sb_bright ' the brightness spin box ' BackLight CtrlVal(sb_bright) Case sw_pmp ' the pump on/off switch CtrlVal(led_run) = CtrlVal(sw_pmp) CtrlVal(tb_flow) = Str$(CtrlVal(sw_pmp) * 20.1) CtrlVal(r_norm) = 1 Case pb_test ' the alarm test button CtrlVal(led_alarm) = 1 GUI beep 250 Case r_econ ' the economy radio button CtrlVal(tb_flow) = Str$(CtrlVal(sw_pmp) * 18.3) Case r_norm ' the normal radio button CtrlVal(tb_flow) = Str$(CtrlVal(sw_pmp) * 20.1) Case r_hi ' the high radio button CtrlVal(tb_flow) = Str$(CtrlVal(sw_pmp) * 23.7) End Select End Sub ' interrupt routine when the touch is removed Sub TouchUp Select Case Touch(LASTREF) ' use the last reference Case pb_test ' was it the test button CtrlVal(led_alarm) = 0 ' turn off the LED End Select End Sub ' function MM.CURSOR( t as integer) as integer 'pin(40) = 1 MM.CURSOR=-1 if t=1 then readtouch MM.CURSOR=lb if sprite(x,1)<>10000 then sprite hide 1 endif elseif t=2 then if lb then MM.CURSOR=x elseif t=3 then if lb then MM.CURSOR=y elseif t=4 then MM.CURSOR=lb elseif t=5 then sprite show 1,x,y,1 else readtouch MM.CURSOR=lb sprite show 1,x,y,1 endif 'pin(40) = 0 end function ' sub readtouch local s$ x = wiiX y = wiiY lb = wiiL x = max(min(x,mm.hres-1),0) y = max(min(y,mm.vres-1),0) end sub ' sub checkWii local integer deltaB, deltaX, deltaY deltaX = classic(LX,wiiPort) - 128 ' adjust as required to remove drift deltaY = classic(LY,wiiPort) - 128 ' using the left hand joystick deltaB = classic(B ,wiiPort) if deltaX <>0 or deltaY <> 0 then wiiX = wiiX + deltaX/8 ' we need to slow the joystick down a lot wiiY = wiiY - deltaY/8 endif if wiiB <> deltaB then wiiB = deltaB wiiL = (wiiB >> 4) and 1 ' left button endif end sub sub mm.beep beeptime as integer if beeptime and mm.info(sound)="OFF" then play tone 600,600,beeptime end sub NO attempt to optimise the code. The joystick needed a lot of slowing down to be usable. One big problem that I missed earlier. Clicking on the 'logging enabled' checkbox brings up a 'confirm' dialog. This causes the system to lockup and needs a couple of resets to get the prompt back. It's the one button I didn't try yesterday. Jim VK7JH MMedit MMBasic Help |
||||
| TassyJim Guru Joined: 07/08/2011 Location: AustraliaPosts: 5913 |
This one uses a serial mouse emulator. It should be easy to adapt to the Silicon Chip device. ''''''''''''''''''''''''''''''''''''''''''''''''''''''''''''''''' ' Demonstration program for the Micromite+ ' It does not do anything useful except demo the various controls ' ' Geoff Graham, October 2015 ''''''''''''''''''''''''''''''''''''''''''''''''''''''''''''''''' Option Explicit Dim ledsY 'mode 10 option console serial Colour RGB(white), RGB(black) ' reference numbers for the controls are defined as constants Const c_head = 1, c_pmp = 2, sw_pmp = 3, c_flow = 4, tb_flow = 5 Const led_run = 6, led_alarm = 7 Const frm_alarm = 20, nbr_hi = 21, nbr_lo = 22, pb_test =23 Const c_hi = 24, c_lo = 25 Const frm_pump = 30, r_econ = 31, r_norm = 32, r_hi = 33 Const frm_log = 40, cb_enabled = 41, c_fname = 42, tb_fname = 43 Const c_log = 44, cb_flow = 45, cb_pwr = 46, cb_warn = 47 Const cb_alarm = 48, c_bright = 49, sb_bright = 50 ' now draw the "Pump Control" display CLS dim integer x, y, lb, rb, sb, xs, ys, cs, ss '''' mouse stuff DIM INTEGER mouseX = mm.hres/2, mouseY=mm.vres/2, mouseW, mouseB, mouseR, mouseL, mouseM ' mouse position and buttons DIM INTEGER mouseMove, mouseClick' flags to indicate changes 'setpin 40, dout initmouse '''' end mouse stuff sprite load "mouse.spr",1 GUI Interrupt TouchDown, TouchUp ' display the heading Font 2,2 : GUI Caption c_head, "Pump Control", 10, 0 Font 3 : GUI Caption c_pmp, "Pump", 20, 60, , RGB(brown) ' now, define and display the controls ' first GUI Switch sw_pmp, "ON|OFF", 20, 90, 150, 50, RGB(white),RGB(brown) CtrlVal(sw_pmp) = 1 ' the flow rate display box Font 3 : GUI Caption c_flow, "Flow Rate", 20, 170,, RGB(brown),0 Font 4 : GUI Displaybox tb_flow, 20, 200, 150, 45 CtrlVal(tb_flow) = "20.1" ' the radio buttons and their frame Font 3 : GUI Frame frm_pump, "Power", 20, 290, 170, 163,RGB(200,20,255) GUI Radio r_econ, "Economy", 40, 318, 15, RGB(230, 230, 255) GUI Radio r_norm, "Normal", 40, 364 GUI Radio r_hi, "High", 40, 408 CtrlVal(r_norm) = 1 ' start with the "normal" button selected ' the alarm frame with two number boxes and a push button switch Font 3 : GUI Frame frm_alarm, "Alarm", 220, 220, 200, 233,RGB(green) GUI Caption c_hi, "High:", 232, 260, LT, RGB(yellow) GUI Numberbox nbr_hi, 318,MM.info(VPos)-6,90,MM.info(FontHeight)+12,RGB(yellow),RGB(64,64,64) GUI Caption c_lo, "Low:", 232, 325, LT, RGB(yellow),0 GUI Numberbox nbr_lo, 318,MM.info(VPos)-6,90,MM.info(FontHeight)+12,RGB(yellow),RGB(64,64,64) GUI Button pb_test, "TEST", 257, 383, 130, 40,RGB(yellow), RGB(red) CtrlVal(nbr_lo) = 15.7 : CtrlVal(nbr_hi) = 35.5 ' draw the two LEDs Const ledsX = 240, coff = 50 ' define their position ledsY = 90 : GUI LED led_run, "Running", ledsX, ledsY, 15, RGB(green) ledsY = ledsY+49 : GUI LED led_alarm, "Alarm", ledsX, ledsY, 15, RGB(red) CtrlVal(led_run) = 1 ' the switch defaults to on so set the LED on ' the logging frame with check boxes and a text box Colour RGB(cyan), 0 GUI Frame frm_log, "Log File", 450, 20, 330, 355, RGB(green) GUI Checkbox cb_enabled, "Logging Enabled", 470, 50, 30, RGB(cyan) GUI Caption c_fname, "File Name", 470, 105 GUI Textbox tb_fname, 470, 135, 290, 40, RGB(cyan), RGB(64,64,64) GUI Caption c_log, "Record:", 470, 205, , RGB(cyan), 0 GUI Checkbox cb_flow, "Flow Rate", 500, 245, 25 GUI Checkbox cb_alarm, "Alarms", 500, 285, 25 GUI Checkbox cb_warn, "Warnings", 500, 325, 25 CtrlVal(cb_enabled) = 1 CtrlVal(tb_fname) = "LOGFILE.TXT" ' define and display the spinbox for controlling the backlight GUI Caption c_bright, "Backlight", 442, 415,,RGB(200,200,255),0 GUI Spinbox sb_bright, MM.info(HPos) + 8, 400, 200, 50,,,10, 10, 100 CtrlVal(sb_bright) = 50 ' All the controls have been defined and displayed. At this point ' the program could do some real work but because this is just a ' demo there is nothing to do. So it just sits in a loop. Do Loop ' the interrupt routine for touch down ' using a select case command it has a different process for each ' control Sub TouchDown local integer mbox ' print "down" Select Case Touch(REF) ' find out the control touched Case cb_enabled ' the enable check box If CtrlVal(cb_enabled) Then GUI Restore c_fname, tb_fname, c_log, cb_flow, cb_alarm, cb_warn Else mbox=MsgBox("Are you sure?", "YES","CANCEL") ' print mbox if mbox=1 then GUI Disable c_fname, tb_fname, c_log, cb_flow, cb_alarm, cb_warn else CtrlVal(cb_enabled)=1 endif EndIf Case sb_bright ' the brightness spin box ' BackLight CtrlVal(sb_bright) Case sw_pmp ' the pump on/off switch CtrlVal(led_run) = CtrlVal(sw_pmp) CtrlVal(tb_flow) = Str$(CtrlVal(sw_pmp) * 20.1) CtrlVal(r_norm) = 1 Case pb_test ' the alarm test button CtrlVal(led_alarm) = 1 GUI beep 250 Case r_econ ' the economy radio button CtrlVal(tb_flow) = Str$(CtrlVal(sw_pmp) * 18.3) Case r_norm ' the normal radio button CtrlVal(tb_flow) = Str$(CtrlVal(sw_pmp) * 20.1) Case r_hi ' the high radio button CtrlVal(tb_flow) = Str$(CtrlVal(sw_pmp) * 23.7) End Select End Sub ' interrupt routine when the touch is removed Sub TouchUp Select Case Touch(LASTREF) ' use the last reference Case pb_test ' was it the test button CtrlVal(led_alarm) = 0 ' turn off the LED End Select End Sub sub initmouse local junk$ OPEN "com1: 19200,256,mousetrap,4" AS #2 ' 19200 is the fastest that all Maximite/micromites can handle junk$ = INPUT$(100,#2) ' flush input buffer end sub ' SUB mousetrap LOCAL INTEGER deltaB, deltaX, deltaY, deltaW local junk$ deltaB = ASC(INPUT$(1,#2)) ' read 4 bytes deltaX = ASC(INPUT$(1,#2)) deltaY = ASC(INPUT$(1,#2)) deltaW = ASC(INPUT$(1,#2)) junk$ = INPUT$(100,#2) ' flush input buffer deltaB = deltaB AND 7 IF deltaX > 127 THEN deltaX = deltaX - 256 ' signed 8 bit integers IF deltaY > 127 THEN deltaY = deltaY - 256 IF deltaW > 127 THEN deltaW = deltaW - 256 IF mouseB <> deltaB THEN ' buttons have changed mouseClick = 1 ' set the flag mouseB = deltaB ' remember button states mouseL = mouseB AND 1 mouseR = (mouseB AND 2)/2 ' extract the individual button states mouseM = (mouseB AND 4)/4 ENDIF IF deltaX <>0 OR deltaY <> 0 or deltaW <> 0 THEN ' mouse has moved mouseMove = 1 ' set the flag mouseX = mouseX + deltaX mouseY = mouseY - deltaY mouseW = deltaW ENDIF END SUB function MM.CURSOR( t as integer) as integer 'pin(40) = 1 MM.CURSOR=-1 if t=1 then readtouch MM.CURSOR=lb if sprite(x,1)<>10000 then sprite hide 1 endif elseif t=2 then if lb then MM.CURSOR=x elseif t=3 then if lb then MM.CURSOR=y elseif t=4 then MM.CURSOR=lb elseif t=5 then sprite show 1,x,y,1 else readtouch MM.CURSOR=lb sprite show 1,x,y,1 endif 'pin(40) = 0 end function ' sub readtouch local s$ x = mouseX y = mouseY lb = mouseL x = max(min(x,mm.hres-1),0) y = max(min(y,mm.vres-1),0) end sub ' sub mm.beep beeptime as integer if beeptime and mm.info(sound)="OFF" then play tone 600,600,beeptime end sub It has the same disastrous problem with the popup dialog that the one above has. Jim VK7JH MMedit MMBasic Help |
||||
| Andrew_G Guru Joined: 18/10/2016 Location: AustraliaPosts: 842 |
OK Jim, While you are at it, how hard would a Joystick with an SC card be? Cheers, Andrew (Are you keeping dry over there?) |
||||
| matherp Guru Joined: 11/12/2012 Location: United KingdomPosts: 8592 |
You must keep the coordinate processing within the protected MM.CURSOR. Try the attached. Set x and y to mid screen in the DIM function MM.CURSOR( t as integer) as integer 'pin(40) = 1 MM.CURSOR=-1 if t=1 then readtouch MM.CURSOR=lb if sprite(x,1)<>10000 then sprite hide 1 endif elseif t=2 then if lb then MM.CURSOR=x elseif t=3 then if lb then MM.CURSOR=y elseif t=4 then MM.CURSOR=lb elseif t=5 then sprite show 1,x,y,1 else readtouch MM.CURSOR=lb sprite show 1,x,y,1 endif 'pin(40) = 0 end function ' sub readtouch local s$ static integer repeatrate local integer deltax, deltay repeatrate=repeatrate+1 if (repeatrate mod 25) <>0 then exit sub deltaX = (classic(LX,wiiPort) - 128)\32 deltaY = (classic(LY,wiiPort) - 128)\32 lb = (classic(B)>>4) and 1 x= x + deltax y= y - deltay x = max(min(x,mm.hres-1),0) y = max(min(y,mm.vres-1),0) end sub |
||||
| mclout999 Guru Joined: 05/07/2020 Location: United StatesPosts: 430 |
For those looking for mouse.spr required for these demos/test programs from another thread here it is. mouse.zip |
||||
| matherp Guru Joined: 11/12/2012 Location: United KingdomPosts: 8592 |
All - remember this functionality is "experimental" and may not make it to the full release. I'm interested in serious commentary on its potential use for real applications - if it isn't useful for the CMM2 then it should be removed to leave space for things that are. |
||||
| elk1984 Senior Member Joined: 11/07/2020 Location: United KingdomPosts: 227 |
A few thoughts, definitely not a feature request list... GUI / TUI or similar interfaces being available on the CMM2 would be a good thing. � Anything that lets modern style interfaces be created quickly and easily would be great. �There's a few UI blocks developing at the moment, like the excellent File Selector so I think there's an interest in UX beyond straight keyboard input. �GEOS, GEM and Workbench were all available well before Windows or X so are a good fit for the era the CMM is harking back to. Although I'm experimenting with a WIMP style interface my concern is by the time any code needed to service a UI has been added, there will be so many restrictions (either in program space or other resources) there won't be anything left for a programmer to leverage it. Seeing TassyJim's posts has made me wonder about interaction with any UI. �Mouse is suited to a pointer, the Nunchuk and Classic Controller Analog Sticks also (although less accurate than a mouse). �The Classic Controller D-Pad and keyboard are probably more suited to focus + interact style behaviours where controls would gain the focus and be clickable (Tab + Enter, D-Pad and A). �I was considering writing a standardised wrapper around the Classic / Nunchuk / i2c mouse that would allow a caller to read from any of those inputs without the programmer needing to swap blocks of code. Anything allowing callbacks from the GUI functions would be interesting too. �I've simulated events in BASIC by having procedure calls in my include code which errors are skipped for the line that invokes the sub/function. �Probably not the most graceful way of doing it. Apart from that, I'd be interested to see if the elements could be styled (maybe a standard formatted graphics sheet that could be uploaded to replace the default?) but that is getting well ahead of the behaviour. Regards elk1984 Edited 2020-10-11 04:49 by elk1984 |
||||
CircuitGizmos Guru Joined: 08/09/2011 Location: United StatesPosts: 1421 |
I lean unapologetically to a TUI interface. I think that until a mouse is supported out of the box (preferably via USB hub support) that a TUI is the easiest to navigate with a keyboard. That translates to being easiest to deal with in an educational environment. Edited 2020-10-11 04:59 by CircuitGizmos Micromites and Maximites! - Beginning Maximite |
||||
| elk1984 Senior Member Joined: 11/07/2020 Location: United KingdomPosts: 227 |
One paradigm, two implementations would be cool if it could be pulled off. Having spent the afternoon learning to solder (badly!) to get a mouse, I agree there's a barrier to entry for a mouse just yet. It's still cool though  |
||||
| mclout999 Guru Joined: 05/07/2020 Location: United StatesPosts: 430 |
I have been thinking it would be great of have this added to the CMM2 as I was watching other threads on GUI and this is the way to go. A robust standardized interphase that everyone can use without dedicating large swaths of code to roll your own interphaes. I found that even with Keyboard it very usable. That thread about file picker is interesting and wondering if there is anything in this standard for file picking, or if it can be added. Thank for your all your great work on this it is amazing to see you guys work and how responsive and helpful you are. |
||||
| Turbo46 Guru Joined: 24/12/2017 Location: AustraliaPosts: 1593 |
Unless a mouse is fully supported in the firmware, I don't see the point. The functionality requires a mouse to be fully useful and to provide one without the other seems pointless. Don't get me wrong, I think it's great!  but without a mouse... but without a mouse...One of my intended projects was to make an HMI for a Modbus master which is why I first tried a mouse and buttons etc on the CMM1. This would be ideal for that purpose and the CMM2 is graphically so much better. It's a pity but I think that the failure to set a standard for things like paddles, joysticks mouses (mice, meeces) et al causes different people to use different pins for different purposes and means you cannot use a standard interface. Bill Keep safe. Live long and prosper. |
||||
| siwypiotr Senior Member Joined: 18/08/2020 Location: PolandPosts: 127 |
Dear Maximite users and creators. I have described my version of Maximite on this forum: https://www.thebackshed.com/forum/ViewTopic.php?PID=156733#156733 I noticed that many people are asking about the mouse support. Since Im working on next model I can implement it. I can do it by adding additional STM or similar microcontroller with USB support and send data to main processor using i2c or other protocol. But I do not want to create additional standard, creators of the firmware have to agree how it should be done and I will follow their guidelines. If anyone has ideas how it should be done I will be happy to hear it. |
||||
| matherp Guru Joined: 11/12/2012 Location: United KingdomPosts: 8592 |
I intend to support the Hobbytronic I2C mouse protocol (very simple) on any of the CMM2 I2C channels. Any device that can fully mimic that protocol (commands and responses) on the same I2C address should then work |
||||
| siwypiotr Senior Member Joined: 18/08/2020 Location: PolandPosts: 127 |
OK, I will add PIC24FJXXGB002. My design has 3 port for Wii Nunchuck so either I will remove one or add jumper for user to decide if he wants 3 controllers and no mouse or 2 with mouse. |
||||
| matherp Guru Joined: 11/12/2012 Location: United KingdomPosts: 8592 |
If you go with the PIC24FJXXGB002 you have to buy the chip pre-programmed by Hobbytronic. It has a custom bootloader to provide security. |
||||
| siwypiotr Senior Member Joined: 18/08/2020 Location: PolandPosts: 127 |
I have seen HEX file on his web page, can not I used a JTAG and flash the micro with it? |
||||
| matherp Guru Joined: 11/12/2012 Location: United KingdomPosts: 8592 |
No, the bootstrap has all the entry points and in any case they deserve income from their efforts |
||||
| siwypiotr Senior Member Joined: 18/08/2020 Location: PolandPosts: 127 |
I changed my mind, there will be stm32l4 series or something cheaper. There is also option that I leave a place for soldering the Hobby chip by the user. Edited 2020-10-12 20:42 by siwypiotr |
||||
| siwypiotr Senior Member Joined: 18/08/2020 Location: PolandPosts: 127 |
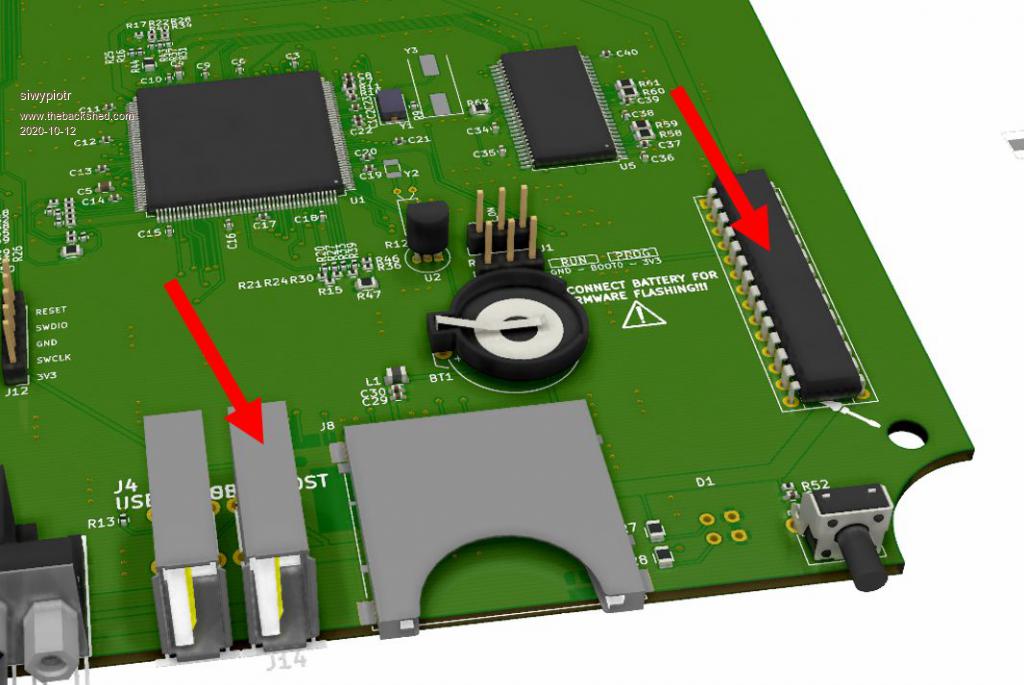 I added mouse port, on PCB there will be DIP socket. Anyone who needs a mouse can buy the DIP-28 chip from Hoppy Electronic and install it. 3d i2c is used (PB7 - SDA3, PH11 - SCL3) |
||||
| matherp Guru Joined: 11/12/2012 Location: United KingdomPosts: 8592 |
You need to add the supporting circuitry - xtal etc |
||||
