
|
|
Forum Index : Microcontroller and PC projects : E 64 Bridge
| Author | Message | ||||
| MMAndy Regular Member Joined: 16/07/2015 Location: United StatesPosts: 91 |
Since the MicroMite+ Explore 64 stamp module is in beta testing, as we speak, a fellow hacker came up with a cool way of referencing the MM+ Explore 64 module to the 64 pin TQFP PIC32MX470. It also has referencing to the IDC 40 ribbon connector used by the 5" and 7" TFT LCD SSD1963 displays. If you have the FREE "Open Office" (version >= 4.1) on your computer you can use our convenient engineering spreadsheet. Column A = 64 pin MM+ Explore 64 schematic ref. V3. Column C = 54 pin Explore 64 pin ref. Column D = used and unused GPIO pins Column F = 40 pin TFT IDC pins The row numbers always indicate the exact pin number. 1-64 for the 64 pin MM+ Explore 64 1-54 for the MM+ Explore 64 module stamp. The spreadsheet treats this module as 2 27 pin strips. The actual pin count is 3 less. 1-40 for IDC 40 pin number for 5" and 7" SSD1963 TFT displays. 2015-07-31_204407_MicroMite_Plus_Explore_64_Master_R1.zip Enjoy ... 
|
||||
| MMAndy Regular Member Joined: 16/07/2015 Location: United StatesPosts: 91 |
Preliminary, approximate $USD cost of main BASIC Computer laptop component parts: (from high to low) 1. 7" TFT SSD1963 LCD Display with touch. $50 <-- Shop around for a better price! 2. USB 5V Lithium power/charger pack 20 A $?? <-- For portable operation - TBD 3. MM+ Explore 64 Stamp Module v 1c $?? <-- Waiting for beta testing completion. 4. E 64 Bridge PCB with components ~ $17 <-- (Vendor quoted PCB 100 quantity) 5. Blow molded enclosure case $15 6. PS2 mini keyboard $13 7. 2A 5V 110 VAC mains power supply (wall wart) $8 8. Misc. hardware and parts for construction $?? |
||||
f1fco Senior Member Joined: 18/03/2012 Location: FrancePosts: 154 |
hello MMAndy, do you have a PCB to sell ? or in the future ? I am interested Pierre, from Nimes, south of France 73s de F1FCO |
||||
| MMAndy Regular Member Joined: 16/07/2015 Location: United StatesPosts: 91 |
The E 64 Bridge is just an interconnect PCB to the MM+ Explore 64 stamp module. It just provides power and signals to a 5" or 7" TFT SSD1963 LCD display, RTC, sounder and keyboard. Since we stated (above) that this E 64 Bridge PCB is for non-commercial use, we are providing options in which a user could make one himself or herself. Option #1 Use our engineering aids, that we provided already (above) and wire wrap or bus wire the connections on a perfboard. We provided a spreadsheet (above) which helps in this point to point wiring. Since both the MM+ Explore 64 stamp module and the 40 pin IDC ribbon connector is on even grid (0.1" space) then for someone with average electronic experience/skills could easily make one. Edit ... Better yet go to the local Australian website ... http://www.protostack.com/ and purchase their prototyping board & other components and just bus wire up the board. Option #2 Take our track patterns (above) and by observing the layout, duplicate our simple reference design using your own PCB layout package. Then send your design to an "off shore" vendor for production. Option #3 Wait for "Big Mike" to finish his "multiple" TFT display piggyback PCB. Option #4 Download the free ExpressPCB PCB design software and import our design and via internet send this design file along with credit card information to this vendor to make it. (5 day turnaround) Warning ... this vendor is extremely expensive for non production boards. For three 3.8" x 2.5" boards the cost is $90 $USD. For large quantities of 100, the price drops down below $10 a board. We will release this PCB design file only when we are 100% certain there are no major mistakes. Note: Being from France could be a problem for this vendor but if you have an "American connection", let this person get the boards and ship them to you. Option #5 Wait for us to complete our project and we might/could have a spare left over and ship you one at no cost BUT you have to contribute something on this forum board. 
Edit ... If there is anyone out there that have the engineering skills to reproduce our "E 64 Bridge" board - you are very welcomed to clone it. |
||||
| MMAndy Regular Member Joined: 16/07/2015 Location: United StatesPosts: 91 |
Project update ... Just received our assembled and tested MM+ Explore 64 from MicroMite.org. Our "E 64 Bridge" PCB just arrived from the vendor. Sill waiting for our "offshore" 7 inch TFT display. (probably stuck in customs) For those following this project - the mini PS2/USB keyboard does work with the MM+. 78 key MC Saite keyboard ~ $13 $USD http://www.ebay.com/itm/Mini-78-Keys-USB-Notebook-Laptop-Computer-PC-Keyboard-Black-/140710433003?pt=LH_DefaultDomain_0& hash=item20c2fed0eb 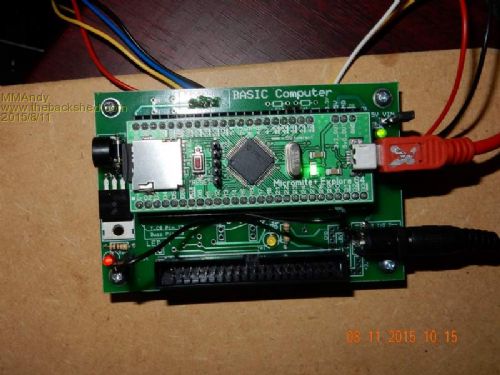
|
||||
| MMAndy Regular Member Joined: 16/07/2015 Location: United StatesPosts: 91 |
For a better name for this project which contains a MicroMite+ Explore 64 v 1b stamp module and our custom made "E 64 Bridge" PCB is EBL -- Embedded Basic Laptop. So far, the beta software testing using v 4.7 b23 (beta) firmware works perfect! The external DS3231 RTC was on pins 43,44 NOT 31,32 - Not a problem, we had solder pads for both I2C channels. The mini keyboard, using an external USB breakout connector works OK. The on-board SD card works OK The Darlington Piezo driver OK All pretested GPIO works OK The testing is ongoing ... 
BTW ... From the picture above ... On the bottom left, the on-board red LED, with a breadboard jumper, was used to retest all GPIO. Also, used as a run LED, The top left edge is the piezo annunciator/sounder with Darlington. The bottom edge has the 40 pin ribbon connector for the 7" TFT SSD1963 LCD display quick connect. On both sides of the MM+ Explore 64 are female headers for hardware development. Two groups of wires leaving the board are for the mini keyboard and RTC (DS3231)
|
||||
| MMAndy Regular Member Joined: 16/07/2015 Location: United StatesPosts: 91 |
|
||||
| MMAndy Regular Member Joined: 16/07/2015 Location: United StatesPosts: 91 |
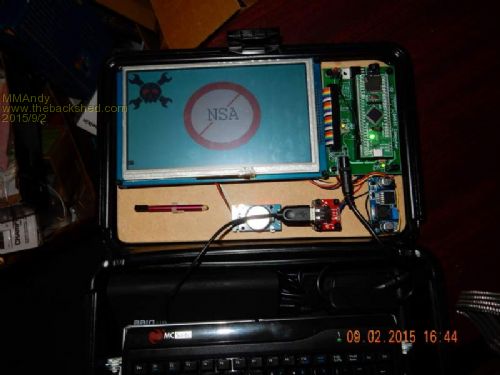
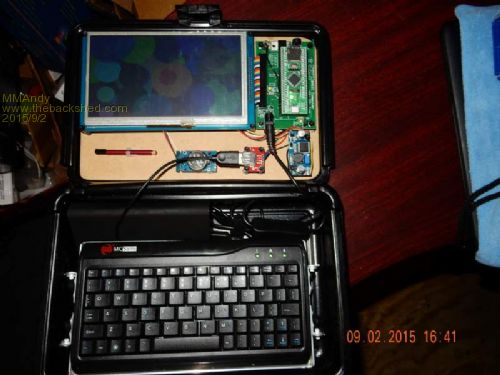
(Above pictures) Embedded BASIC Laptop running on a USB Lithium battery pack/bank. The key to long battery life is to set the Backlight to 10%. So far, our battery rundown testing looks very promising. 
It took the longest to obtain the 7 inch TFT display from Ebay. We had to switch vendors due to vendor non-delivery. ------------------------------------------- Embedded BASIC Laptop Project Design Q & A ------------------------------------------- Q What made it possible for you to design your Embedded BASIC Laptop? A First and foremost was Australian Geoff Graham MicroMite+ with embedded MMBasic that interfaced easily with a keyboard and TFT LCD display. Second, was the ability to obtain a small mini keyboard, off the shelf, to function with the MicroMite+. Third, was low cost USB power packs/banks available to charge mobile devices and to also power the MicroMite+. Q Why did you use the DS3231 RTC with battery backup? A It's very inexpensive and precise. It has on chip "temperature" controlled oscillator TCXO built it which gives it @ 25C +-2 PPM or 0.17 sec/day or 1.05 minutes/yr. With temperature controlled oscillator, this RTC in our Embedded BASIC Laptop can operate in varying ambient conditions and still keep accurate time. These modules can be bought from Ebay and most of them also already have the I2C required pull-ups built into the module. Q What is so unique about your Embedded BASIC Laptop? A It's probably the only portable home-made BASIC (Microsoft BASIC - MMBasic) laptop in existence today. With a mini keyboard and high current USB power bank/pack allows for hours of portable BASIC programming experience without any PC and network connection. The built-in editor, embedded BASIC and SD card memory allows for easy program development. The touch input on the LCD TFT display allows for advanced user applications. Q Why did you have a LM2596 DC-DC step down 5V-3.3V adjustable converter? A It powers the TFT 7" 3.3V LCD display electronics. We did not want the use up the on-board 3.3 V power - this power is used for hardware development. Q What is the total cost of the Embedded BASIC Laptop? A The cost varies allot due to ones ability to obtain the lowest possible cost for all components in this laptop and electronic skills. If your are an experience hobbyist/hacker with good soldering/troubleshooting skills and you build everything from scratch the cost is ~ $125 $USD + battery pack. This means you build the MM+ Explore 64 Stamp, E 64 Bridge (bridge connector board) and wire together all peripheral modules. The cost will increase if you purchase all the modules pre-build. The battery pack was not included in this price due to the many user variations/specifications, but the average cost is $25 $USD for a "quality" 13,000 mAh. USB Lithium power pack/bank with LCD. We added more "bells and whistles" by designing a custom E 64 Bridge board, custom keyboard stand, adding a GPS for remote time and by adding a in-line power jack switch. Q What is the TIP120 Darlington used for? A It drives almost any on-board +3-5V buzzer. Q What is so special about your mini keyboard (MC-Saite)? A It has a keyboard chip that can do both USB and PS2 and it's extremely small for our Embedded BASIC Laptop for transport. Q Why did you use a blow moulded case as an enclosure? A It's very inexpensive due to the fact that it's main commercial use is to transport hand guns. There are more guns in the USA than people! Other embedded enclosures, like the 3D "Pi-top" uses a custom case which cost ~ $150 $USD which is 15 times the cost for our blow molded case! Q Is your blow moulded case water proof? A No, but it's water resistant. For 100% waterproof enclosure just purchase a case like Pelican. Q Why didn't you just piggyback your "E 64 Bridge" board to a TFT display? A There are female headers on our "E 64 Bridge" for hardware development and on the "MM+ Explore 64" stamp module it has also an easy accessible SD memory card slot. Q Why are you not using the SD memory card on the 7" TFT display? A Its very in-accessible being on the back of the TFT display and it also uses up additional GPIO. Q What is the 5V VIN jumper used for? A It prevents 5V "back-feeding" when using both the USB power and external power at the same time. Only one power source should be used at a time and version 1b of MM+ Explore 64 does not have a back feed protection diode built in the module. (Version 1c will have this diode) Q Is there a schematic of your "E 64 Bridge" board? A Yes, but we also made a handy engineering spreadsheet. Pair that document with the MM+ Explore 64 docs to build an E 64 Bridge clone. Q Can your E 64 Bridge be made on a perf or proto type board to save money? A Yes, the connection count is about 25 connections plus power and ground. The MM+ Explore 64 stamp module is on even grid (0.1" space x 0.9" wide) along with the 40 pin IDC ribbon connection. Note: On the TFT display ribbon connector header, from the square pad, is numbered 1-20 and then restarts at 21-40. A good proto board is from Protostack.com (AU) - Prototyping Board - Large - Style 2 with IDC support - just cut it down for your requirements. Q What is the red test LED used for? A To check all the GPIO using the secondary headers used for bread boarding. Also can be used as a CPU run LED. Q How is the electronics installed in the blow moulded case? A Using a piece of Masonite (clipboard) with Velcro (industrial) to attach all the electronic modules via stand-offs to the inner lid of the case. Q What was the hardest part in designing the Embedded BASIC Laptop? A The electrical/electronics/firmware v 4.7b23 was flawless due to the great work of Geoff Graham and others. We believe it was the mechanical design of hinge/cradle for the mini keyboard, the enclosure design and trying to spec up a portable Lithium power supply was, by far, the hardest part of our design. Q What GPIO pins are left over? A ... OPTION LCDPANEL SSD1963_7(A), LANDSCAPE (USES PINS 22,24,27,28,1,2,3,60,61,62,63,64) OPTION SDCARD 12,14 (CARD SELECT, CARD DETECT) OPTION KEYBOARD US (USES PINS 54,55) (CLOCK DATA) OPTION TOUCH 21,18,48 (T_CS, T_IRQ, BUZZER) <---- user selectable. SPI2 IS USED FOR ONBOARD SDCARD AND TFT TOUCH (PINS 4,5,47) RTC (USES PINS 43,44) SERIAL CONSOLE COM4 (USES PINS 6,58) UNUSED GPIO PINS 8,11,13,15,16,17,23,30,33,42,45,46,49,50,51,52,53,59 UNUSED GPIO PINS THAT CAN BE USED AS ANALOG 8,11,13,15,16.17,23,30,49,50,51 UNUSED GPIO PINS NOT BUSSED (SPI,I2C,COMM ...) 23,30,33(INPUT ONLY),42,46,49,51,52,53 |
||||
| viscomjim Guru Joined: 08/01/2014 Location: United StatesPosts: 925 |
mmandy, SUPER impressive. Great job. Its amazing how much can be done with a "basic" ucontroller. Keep up the good work. this is very interesting!!!!! |
||||
| MMAndy Regular Member Joined: 16/07/2015 Location: United StatesPosts: 91 |
A bit of humor ... WARNING ... WARNING ... WARNING ... Do not allow this to happen to you if you decide to construct this portable Embedded BASIC Laptop. Do NOT never, ever take this laptop to the airport for transport or you will be in for a great surprise! Bad things will happen when you hear "the snap" from the white gloves being put on! @TSA security check point at my local US airport carrying my Embedded BASIC Laptop. TSA - What's in the case? Me - A BASIC computer. TSA - Open the case up. TSA - Is that a computer? Me - Yep. TSA - Who made this computer? Me - I did along with some help from some fine Australians and New Zealanders. TSA - Please turn it on. Wow! - this boots up way too fast. This is not a computer? and by the way, who is this guy Geoff Graham? TSA - Step aside and please go ahead and wait over there. I need to get my white gloves for a C A V I T Y search. 
Please note: You cannot carry > 32,000 Lithium mAh battery on board an airplane. This requirement can change at any moment in time! |
||||
| MMAndy Regular Member Joined: 16/07/2015 Location: United StatesPosts: 91 |
Alternative use of Embedded BASIC Laptop ... The Internet of inter-connected computers is a boon to e-commerce but allows the threat of hackers, malware, phishing, viruses, Trojans and even government snooping. In the USA, our NSA (National Security Agency) was doing just that to "protect" Americans from terrorist. There is one simple solution to prevent the above parties from your personal data - just don't allow a network connection on your computer! The Embedded BASIC Laptop has a non PC micro controller chip and electronics that prevents data snooping. The on-board SD card memory allows easy data storage and transport of user personal data. With additional hardware/software safe guards, you can be assured that your data is secure and protected even from NSA. A fellow hacker came up with a solution to send his data into a "black box" to encrypt/decrypt his data from prying eyes.
|
||||
| MMAndy Regular Member Joined: 16/07/2015 Location: United StatesPosts: 91 |
EBL Design files ... Design info, schematic and "Open Office" spreadsheet. 2015-09-03_013552_EBL_Design_R1.pdf 2015-09-03_013626_E_64_Bridge_R1b.pdf 2015-09-03_013850_MicroMite_Plus_Explore_64_Master_R1b.zip Enjoy
|
||||
| MMAndy Regular Member Joined: 16/07/2015 Location: United StatesPosts: 91 |
Update ... We chose, for our USB charger pack, high quality LG 18650 Lithium cells rated at 13,000 mAh. The Embedded BASIC Laptop ran for about 30 hours which translates to ~ 3.75 8 hour days before needing another re-charge. (We used a backlight brightness of 10%.) More testing on-going...
|
||||
| viscomjim Guru Joined: 08/01/2014 Location: United StatesPosts: 925 |
thats better than any laptop I ever had.... |
||||
| MMAndy Regular Member Joined: 16/07/2015 Location: United StatesPosts: 91 |
Hands down, the hardest part of our design was finding the proper battery pack to power our Embedded BASIC Laptop. Vendors will tell you the battery specs but only by testing the battery pack(s) will you know if the specs are true. We used a handy USB device $4 $USD "charge doctor", found on Ebay, to indicate the output charging voltage and current. The capacity of our high quality battery pack (13,000 mAh) was corrected stated and was verified by testing but it failed to keep the output charging voltage at 5.0 VDC. The actual output charging voltage was 4.5-4.7 VDC. Note: The regulator, on the MM+ Explore 64, has a drop out of 625 mv + 3.3 VDC = 3.925 which is the lowest possible voltage for a power pack. We also bought a very fast input charging rate of 2 amps (the normal is 1 A) and it took about ~ 12 hours to charge it instead of the computed rate of 6.5 hours @ 2 amps. ( 1 A x 12 hrs = 12,000 mAh <--- 1 amp charge rate) We have to find another power pack vendor.
Edit ... I might add that the turn-on current surge, from the 7" TFT display, is so great that many power packs can handle it and the output charging voltage is greatly reduced which prevents proper MM+ laptop operation. A backlight reduction from 100% to 10-20% on boot-up might/will prevent this from happening. Edit addition 6/9/15 13:40 ... For those who might want to consider of building a portable Embedded BASIC Laptop here is our "rule of thumb" number for the USB charger power pack/bank. If you find a vendor, who doesn't deceive you on the standard milliamp hour rating in the power bank, then you can use the factor of "2.3" x mAh./1000 will give you the number of hours your Embedded Basic Laptop will run using a backlight setting of 10%. For instance, a "PocketJuice" (Walmart) power bank of 4,000 mAh. will give you about ~ 9.2 hours of runtime. Using the maximum power bank allowed on an airplane (32,000 mAh.) will yield ~ 73 hours. By using a low runtime time will reduced the size of the power bank and the cost "should" also drop accordingly? (The PowerJuice is the size of 4 ice cubes!) Note: The backlight of 10% is a very reasonable setting for editing on the laptop. Any greater number will deplete a power bank quicker.
More power bank testing on-going ... |
||||
