
|
|
Forum Index : Microcontroller and PC projects : PicoMiteWeb lessons
| Author | Message | ||||
| Andrew_G Guru Joined: 18/10/2016 Location: AustraliaPosts: 840 |
Thanks to you all. Phil - It is in a box in a container in Dandenong. Eleven months ago we packed believing that our gear would only be stored for a couple of months. Then they found mould where we were meant to be staying while we built a new house. Still not close to being fixed ... Lizby - thanks. Yes that might work. Jim - is this the one you had in mind? It is $75 and has DHCP (Jaycar only 1km away). Cheers, Andrew Edited 2023-03-26 12:06 by Andrew_G |
||||
TassyJim Guru Joined: 07/08/2011 Location: AustraliaPosts: 5903 |
Yes, that's the one I saw. Jim VK7JH MMedit MMBasic Help |
||||
| TheMonkeys Regular Member Joined: 15/12/2022 Location: AustraliaPosts: 59 |
How about changing {randomnumber} to {round(Pin(temp),2)} This will provide the current PicoW temperature. "round?" I hear you say, "what is round?" Well, I like to keep floats to a manageable length, so... Function round(value!,decs%) As float round = Cint(value!*10^decs%)/10^decs% End Function returns value! rounded to decs% decimal places... Cheers, Chris. |
||||
| LucV Regular Member Joined: 19/02/2023 Location: NetherlandsPosts: 62 |
Here is the next chapter. The idea of Chris is a good one. However I did not have the time to implement it yet. This shows how to put multiple different values on the webpage (in the table) and it shows how to automatically update the wenpage. Have fun: Chapt10.pdf Luc's tech Blog |
||||
| Volhout Guru Joined: 05/03/2018 Location: NetherlandsPosts: 3526 |
Hi LucV, Still following this with interest, so keep going. I am learning things every chapter. Currently waiting for my picoW to arrive so I can actually practise... Volhout PicomiteVGA PETSCII ROBOTS |
||||
| LucV Regular Member Joined: 19/02/2023 Location: NetherlandsPosts: 62 |
Hey Volhout. Thanks for the thumbs up but ......... Where did you order the Pico W's. I get them from Kiwi Electronics in the Netherlands Kiwi Electronics 8 euro for the Pico W and just 3,95 euro for the Pico !!! Great prices and generally fast delivery. You can even collect your order they are in The Hague. They are an official Raspberry reseller. Shameless plug as they sell my book ESP32 uitgelegd (Dutch version)  Luc Edited 2023-03-31 22:23 by LucV Luc's tech Blog |
||||
| Andrew_G Guru Joined: 18/10/2016 Location: AustraliaPosts: 840 |
Hi Luc et al, Many thanks for Chapter 10. Please keep it up. I'm a bit like a kid at Christmas wanting to open up the next present (ie Chapter). As an update to the discussion a few posts above - I toddled off to Jaycar the next day and bought the WiFi router; only to find it was broken. Jaycar were fine but the replacement only arrived yesterday. I think I've managed to get it working (I am definitely no expert). I can see life to/from it and the Pico-W (but not yet in a meaningful way). I can now work through your chapters so I am ready for your IoT chapter(s) in due course. Thanks again and cheers, Andrew |
||||
| LucV Regular Member Joined: 19/02/2023 Location: NetherlandsPosts: 62 |
Easter is coming up and that is a holliday for most so I am giving you the link to the next chapter here. Maybe you'll have some time to play with the possibilities discussed in this chapter. In previous chapters we send information from the Pico to a webpage. This time we are going the other way round. 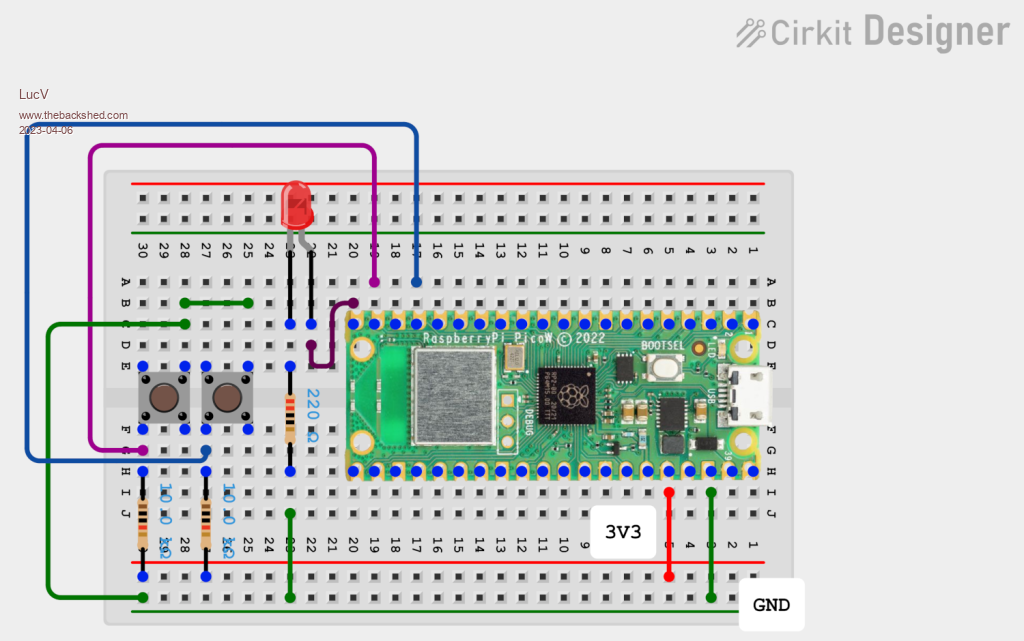 The chapter starts with building a simple setup on a breadboard: a led and 2 buttons. Then there is a small program. When the first button is pressed the led is set on and when the second button is pressed the led is set off. 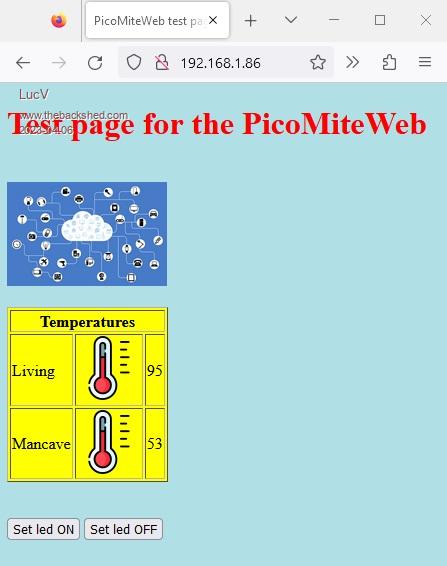 Next step is to build a webpage on which there are two buttons. They will do the same as the fysical buttons: first button sets the led on and second button sets the led off. Now we can fully operate the Pico remote from our lazy chair. As this is a large chapter, I had the same problem as with chapter 8 I could not upload it. So I put it up at Mediafire just like I did with chapter 8. You can download it there free. Chapter 11 Have a nice Easter Edited 2023-04-06 07:25 by LucV Luc's tech Blog |
||||
| LucV Regular Member Joined: 19/02/2023 Location: NetherlandsPosts: 62 |
After a holliday and the release of my new book in Dutch I finally found some time to write another chapter. The last chapter demonstrated how to put buttons on your webpage. And those buttons would set a led fysically attached to the Webmite on or off. Only point was the buttons did not aesthetically look good. This chapter changes that. The chapter shows two ways to put nice looking buttons on your webpage. 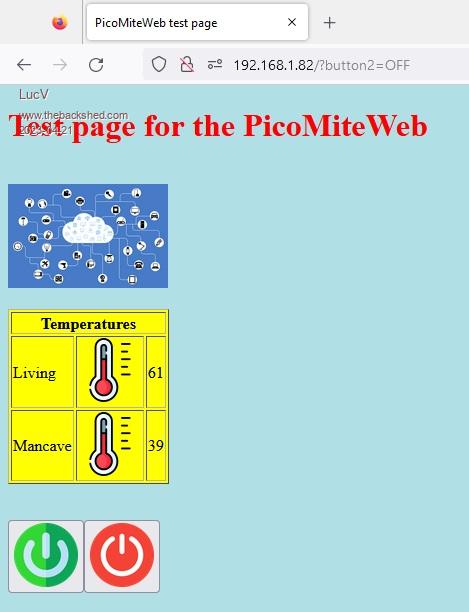 Here is how to do that: Chapter-12.pdf For those interested: My new book is about Javascript and provides over 500 tips and tricks for working with Javascript. It is in Dutch and available within the next weeks by all major book sellers and websites. The English version is coming up. It is now getting proof readed and will internationally be available in a few weeks (through Amazon, Barnes and Nobles etc etc etc). Edited 2023-04-21 05:21 by LucV Luc's tech Blog |
||||
| Volhout Guru Joined: 05/03/2018 Location: NetherlandsPosts: 3526 |
Hi Luc, Thanks for providing this. I have been out of he training for few weeks, but picked up again (now I have a pico-W on order). Hope to actually start playing with it soon.. Volhout P.S. ik bestel tegenwoordig bij Otronic, maar die is iets duurder. Edited 2023-05-06 05:10 by Volhout PicomiteVGA PETSCII ROBOTS |
||||
| nbrok Regular Member Joined: 13/02/2023 Location: NetherlandsPosts: 59 |
@Luc and @volhout Tinytronics in Eindhoven has pico-w on store again. Greetings, Nick de pe1goo |
||||
| Volhout Guru Joined: 05/03/2018 Location: NetherlandsPosts: 3526 |
Hi Luc, I am missing a way to get values from pc to webmite. Also Some info on how to locate items at fixed location on the screen. Volhout PicomiteVGA PETSCII ROBOTS |
||||
| LucV Regular Member Joined: 19/02/2023 Location: NetherlandsPosts: 62 |
Hi Volhout, This is a complete different ballpark. What we have done in the lessons is to build a webserver in the Pico and the PC is only displaying what the Pico dictates it to do. What you want is a webserver on your PC that sends data to the Pico. Can that be done ??? Absolutely. In a few easy steps ??? Well there is a lot more involved to achieve that. Not only do you need to build a kind of webpage with HTML code but just like the Pico uses Basic to transfer and receive data the Pc also needs an underlying programming language. Is that available ??? Yes every browser has it build in and it is called Javascript. Guess what......... I just wrote a book about Javascript: Javascript Tips It is in Dutch however and it is not a learning book it is a book full of short tips about sorting array elements on length, setting dates in the future, calculating the time it takes to perform a function etc. etc. etc. Short(3 to 20 lines) programs that perform a function. There is an English book coming up and for those interested you can have a peek pre-view here (there are a few hundred tips there): Javascript tips website by me ;) Back to your question: Is it possible ??? Yes. But you need to learn Javascript. If you want I can point you to some pretty good resources for learning Javasceript. Luc Edited 2023-05-18 04:49 by LucV Luc's tech Blog |
||||
| lizby Guru Joined: 17/05/2016 Location: United StatesPosts: 3015 |
In what manner do you want to get data from the PC to the WebMite? For instance, by typing the numbers into a browser? Or through an automated process, by, for instance, telnetting a file from the PC to the WebMite from time to time? Regarding "how to locate items at fixed location on the screen", that might mean setting up an HTML table (or tables within a table) to get data items where you want them. Can you provide more information about exactly what you want? PicoMite, Armmite F4, SensorKits, MMBasic Hardware, Games, etc. on fruitoftheshed |
||||
| JohnS Guru Joined: 18/11/2011 Location: United KingdomPosts: 3658 |
You want the PC to push the values? Or the 'mite to choose when to fetch them? Whose screen - PC or 'mite? John |
||||
| Volhout Guru Joined: 05/03/2018 Location: NetherlandsPosts: 3526 |
We have learned that the push of a button (mouse click) can send a string to the webmite. I am looking for a similar mechanism where I can click on a field, type a value, and send the value to the webmite.. A table could do the formatting. Thanks. Volhout Edited 2023-05-18 06:39 by Volhout PicomiteVGA PETSCII ROBOTS |
||||
| LucV Regular Member Joined: 19/02/2023 Location: NetherlandsPosts: 62 |
Volhout, There is an input command in HTML. That puts a field on the screen in which you can put a value. Let me see if I can come up with something for that. Maybe another lesson ???? Stay tuned. Another option is a slider that sends a value to the Pico. There is a native slider in HTML. I'll try that too. Stay tuned !!! Luc Luc's tech Blog |
||||
| lizby Guru Joined: 17/05/2016 Location: United StatesPosts: 3015 |
Peter has covered that. I think the syntax may have changed, but the first example I have found that he posted is here. Does someone have a link to the latest Function parsehtmldata$? It would be well if a reference to this could be placed in the manual. It's the heart of getting data from the browser back to the MMBasic program. (In the examples I have posted of my code, I am using a different parsehtmldata from back in the picromite days, so it is not appropriate as a current example.) ... (Some time later) Doh!. Of course, what I needed to do was search on "parsehtmldata" in a post by matherp. This may be the latest: parsehtmldata ~ Edited 2023-05-18 07:25 by lizby PicoMite, Armmite F4, SensorKits, MMBasic Hardware, Games, etc. on fruitoftheshed |
||||
| lizby Guru Joined: 17/05/2016 Location: United StatesPosts: 3015 |
I'll try to be as specific as possible, using Peter's thermostat example. Here are my options: > option list WebMite MMBasic Version 5.07.07 OPTION COLOURCODE ON OPTION DISPLAY 40, 110 OPTION WIFI MyAccessPoint, ********* OPTION TCP SERVER PORT 80, 6000 These are the files I have: > files A:/ <DIR> . <DIR> .. 00:00 01-01-2000 4 bootcount 00:15 01-01-2000 1152 favicon.ico 21:32 17-05-2023 4881 go.bas 22:01 17-05-2023 128 index.html 22:02 17-05-2023 128 test4.html 00:14 01-01-2000 2688 thermo.html 2 directories, 6 files, 593920 bytes free > index.html and test4.html are identical: I created them at the DOS prompt with: >echo "<html><body>Bingo!</body></html>" > index.html thermo.html is Peter's code: Option explicit Option default integer Dim myfloat!=16.123 Dim myint%=999 Dim mystring$="The PicoMite Web is GO!!!" Dim buff%(512) Dim pp$="INDEX" Const maxargs=20 Const ds18B20pin = 4 Const relaypin = 2 Const stemp=17 'setting for lowest temperature on radio buttons Const heatingoff$=" BGCOLOR='#00ff00'>Off" Const heatingon$=" BGCOLOR='#ff0000'>On " Const check$="checked='checked' " Const hysteresis=0.5 ' Dim checked$(11) Dim integer setpointb=4 'setting for default temperature Dim integer setpointt=stemp+setpointb-1 Dim notstarted=1,notended=0 Dim float currenttemp,readtemp Dim float maxtemp, mintemp Dim heating$=heatingon$ checked$(setpointb)=check$ SetPin relaypin,dout currenttemp=TEMPR(ds18b20pin) maxtemp=currenttemp mintemp=currenttemp updateheater On error skip WEB ntp -3 ' nova scotia daylight savings time WEB tcp interrupt TCPrequest PRINT "Listening @ "+mm.info(ip address) ' LB Do If Right$(Time$,1)="0" And notstarted=1 Then TEMPR START ds18b20pin,3 notstarted=0 notended=1 EndIf If Right$(Time$,1)="2" And notended=1 Then readtemp=TEMPR(ds18b20pin) If readtemp<1000 Then currenttemp=readtemp notstarted=1 notended=0 maxmin updateheater EndIf ' poll Loop Sub TCPrequest Local a%,s$,page$,i,nparams% Local arg$(1,maxargs-1) For a%=1 To MM.Info(max connections) If Not MM.Info(TCP request a%) Then Continue For LongString clear buff%() WEB tcp read a%,buff%() If LLen(buff%()) Then ' Print "Received ",LLen(buff%())," bytes on PCB ",a%-1 ' LongString print buff%() page$=parsehtmldata$(nparams%,buff%(), arg$()) Print page$ For i=0 To nparams% Print arg$(0,i),"=",arg$(1,i) If arg$(0,i)="RB" Then ' setting for radio button checked$(setpointb)="" Print Val(Right$(arg$(1,i),Len(arg$(1,i))-1)) setpointb=Val(Right$(arg$(1,i),Len(arg$(1,i))-1)) setpointt=setpointb+stemp-1 checked$(setpointb)=check$ updateheater EndIf If arg$(0,i)="RESET" And arg$(1,i)="YES" Then 'Reset maxmin maxtemp=currenttemp mintemp=currenttemp EndIf Next If UCase$(page$)="INDEX" Then Print "sending test page" pp$=page$ WEB transmit page a%,"test4.html" ElseIf UCase$(page$)="THERMO" Then Print "sending thermostat page" pp$=page$ WEB transmit page a%,"thermo.html" ElseIf page$="small.jpg" Then Print "Sending picture" WEB transmit file a%,"small.jpg","image/jpeg" ElseIf page$="favicon.ico" Then Print "sending favicon" WEB Transmit FILE a%,"favicon.ico","image/vnd.microsoft.icon" Else s$=LGetStr$(buff%(),1,Min(255,LLen(buff%()))) Print s$ WEB transmit code a%, 404 EndIf EndIf Next a% End Sub ' Function parsehtmldata$(paramcount As integer, inbuf() As integer, arg$()) Const starttext$="HTTP" Local a$,b$ Local integer buf(Bound(inbuf())) Local integer inpos,startparam,processargs paramcount=0 inpos=LInStr(inbuf(),"GET /",1) If inpos=0 Then parsehtmldata$="" Else LongString MId buf(),inbuf(),inpos+5 inpos=LInStr(buf(),starttext$,1) If inpos>2 Then 'page request found inpos=inpos-2 a$=LGetStr$(buf(),1,inPos) inpos=Instr(a$,"?") If inpos<>0 Then 'parameters found processargs=1 parsehtmldata$=Left$(a$,inpos-1) a$=Mid$(a$,inpos+1) Do arg$(0,paramcount)="" arg$(1,paramcount)="" inpos=Instr(a$,"=") startparam=1 arg$(0,paramcount)=Mid$(a$,startparam,inpos-startparam) startparam=inpos+1 inpos=Instr(a$,"&") If inpos<>0 Then arg$(1,paramcount)=Mid$(a$,startparam,inpos-startparam) a$=Mid$(a$,inpos+1) paramcount=paramcount+1 Else arg$(1,paramcount)=Mid$(a$,startparam) paramcount=paramcount+1 processargs=0 EndIf Loop While processargs Else parsehtmldata$=a$ EndIf Else ' no page requested parsehtmldata$="INDEX" EndIf EndIf End Function Sub maxmin If currenttemp>maxtemp Then maxtemp=currenttemp EndIf If currenttemp<mintemp Then mintemp=currenttemp EndIf End Sub Sub updateheater ' Print "current setpoint is ",setpointt ' Print "current temperature is ",currenttemp Local float hcalc If setpointt=stemp+11 Then Pin(relaypin)=1 heating$=heatingon$ ElseIf setpointt=stemp Then Pin(relaypin)=0 heating$=heatingoff$ Else hcalc = setpointt + hysteresis If currenttemp>=hcalc Then 'turn heating off Pin(relaypin)=0 heating$=heatingoff$ EndIf hcalc = setpointt - hysteresis If currenttemp<=hcalc Then 'turn heating on Pin(relaypin)=1 heating$=heatingon$ EndIf EndIf End Sub Before the main DO loop I added a line to print mm.info(ip address). I also changed the "WEB NTP" line to add the proper offset parameter for Nova Scotia Daylight Savings Time ("-3"). Here is the thermo.html file: <html> <head> <title> Remote Thermostat</title></head <link rel="icon" type="image/x-icon" sizes="16x16" href="data:image/png;base64, 'AAABAAEAEBAQAAEABAAoAQAAFgAAACgAAAAQAAAAIAAAAAEABAAAAAAAg 'AAAAAAAAAAAAAAAEAAAAAAAAAAAAAAAAP//ADMA/wD/AAQAFf8AAAIACABZAP8AAAAAAAAAAAAAAAAAAAAAA 'AAAAAAAAAAAAAAAAAAAAAAAAAAAAAAAAAAAAAAFAAUAVQBVAAUABQUABQBQBVAFBQAFAFAFBQAAVQBVAAUFB 'QAAAAAABVAAAAAAAAAAAAAAAAAAACREMzERAAAAJkRDMxEQAAAmZEQzMREAAAZmREMzERAAAGZkRDMxEQAAB 'mZEQzMREAAAZmREMzERAAAGZkRDMxH//wAAuzMAALrtAACa7QAArzMAAKv/AACf/wAA//8AAAA/AAAAHwAAA 'A8AAIAHAADAAwAA4AEAAPAAAAD4AAAA" /> ' (REMOVE THE COMMENTS ABOVE to get the image to work--all one long line) <body> <form name='f1' method='get' action='{pp$}'> <h2 align='left'>Remote Thermostat Control System V1.0</h2> Update Code: <input type='text' name='CODE' size='6' value='000000'> <TABLE BORDER='1' CELLSPACING='0' CELLPADDING='5'> <TABLE BORDER='1' CELLSPACING='0' CELLPADDING='5'><TR><TD></TD> Reset Max/Min <TABLE BORDER='1' CELLSPACING='0' CELLPADDING='5'><TR><TD>Thermostat</TD> </body></html> (NOTE: in the html file, remove the comments in the "href=data" field to make it all one line; I put the comments in because otherwise it messes up the forum post.) I loaded the files into the webmite with xmodem. In my browser (chrome), I entered the IP address and "THERMO": 192.168.2.203/THERMO 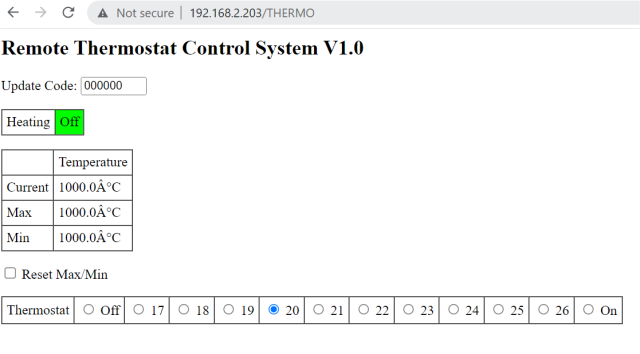 I entered "4321" in the "Update Code" box and click the radio button labelled "21". This was printed at the console: THERMO CODE = 4321 RB = R6 6 = sending thermostat page The line, "CODE = 4321" is printed in the program at line 63 with "Print arg$(0,i),"=",arg$(1,i)". The args come via the magic provided by HTML and Peter's code; in the html file, "<input type='text' name='CODE' size='6' value='000000'>" sets the name of the variable, "CODE", and value becomes what you type--4321 in this case. In your browser on the URL line you will see "http://192.168.2.203/THERMO?CODE=4321&RB=R6". After the "?" come the argument=value pairs: "CODE=4321" and "RB=R6". Peter's code strips the "R" off of "R6" and gives a value for the radio button variable of 6. Right at this point, in the "For i=0 To nparams%" loop, is where you would put your code to deal with the values returned from the browser to the program. Hope this helps (and hope that it is broadly correct). (And hope the thread isn't too much hijacked--apologies.) ~ Edited 2023-05-18 12:18 by lizby PicoMite, Armmite F4, SensorKits, MMBasic Hardware, Games, etc. on fruitoftheshed |
||||
| Volhout Guru Joined: 05/03/2018 Location: NetherlandsPosts: 3526 |
Thans a lot! This helps me much with my project. Volhout PicomiteVGA PETSCII ROBOTS |
||||
