
|
|
Forum Index : Windmills : Yet another axial
| Author | Message | ||||
| Xmaswiz Regular Member Joined: 14/04/2011 Location: United StatesPosts: 69 |
The work looks awesome! Love the Photos, and very envious of the CNC router.  Santa Maria, CA. Noel |
||||
| Gizmo Admin Group Joined: 05/06/2004 Location: AustraliaPosts: 5036 |
Thanks for the feedback guys. Yes Mac the coils are wound in the same direction, but thats not important, so long as you connect them up correctly, ie a coil wound backwards must be conneced backwards. The combination of the lathe chuck and the wire tensioner is making winding the coils easy, I was lucky I found a setup that worked first try. Next time I wind coils I'll do the same, make sure I get the tension good. The epoxy is a fibreglass epoxy with a slow hardener. Takes bloody hours to set! Yeah Noel the CNC helps, but you can get the same accuracy by printing templates on paper and glueing it to the timber. I was doing that in the early stages of this project. But now I that have the CNC going again, I may as well use it where I can. 7 coils finished now, 5 to go. Glenn The best time to plant a tree was twenty years ago, the second best time is right now. JAQ |
||||
Trev Guru Joined: 15/07/2006 Location: AustraliaPosts: 639 |
Glenn, I used 5 minute aralite (epoxy) and just put a swipe on every layer with a flat strip of plastic. Wind the first coil, mix the glue and swipe it. While it is still wet, wind the next layer and swipe it. You can get a few layers on with one mix, before you have to mix more glue. Just keep going. The last layer you wait 5 minutes for the araldite and then slide it off the former and start again. I forget now how long but I think it was only a few hours to make all 9 coils in my AXFX. Trev @ drivebynature.com |
||||
| Gizmo Admin Group Joined: 05/06/2004 Location: AustraliaPosts: 5036 |
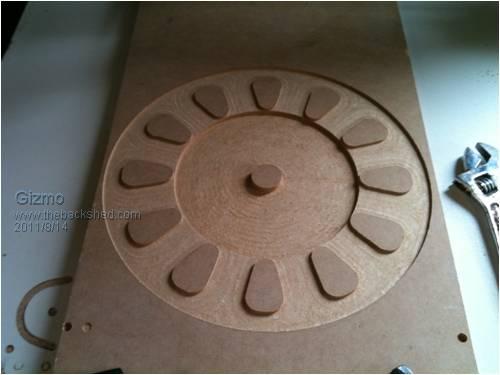
Yeah I was going to use Aradite but since the rest of the mold would be made up of fiberglass epoxy I decided to stick with the one product, just in case one didn't stick to the other. All coils are finished now, big learning exercise, by the time I got to coil 12 I had it sorted. They ended up wider that I planned, there's a bit of a difference in how much wire you can wind onto a former in theory, and in practice. This means the coils are about 1mm bigger is diameter than I expected, so they wont fit side by side in the mold I drew up in CAD. So back to the computer. With a slightly bigger diameter stator drawn up, I thought I would fire up the CNC again to made another test mold, but only a couple of mm deep, just to make sure its all going to fit together. 
And here we have the coils in place. 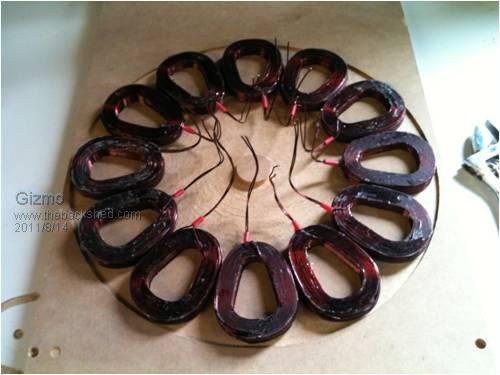
All fits, though the wider stator will now interfere with the magnet plate spacing bolts, so I'll have to modify them to clear the stator. Ahh well, it is a prototype after all. Next up, CNC the real mold. Glenn The best time to plant a tree was twenty years ago, the second best time is right now. JAQ |
||||
| Trev Guru Joined: 15/07/2006 Location: AustraliaPosts: 639 |
Epoxy (araldite) is still epoxy. Epoxy will stick to anything. I used araldite on the coils and then polyester (& glass) for the stator. The polyester I used is not a casting resin, just the standard F/glass resin, that's why it buckled, too much heat on cure in the thick section. But no problem with sticking. Curious. What's the dark colour in the coils? Trev @ drivebynature.com |
||||
| Gizmo Admin Group Joined: 05/06/2004 Location: AustraliaPosts: 5036 |
I think its just the light Trev, took the pic with my phone. The epoxy is clear, and the copper does have a dark red enamel. I'm impressed with how strong the coils are when impregnated with the epoxy, these things are rock hard. I'm making a few small changes to the mold to cut back on the amount of epoxy I'll need. I'm using a slow hardener, so hopefully wont have any problems with it overheating while curing. Is it ok to pour in a layer, wait for it to cure, then another layer, sort of thing, to stop any heat problems? The other thing that concerns me is how easy the finished stator will separate from the mould. I've been using the release agent on the coil formers, but the porous nature of the MDF mold is a worry, I wonder if I should be waxing it. I was also thinking of drilling some holes into the MDF and tapping in wood dowels before I CNC it out. I could then tap the back of the dowels to knock out the cured stator. Any suggestions? Glenn The best time to plant a tree was twenty years ago, the second best time is right now. JAQ |
||||
shawn Senior Member Joined: 30/03/2010 Location: New ZealandPosts: 210 |
Glenn my mold was done in about 3/4 pours. just be careful of getting resin set hard between the molds this will hold the mold apart and give you a wider stattor. truth is mine is not that tidy. LOTS AND LOTS OF WAX MINE WAS MDF TOO. |
||||
| Tinker Guru Joined: 07/11/2007 Location: AustraliaPosts: 1904 |
A quicker way is to seal the MDF mold with epoxy resin first, it will soak right in if the MDF is warmed up a little first. Once that has fully cured a light sanding will smooth-en the wood fibers off. Then start with the waxing. The only molding of coils I did was on perspex instead of MDF. Perspex is much smoother and easier to wax. In this case its better to machine the coil centers separately and screw them in place. With removable centers the lot comes easier of the backing plate and the centers can be knocked out then. Your fancy XY router should have no problems with that job, right down to locating the coil center mounting holes very accurately. Klaus |
||||
| VK4AYQ Guru Joined: 02/12/2009 Location: AustraliaPosts: 2539 |
Hi Glenn I found that putting compressed air in behind the component works OK to get them from the mold without point damage from trying to knock them out. drill a hole and soak it wit resin then tap with a thread to take a fitting to connect to compressor and put a piece of tape over the hole. That works on aircraft components so should work on yours. I used bees wax as a release agent. All the best Bob Foolin Around |
||||
| Gizmo Admin Group Joined: 05/06/2004 Location: AustraliaPosts: 5036 |
These are all good tips. I'll try Bobs air trick, or at least have a taped over hole in the mould in case I need it. And I think I'll go for the pre cut centers too, screwed in place, I can use the CNC to accurately drill the pilot holes. Glenn The best time to plant a tree was twenty years ago, the second best time is right now. JAQ |
||||
| Trev Guru Joined: 15/07/2006 Location: AustraliaPosts: 639 |
The mould surface does need to be sealed and smooth to make an easy release. If not sealed the MDF will become part of the casting. I used f/glass release wax and PVA release agent to ensure easy release. I used the laminated chipboard and drew the coil positions on with a compass. I layed one 225gsm woven matt on to the board and being so thin the pencil lines on the board can be seen through it. While still wet I placed all the coils and let it set. Then wrapped insulation tape around the coils to form a dam. I did lay up in layers to avoid the heat and distortion. It is a good idea. I just used the standard polyester resin which is not suitable for the application. Trev @ drivebynature.com |
||||
| Gizmo Admin Group Joined: 05/06/2004 Location: AustraliaPosts: 5036 |
The mold is finished, well, the CNC part anyway. I still need to make the lid from some 12mm form ply. The lid will screw down onto the mold with 12 screws through the centers of the coils, which will make sure they are squashed down to the correct height. Each coil is 11mm thick, and the mould is 12mm deep at the coils, 15mm deep in the middle. That gives me 0.5mm each side of the coil for the fibreglass mat and epoxy. 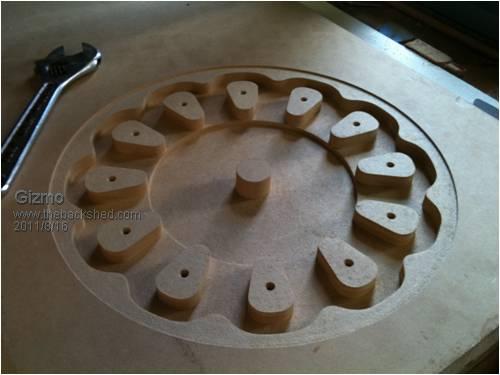
After taking the photo I waved the blow torch over the mold to remove most MDF hairs, then painted it with some epoxy to seal it. Once that cures I'll sand it and apply the release agent and wax. Glenn The best time to plant a tree was twenty years ago, the second best time is right now. JAQ |
||||
Raptor50 Newbie Joined: 17/08/2011 Location: SwedenPosts: 8 |
I am amazed by all the stuff you get together, and really envious of the tools you have to make stuff. This tread btw, is really interesting becouse i am in a middle of a generator build that i have going on, but my cabin rebuild takes a lot more time than i like. But i have 9 coils of 150 rounds with 1mm wire, not 12 like you who was a really nice idea with the opportunity to change 12/24 volts. 
I have'nt gotten any testresults though. I was just putting this together to see if it could get me some power at all.. :) But I guess you finish before me, so i look forward to the results.. I wish the day had more hours.. |
||||
| Gizmo Admin Group Joined: 05/06/2004 Location: AustraliaPosts: 5036 |
I like to have tools. One of my biggest problems is I will often go down the shed to make something simple, or fix something, and end up spending more time making the tools to do the job than I actually spend on the job. The CNC router is one of those tools, I put at least a couple of weeks into building it, and its maybe spent 8 hours in its life actually doing something usefull. But it was fun to build, and recently its been realy handy. I think its because I spend a lot of time on the computer writing software, etc. I'm dont consider myself a computer person, I hate siting at a keyboard all day, so making something with my hands is a real buzz for me. When I die I want to be buried with a few of my favorite tools. 
Be interesting to see how much you get out of that machine Raptor. With the price of neo's going through the roof, I think we will start to see a lot more ceramic magnet alternators in the future. They may be bigger, and make less power, but they are going to be a lot cheaper. Glenn The best time to plant a tree was twenty years ago, the second best time is right now. JAQ |
||||
| Gizmo Admin Group Joined: 05/06/2004 Location: AustraliaPosts: 5036 |
Poured the stator last night and today. This pic is the 2nd pour. All the coils are held in place with timber braces and packing spacers. There is fibreglass mat and epoxy under the coils and around the center of the stator. 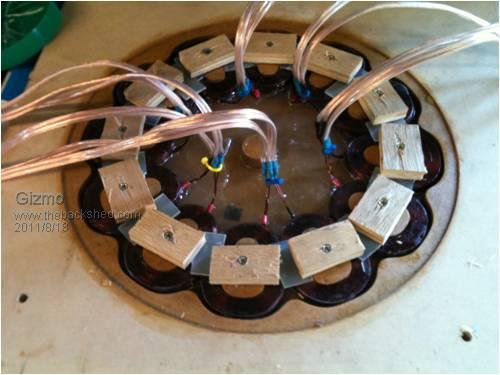
When it had cured I arranged the wires so they would be clear of the mounting holes. 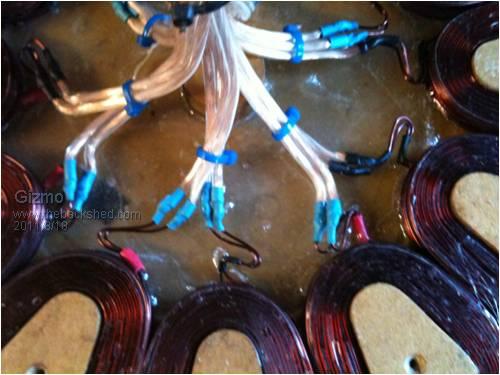
Then added more fibreglass mat and expoxy, and screwed down the lid. 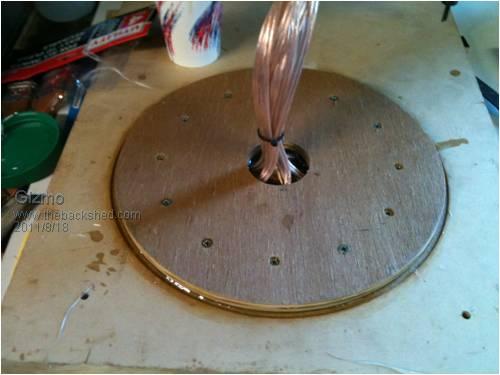
I'll find out tomorrow how it turned out. Fingers crossed. Glenn The best time to plant a tree was twenty years ago, the second best time is right now. JAQ |
||||
| Raptor50 Newbie Joined: 17/08/2011 Location: SwedenPosts: 8 |
NICE.. I have never seen anyone connect the cables this way. How are you going to get them out of the PMA? You have magnet discs on both sides and bolts on the outside of the discs as well.. I am looking forward to see this solution.. :) Take a LOT of pictures.. :) Shi... I forgot to tell you.. When you use aluminium foil when you cast, it's WERY easy to take out the whole thing of the mould.. I wish the day had more hours.. |
||||
ChrisOlson Regular Member Joined: 19/01/2010 Location: United StatesPosts: 60 |
Hi Glen, Interesting thread and glad to see someone else using ferrite mags. I built this 24 volt dual stator two-phase generator for one of my 3.8 meter geared turbines. It's a bit more powerful than the neo generator, however the ferrite generator assembly weighed 78.8 lbs which is over twice the weight and size of the neo unit. I used 50mm x 50mm x 25mm thick C5 blocks - 40 of them at $1.89 each (this is a 10 pole generator). It produces 60 amps @ 25 mph wind speed (11 m/s) on the 3.8 meter machine. 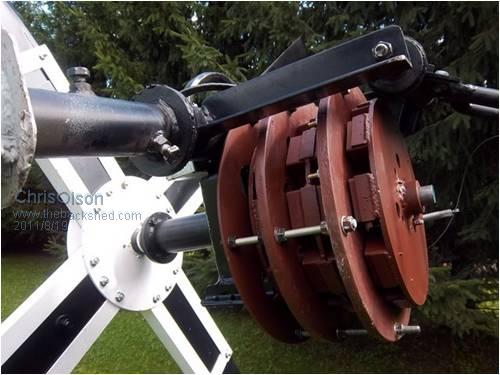
-- Chris off-grid in Northern Wisconsin, USA |
||||
| Gizmo Admin Group Joined: 05/06/2004 Location: AustraliaPosts: 5036 |
Hi Chris Yeah I've been watching your posts on Fieldlines, very interesting. I think there is going to be a future in ceramics, we just need to rethink some of the rules we used for neo magnets. If it means a stacked stator that weighs more, so be it. Glenn The best time to plant a tree was twenty years ago, the second best time is right now. JAQ |
||||
| Raptor50 Newbie Joined: 17/08/2011 Location: SwedenPosts: 8 |
I am wondering about the prices you find on the neo magnets... I noticed some one was writing on Aussie magnets, and when i compered the prices from Aussie and back home i Sweden, i was REALLY amazed.. I can take a cpouple of examples: 30mm x 5mm Disc Neo (round) Aussie 12,10$ Aus X 24 = 290,4$ Aus Solberga (Sweden)2,6 Euro X 24 = 62,4 Euro / 86,1$ Aus Difference 204,3$ Aus 50,8 X 25,4 X 12,7 Aussie 50,82$ Aus X 24 = 1016,4 Solberga (Sweden) 5,52 Euro X 24 = 118 Euro / 162,77$ Aus Difference 853,63$ Aus Has the prices gone thru the roof the last year or is this something that has happened over a few years? Link to the swedish magnet site i refer to :Solberga Vind I wish the day had more hours.. |
||||
| ChrisOlson Regular Member Joined: 19/01/2010 Location: United StatesPosts: 60 |
That's what I decided. Some of the guys will get a bit bent over the stacked assembly. But with these weak magnets it's an easy way to double the ampacity and power output without getting into something that you can't lift. I'm enjoying seeing somebody else's experiments with the ferrite mags. There's not a lot of plans out there to built ferrite machines. Keep up the good work!! -- Chris off-grid in Northern Wisconsin, USA |
||||
