
|
|
Forum Index : Microcontroller and PC projects : CMM2 All-In-One Case
| Page 1 of 3 |
|||||
| Author | Message | ||||
| djwildstar Newbie Joined: 29/07/2020 Location: United StatesPosts: 24 |
I've just finished a little woodworking project, and thought you folks might be interested. Like many of you, must first personal computer was a ZX-81 (I built it from a kit) when I was a teen. I later added on a RAM cartridge, and hacked on a full-size keyboard. The result was rather temperamental, since any disturbance would jostle either RAM pack or the keyboard wiring. My father built a wooden case to house it and solve the reliability problem. So when I got the CMM2, I knew I had to build a small all-in-one case reminiscent of the home computers of the 80's - about the size of a notebook. I found a compact wired USB keyboard that worked with the CMM2, and decided that I would also wanted speakers and an audio amplifier inside the case. I also didn't want to lose access to the I/O bus, so I had to bring that out on the back panel. These features wound up dictating the overall size: the keyboard sets the width, the CMM2 + speakers + back panel clearance set the front-to-back depth, and the I/O panel set the height. The first photo shows it from the front. The keyboard (plus the width of the side panels) sets the overall width to about 12.125" (30.8cm). The CMM2 is mounted on the left side, with cut-outs for the SD card and game controller connector. There are also holes for the IR sensor and the LEDs. The left-side photo shows these with an SD card inserted. The round depression lets you insert and remove the card easily (and reminds me of a floppy disk drive). The overall front-to-back depth is set by the CMM2 and speakers, and is about 9.5" (24.1cm). I put a power switch and volume control on the left-hand side. The amplifier is rated at 5W per channel, and drives a pair of 2" speakers mounted under the keyboard (it can get quite loud). The back panel has a pair of fans (I was concerned with heat build-up in the case due to the audio amplifier) as well as a Raspberry PI I/O board, and sockets for USB power and VGA output. The I/O board set the height of the case to 3.0" (7.62cm). The keyboard is a friction fit into the front of the case, and is held in place by a small lip on the top. The top is held in place by four high-powered magnets, but is eailsy removed for access to the CMM2. My CMM2 board did not come with a power switch, so the only modification I made was to remove the soldered bridge between the switch connector holes with a pair of jumper pins. This let me put the power switch on a 2-pin connector (and jumper the pins if in the future I want to use the CMM2 board outside of the case). There is an internal Raspberry PI I/O splitter, and I added a pair of pins to tap +5v and Ground. Having the I/O connector inside the case potentially allows me to add expansions inside the case in the future.  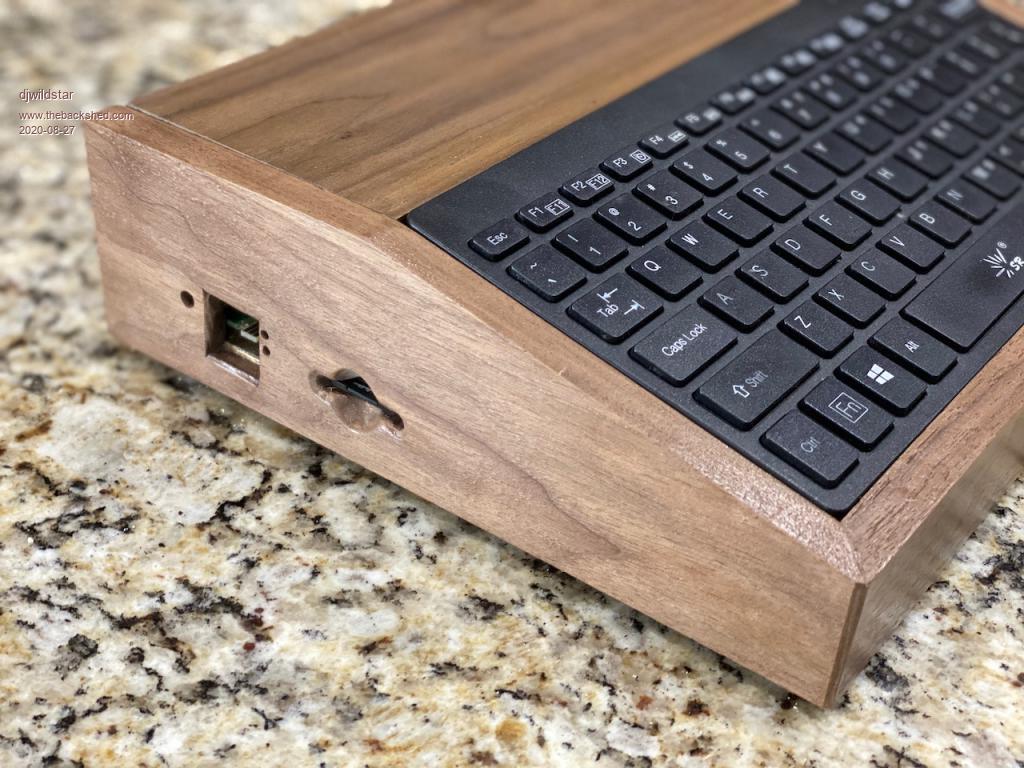 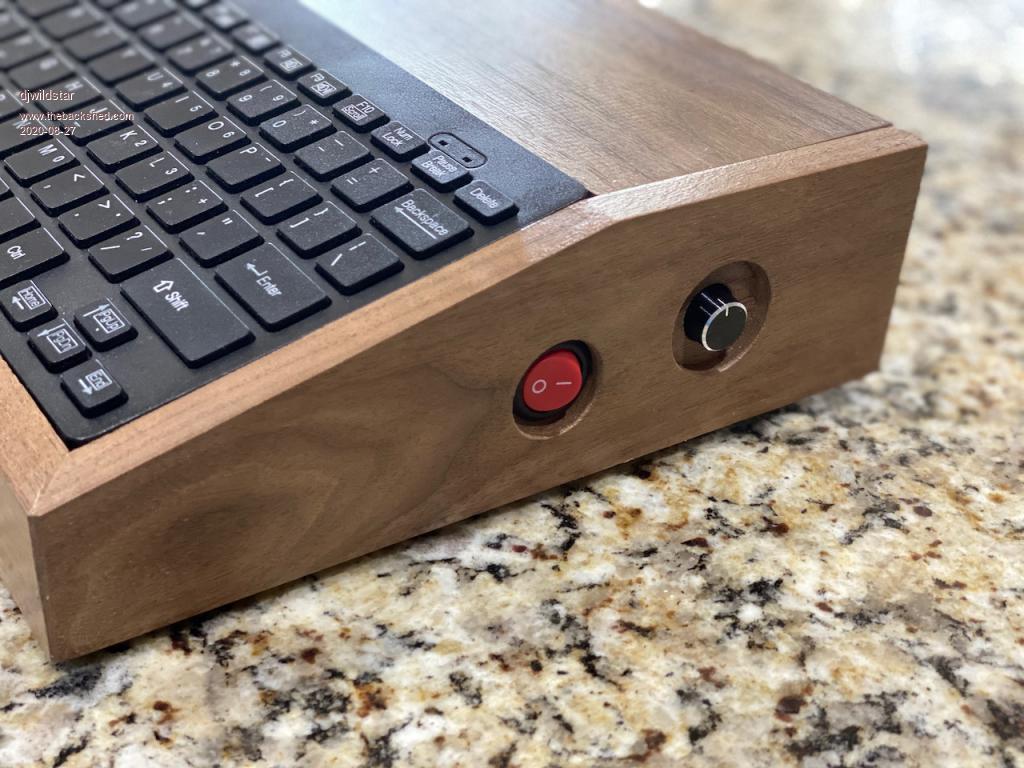 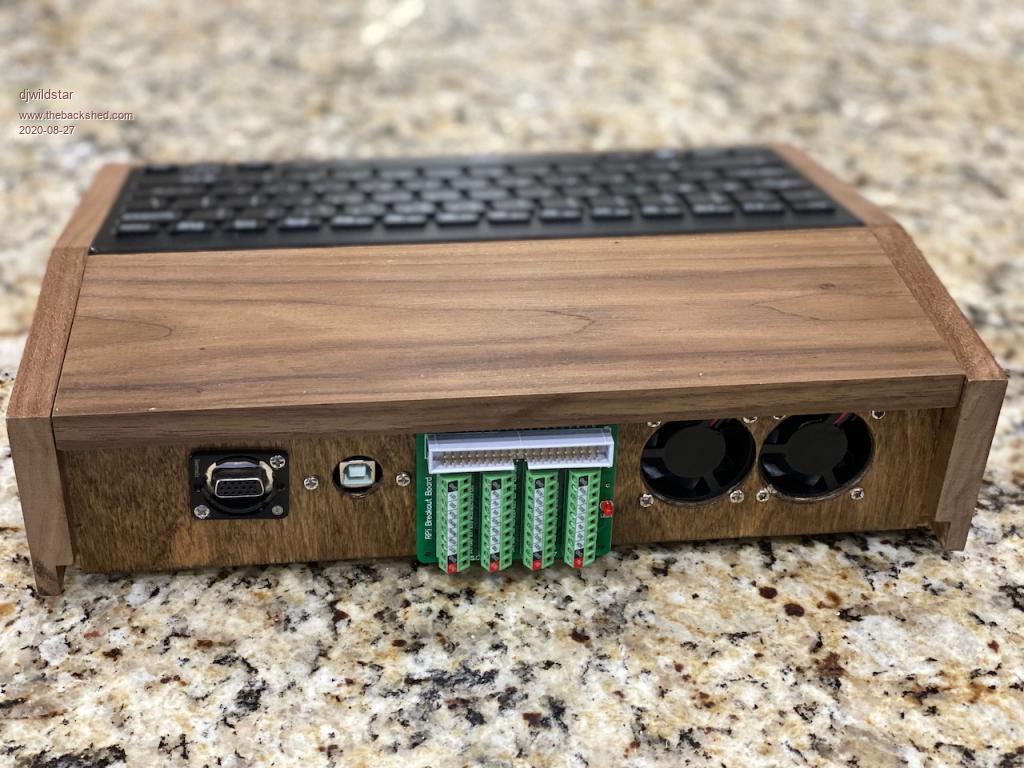 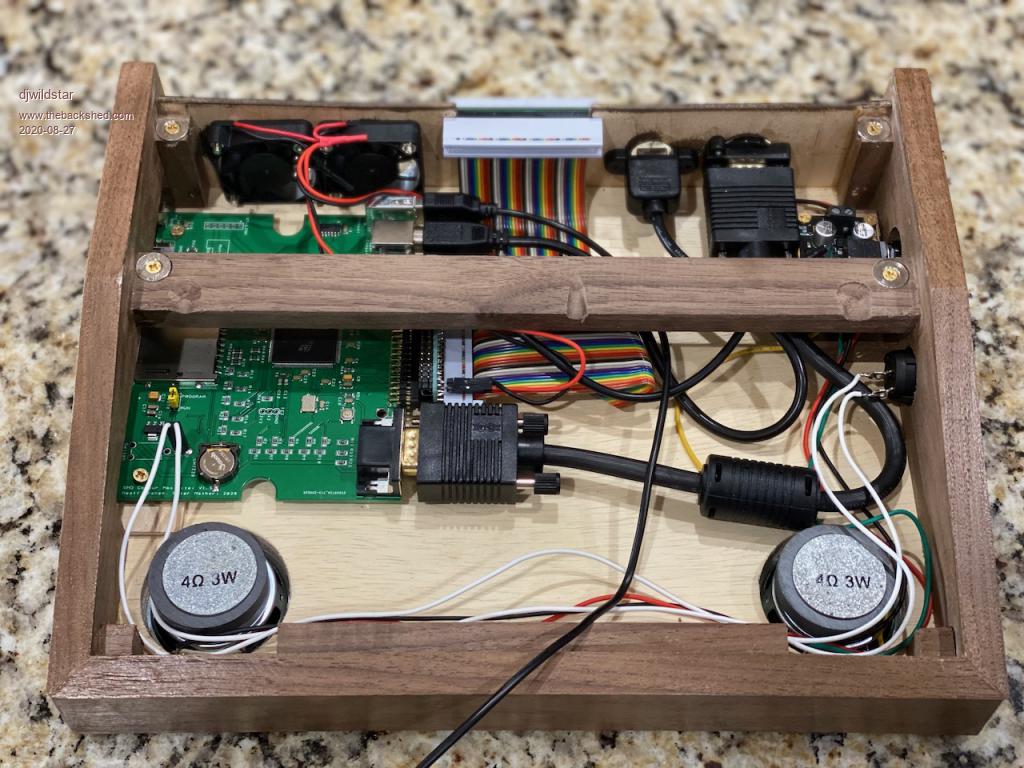 |
||||
| matherp Guru Joined: 11/12/2012 Location: United KingdomPosts: 8608 |
  |
||||
| HellbentHorse Regular Member Joined: 08/07/2020 Location: AustraliaPosts: 55 |
Beautiful work mate! |
||||
| thwill Guru Joined: 16/09/2019 Location: United KingdomPosts: 3865 |
That is an object of incredible beauty that I very much covet. Tom Game*Mite, CMM2 Welcome Tape, Creaky old text adventures |
||||
datawiz Newbie Joined: 10/08/2020 Location: United StatesPosts: 26 |
Wow, that's awesome! Nice work, I'm certainly inspired by this. I grew up with an Apple II+, and this reminds me of the shape-- and then makes me think about the original Apple I kit and owners creating their own wood cases. 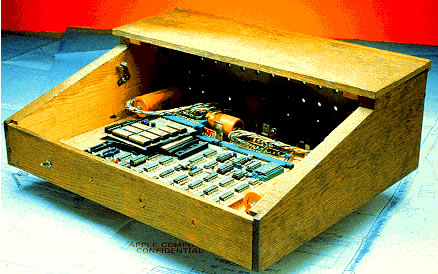 |
||||
| berighteous Senior Member Joined: 18/07/2020 Location: United StatesPosts: 110 |
So pretty. All of us want you to make us one. lol. |
||||
| William33 Newbie Joined: 27/07/2020 Location: GermanyPosts: 9 |
Absolutely fantastic! |
||||
| Seamus Newbie Joined: 18/08/2020 Location: United StatesPosts: 9 |
Great work, there! I've been kicking around ideas of my own, eagerly awaiting the arrival of my kit to play around with various layout and design options. Your computer looks fantastic! [Insert clever signature here] |
||||
| djwildstar Newbie Joined: 29/07/2020 Location: United StatesPosts: 24 |
For those of you who want to build your own, here are my plans. �Sorry that the dimensions are all in inches and fractions, but I'm in the US so all of my machinery is calibrated this way. �Tools required are a tablesaw, router table, and hand drill as well as my trusty block plane, chisel, and carving gouge (for the SD card recess). �If you have one, a drill press would be particularly helpful. When working on the cut-outs for the CMM2's game controller connector and SD card port, I printed a full size control panel template and stuck it to the side using repositionable adhesive. �I then cut to the template. �Because of the thickness of the wood, you will have to cut a larger game port opening than the standard front panel - it needs to be large enough to clear the sides of the plug and the clip on the top (on the other hand, this makes it impossible to plug the controller in upside-down). �I used a drill to define the ends of the SD card slot, then drilled out most of the waste in the middle, and finished off with a fine chisel. �I cut the round recess by eye to fit my fingers. The main change that I would make in hindsight are to stack the USB-B and VGA connectors vertically, instead of placing them side-by-side. �This will leave enough space to the left of the DROK amplifier board to utilize the audio jack. �Due to lack of space (and reports of faulty audio jacks on these amplifiers), I soldered the audio cable directly to the L, R, and G pads on the amplifier board. If you don't have an old-school VGA monitor handy (I do), you might want to add a VGA to HDMI converter inside of the case, and have an HDMI jack on the back panel instead of VGA. �This would also save space. CMM2 All-In-One.pdf Edited 2020-08-27 06:12 by djwildstar |
||||
| mclout999 Guru Joined: 05/07/2020 Location: United StatesPosts: 430 |
Very nice. �I started a thread long befor I got my own CMM2 about this but YOU DID IT and very well. �I still want a small mechanical keyboard version though. �I miss having a Mechanical keyboard like I have on my PC. Your project inspires me to revisit this again. We could also have someone that has experience with 3D priters make some designed for a printable case and that would make the front panel a lot easy to deal with. You might even be able to slot in the actual front panal of the offical case in the printed case. �I have not dipped my toe in on 3D printing yet but would like to start. https://www.thebackshed.com/forum/ViewTopic.php?TID=12374&P=1#150490 Edited 2020-08-27 06:30 by mclout999 |
||||
CircuitGizmos Guru Joined: 08/09/2011 Location: United StatesPosts: 1421 |
Great work! Micromites and Maximites! - Beginning Maximite |
||||
Lou Senior Member Joined: 01/02/2014 Location: United StatesPosts: 229 |
I love it dj, well done. CG has just shipped CMM2's for me and Zonker to play with, can't wait for my new toy !! I want to try some of the old games on it, thanks to matherp and Geoff for creating the CMM2. Lou Microcontrollers - the other white meat |
||||
bigmik Guru Joined: 20/06/2011 Location: AustraliaPosts: 2870 |
Very nice work djwildstar, Before I read to the bottom of the post, I was already thinking about how I would use a router on the INSIDE to thin the side panel enough to access the SD card and then I see your masterful work sculpting from the OUTSIDE. Extremely well done if I must say. Have you thought about a rechargeable battery backup as well in the case so it could be a self contained portable PC? There is no doubt plenty of room for possibly a 20,000mAhr battery bank. If you needed to you could probably make your own VGA cable from something more flexible like CAT5/6, or ribbon cable as there are only 6 wires needed and this would enable you to flex the cable much easier to allow a bit more `wriggle room' How are you at manufacturing 896 of these?     A job well done and worthy of applause Kind Regards Mick  Mick's uMite Stuff can be found >>> HERE (Kindly hosted by Dontronics) <<< |
||||
| Volhout Guru Joined: 05/03/2018 Location: NetherlandsPosts: 3591 |
Beautiful piece of work. I want one..... But why the 2x fans ? Are you looking at overclocking the STM32 ? PicomiteVGA PETSCII ROBOTS |
||||
| djwildstar Newbie Joined: 29/07/2020 Location: United StatesPosts: 24 |
Thank you for all of the great comments! If any of you are interested in building a case, I'll be happy to post with more-detailed instructions -- let me know if there is interest. Some answers to questions: @mclout999 -- The only small-form-factor mechanical keyboards I could find were gaming keyboards with backlighting. �I was concerned that most keyboards with backlighting would either have an internal USB hub or would draw too much power to work with the CMM2. �I don't mind the laptop-style keyboard, since that is what I use for the vast majority of my typing anyway. �You can adjust the plans to fit a different keyboard. �Most mechanical keyboards are significantly larger than the one that I used, so let me know if you want help with the adjustments. I considered routing all the way through the sides so that I could mount a thin panel (either 1/8" plywood or thin aluminum sheet) for the controls and connectors. �I rejected this because I couldn't figure out a way to make it look elegant using the tools and materials I have. �I think that CNC machining would be one possible solution - a CNC machine could make short work of the carving, and could potentially be cleaner and more accurate than my hand-work. �CNC would also be a good route for producing these in volume. @bigmik -- It isn't clear from the photos I posted, but I did use a router on the inside of the side panel. �The photo attached to this post shows it better. �The panels are 1/2" walnut (left over from a previous project), and I routed it down to about 1/4". �It turns out that this isn't nearly thin enough to access the SD card. �I think you would need to get down between 1/8" and 1/16" (2-3mm) before you could easily access the SD card. �I wasn't confident that I could route that much away without ruining the piece, so I decided to carve the recess instead. �At the bottom of the round recess, the remaining wood is paper-thin. I didn't even consider a battery back-up for the CMM2. �There is plenty of space inside of the case for it, and it shouldn't be hard to hook up a battery and charge controller. �However, I don't have a battery-powered VGA monitor, �and the CMM2 saves edited programs to the SD card automatically, which limits the danger from sudden power outages. �Ultimately, this project was about 80's nostalgia and none of the machines I used back then had batteries. � For the VGA cable, I had a 30cm male-to-male VGA cable on hand (I think it came with a very old KVM switch system I used to use), so I used it. �A thinner and more-flexible cable would be nice, though. �I would worry about RF interference between the VGA signal and the amplifier board (which is largely unshielded). �While the VGA dot clock is too high to be a problem the vertical signal (either 60, 70, or 85Hz) and horizontal signals (31.778, 43,3, 53.7, and 68.7kHz) could both be a problem. �Even if building my own, I think I would want to use some type of shielded cable. For manufacturing, I think a wooden case would cost more than the CMM2 board would. �This took about 12 hours of work, and I was able to use some walnut scraps I had left over from a previous project. �I don't have ready access to a CNC machine, but if someone does, I'd love to work with them to come up with a way to manufacture case pieces. @volhout -- I'm not overclocking the STM32, but I was worried about placing it in an insulated box with a 10W heat source (the sound system). � So I did some math: For case cooling, the rule of thumb is that the increase in temperature inside the case in degrees F is (3.16 * Watts) / CFM. �I estimated power at about 1W for the CMM2, up to 10W for the amplifier and speaker system (because it is a 5W+5W stereo amp), so 11W plus an unknown additional amount for the keyboard and any future expansions. �The USB power supply I'm using can deliver 21W, so that sets the upper limit. � The fans I used are 40mm 5v 2500RPM fans that are rated at about 3 CFM airflow. �However, it is likely that airflow in the case is restricted. �The main air inlets are a series of holes underneath the STM32 and the amplifier. �Total inlet area is about 0.8 square inches, so that we are probably getting only about half the rated airflow from the fan. Assuming room temperature of 74F, this means the CMM2 may have to operate in a 97F to 118F (36C to 47C) environment. �This is acceptable but a bit warm for my taste. �A second fan provides some "insurance" against airflow issues - in a restricted case, it won't double airflow, but it will definitely improve it, probably to somewhere in the 2.0 to 2.5 CFM range. �This should bring temperatures inside the case down to 89F to 103F (32C to 39C), which is better. 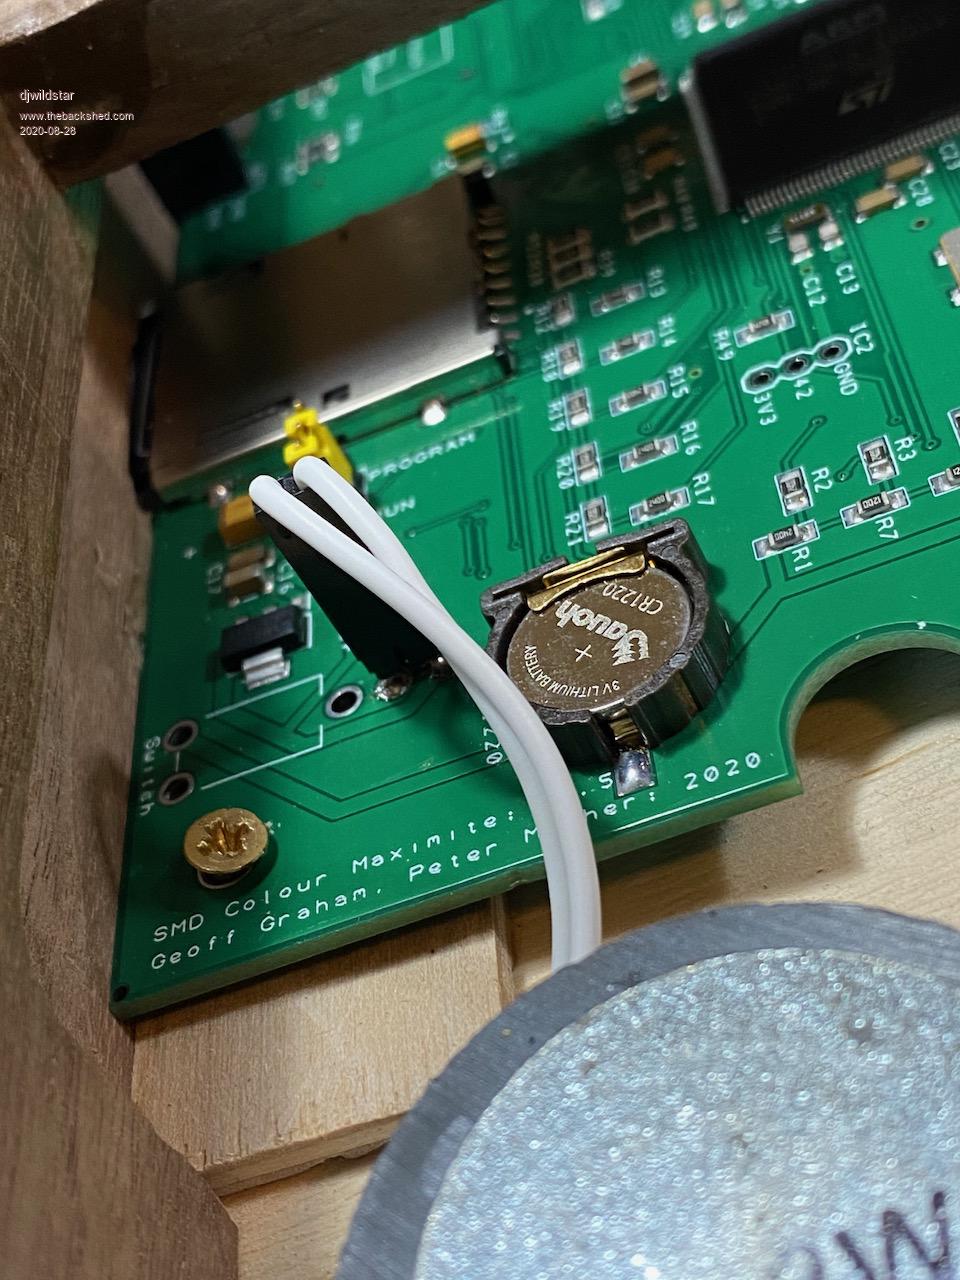 Edited 2020-08-28 01:05 by djwildstar |
||||
| PeteCotton Guru Joined: 13/08/2020 Location: CanadaPosts: 316 |
Fantastic job! I love this idea! |
||||
| MikeAlves Newbie Joined: 29/07/2020 Location: United StatesPosts: 16 |
This is a fantastic build! |
||||
vegipete Guru Joined: 29/01/2013 Location: CanadaPosts: 1085 |
Very nice wood work! Maybe reverse one of the fans? Have the one closer to the corner blow inwards and put a baffle between them? I really dislike the way fans are used on typical equipment. A fan blows outwards. Which means (dusty) air is sucked in through whatever opening are in the case. When I build industrial equipment, I try to arrange for a fan sucking air IN through a filter. That way, the unit has slight positive pressure with clean(ish) air, which then leaks out through all the holes. As a result, after months or years of service, the inside doesn't look like a badger nest. Visit Vegipete's *Mite Library for cool programs. |
||||
| Seamus Newbie Joined: 18/08/2020 Location: United StatesPosts: 9 |
Bonus: there's a nice breeze to dry your sweaty palms as they hover over the keyboard, while you try to figure out where to go next with your program. (either that, or an annoying whistling sound from the air coming out through the drain holes in the bottom of the keyboard... )[Insert clever signature here] |
||||
| RetroJoe Senior Member Joined: 06/08/2020 Location: CanadaPosts: 290 |
Awesome work! No question that an all-in-one case is essential for an authentic retro-computing experience. My wood-working skills are not that hot, so I'm taking a more "commercial" approach - here's my CMM2's new home, all gutted and Retrobrited and ready for an Apple //c keyboard-to-USB encoder. There's actually enough room in there to fit both a CMM2 and RPi, in which case I'll have a portable "Emulation Station" that can run a "real" CMM2 and dozens of emulated 8-bit platforms. 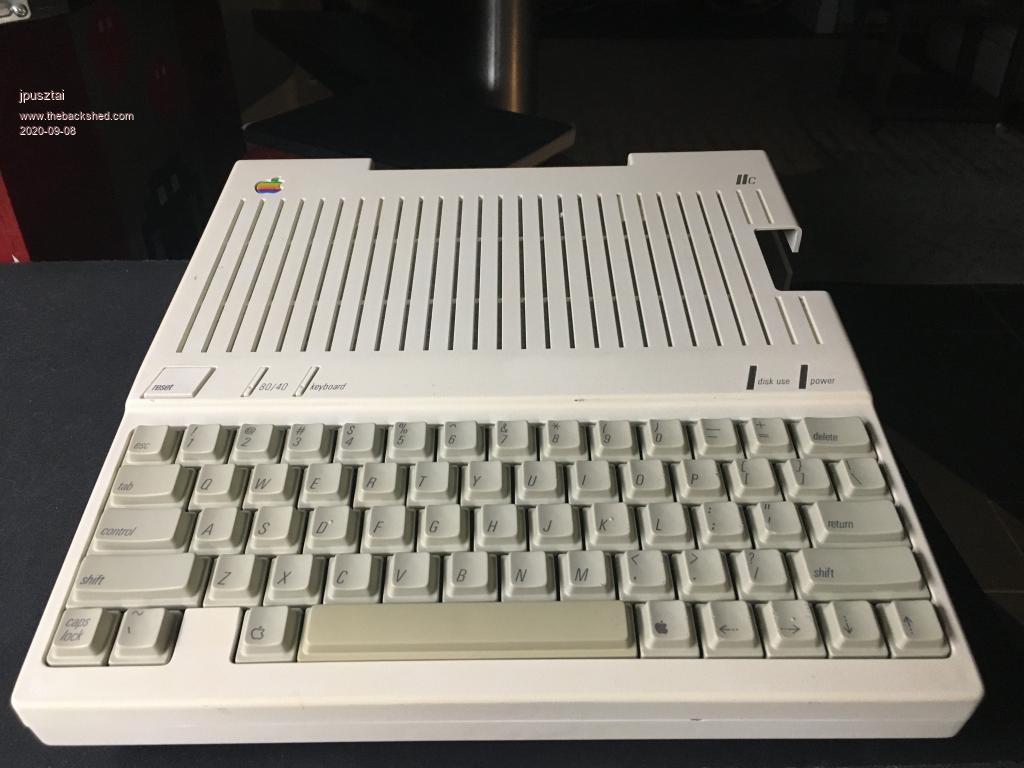 Enjoy Every Sandwich / Joe P. |
||||
| Page 1 of 3 |
|||||
