
|
|
Forum Index : Electronics : Bryan's 150V 45 A MTTP
| Author | Message | ||||
Bryan1 Guru Joined: 22/02/2006 Location: AustraliaPosts: 1210 |
G'Day Guy's, Well I'm on looking for a scope and came across this fleabay one I reckon the DS0D15 which is $319 and 3 day shipping would be the one so what do you guy's reckon bargain or junk ??? As this latest choke I made only came in at 24uH it would be good to setup Poida's tester and see if it will handle that 1.5 Kw solar array, now being 10 turns of that 7x3 wire out of that forklift battery charger and the wire I did show on my crab burner anyway with more MPPT's to make and inverters yet to build I do think a scope is needed toy to have Cheers Bryan Edited 2023-12-28 15:51 by Bryan1 |
||||
| Murphy's friend Guru Joined: 04/10/2019 Location: AustraliaPosts: 583 |
Bryan, I recently bought the scope you linked to, did not need the 15 model with signal gen + extra expense. I'm happy with the scope's performance but it has way more features than I ever need. Its a big learning curve to use it, take it slowly, print out the manual pages you want and take it from there. |
||||
| Bryan1 Guru Joined: 22/02/2006 Location: AustraliaPosts: 1210 |
Thanks mate well I did go and buy it and well for $319 or 4 payments on afterpay of $80 I'm happy. Now I do think a new topic on running these scopes should be on order just so us new guy's and others can learn how to use them properly. I do think this scope will be great on my cnc quest so I can see if the signals are going thru etc. Also I'm like a bull in a China shop in my thinking I can conquer what I'm thinking and eh If I don't know it's time to learn. Now with my night shift restarting on Jan 1 things will slow down a tad as I do need to find a decent power supply for my CMM2. Cheers Bryan |
||||
| wiseguy Guru Joined: 21/06/2018 Location: AustraliaPosts: 998 |
Hi Bryan, that is a lot of CRO for the price. Compared to some of the single PCB uncased cheapies and kits with 1/4 the bandwidth and usually only 1 channel it looks like a bit of a bargain. It only has a single x1 x10 probe, and 2 x1 clip leads. The x1 x10 probes I find are the best for general use. Having said that the clipleads are probably fine for your intended use for now, looking at the voltage across the inductor. The main issue with the clip leads is the relatively high capacitance of the cable which can cause issues when connecting to high impedance points in active circuits. They should only be used when probing DC voltages or low frequency low impedance points. So, whilst not urgent now keep an eye open for another 100mHz x1 x10 probe (new or used) at a bargain price. As Klaus said whilst I was writing this, it does open up a whole new world and has more features than you may ever need, do spend the time & effort learning how to fly it and for the relatively small outlay you can't really go wrong. If at first you dont succeed, I suggest you avoid sky diving.... Cheers Mike |
||||
| Bryan1 Guru Joined: 22/02/2006 Location: AustraliaPosts: 1210 |
Hi Mike well mate if are back from your holiday how about coming up the hill so you can give me a hand on lesson and eh mate if you could go and see your guy for those aerosharps I do have all the components to build my first nano inverter, now as I do have all of those 360 amp fets I have cut some big heat sinks for them. Well if one is going to build something why not make it big and I'll use 24 fets on the board as I do want to use a plasma cutter and may just need that big inverter with 3 toriods. Cheers Bryan Edit: Mike if you can source the better probes just let me know the price and the cash will be here to pay for them. Edited 2023-12-28 19:01 by Bryan1 |
||||
| wiseguy Guru Joined: 21/06/2018 Location: AustraliaPosts: 998 |
Bryan I am back from holidays however I am so far behind in my personal life issues and projects I am sorry to say I have to decline your request for some CRO lessons. I have found 3 you tube videos that I think give a very good description of what a CRO is, how to compensate the probes and how to use a CRO. I suggest the following order: First Vid Second Vid Third Vid The third vid is a bit crazy but drives home some points of ways of how not to use the CRO and pitfalls for beginners. Main interest is from 0:30 to 10:30. Not sure if Roger may have some time available for a quick CRO session but for some time I won't be available (read months!). The bad news continues, I recently contacted the source of inverters but their premises are shut and they have minimised their business. They now operate from private premises and when I contacted them they had 1 inverter, a transformerless one and had not seen an Aerosharp for quite a while. I left my number there about 6 weeks ago and am still awaiting a call that they have an Aerosharp of any size. I suspect that the source we had is no more. I really wish I had taken every Aerosharp they had at the time in retrospect. As far as the probe I suggest an LF312 available from Farnell for ~ $30 + freight - so consolidate more items to get the order to $60, I think that then becomes free shipping. If at first you dont succeed, I suggest you avoid sky diving.... Cheers Mike |
||||
| Bryan1 Guru Joined: 22/02/2006 Location: AustraliaPosts: 1210 |
Hi Mike one can understand just how busy life can be and yes it was a big ask of me so I do hope you are in good spirits and feeling well mate. Anyway to get over the $60 mark I just ordered 2 of those probes  also ordered those fet drivers for the nano inverter and a batch of LM358's so now I think I have everything to build my first nano inverter. also ordered those fet drivers for the nano inverter and a batch of LM358's so now I think I have everything to build my first nano inverter.I will go and ask around some motor winding business's and see if they can help me out with the toroids. Also a big thank you for posting those CRO video's and tonight when I do get some spare time I'll go thru them all. Cheers Bryan |
||||
| Bryan1 Guru Joined: 22/02/2006 Location: AustraliaPosts: 1210 |
Well guy's time does fly when one works nightshift and sofar this year is flashing by so with easter next week I have a mate coming down and all that solar is going on the roof finally. Now when I went that purchase for all the solar gear I did have a good chat with Roger about my upgrade and the subject got onto that 4mmsq wire I bought. I did ask if one can buy 2 into one MC-4 connectors as I'm going 2 in series so with the 1.9Kw array 5 stings. Roger did say 4mmsq would handle a max of around 16 amps so I do think going 6mmsq wire would be much more safer in the long run. So then with the 2 into one connectors using 6mmsq wire it will negate the use of a box and it will be just 2 wires going down. By doing the same with the 1.5Kw array which is only 3 strings will be the same as the 1.9Kw array no box's will be needed. Those 2 MTTP's just need the final parts installed and I do need to make one more control PCB and LCD setup as that first MTTP I made the setup is still good. I will be using those grid tie box's for each MTTP and will be making a new rail for them to sit on so one sits above the other. Many years ago I did make a brass positive busbar and I will finally make 2 new ones that have more tapped holes so it can fit the new power sources for both the positive and negative rails so that will clean up the whole array. I will be testing each MTTP on my shed array and as I'll be home this week where I have been staying down in town thru the hot weather. So each day it will be one step further with the plan of easter being the power on date for this new array. Cheers Bryan |
||||
| phil99 Guru Joined: 11/02/2018 Location: AustraliaPosts: 1788 |
Perhaps there are different rating tables for solar cables but for mains cable 4 sq. mm. is usually rated at 32A. De-rated on very long runs to ensure no more than 5% voltage drop. |
||||
| Bryan1 Guru Joined: 22/02/2006 Location: AustraliaPosts: 1210 |
Hi phil what I find on my shed array 190 watt panels do around 5 amps each in full sun when the battery is charging I have seen close to 30 amps coming in. Now each of those 6 panels are in parallel so which this new array of 190 watt panels by the time the last string the current should be close to 40-50 amps DC if my calculations are correct. So by going 4mm on the first panels then switching to 6mm further on should be OK. Eh mate trying to ask these solar guy's who just put all the panels in series don't have a clue about an off grid array. Maybe I am missing something here but DC amps and AC are 2 different things, but eh when i do build stuff I do like go well over rated so thats why I asked the question is 6mm enough. I do find with my 80 amp Staff & Standbury battery charger it does like burning out 15 amp extension leads as with a 13 amp current draw constant over hours does heat up the mains connections. To date since I have been using those 15 amp rated extension cables 3 have burned out so is it bad products or the pure fact 13 amps with mains cable won't hold up over time. This battery charger has worked flat out over 20 years and still puts out a pure 85 amps mainly as I tweaked a pot to get off sealed battery mode. Maybe I should get Roger around so we can trace out the circuit so we can make our own. I mean every off grid array does need a battery charger don't they and this solid state charger is the bee's knee's of battery chargers that just keep giving and yes over the years it has worn out gensets. I have been out the game for so long but the power system I built back in -03 is still going. My 20 year upgrade is going ahead and if those lithium batteries turn up the fun can really start but for me I do want to look at 48 volt 1000AH forklift batteries as I will need a few of them when I move out to the back of the farm. Cheers Bryan |
||||
| Bryan1 Guru Joined: 22/02/2006 Location: AustraliaPosts: 1210 |
G'Day Guy's, Well finished nightshift this morning and the long weekend is here for me I got straight onto looking at those rails for the panels and cheap ching crap as just about every SS cap screw was welded to to the base.So into M&M and got new rails fixing everything need to fix the panels on the roof and wouldn't one know it the rego on my ute expired last Monday so had to re-register it to go get the rails. Now as all the new panels are 30mm thick I had to get longer bolts so all up about $600 for the new mounting. My plan is to get the rails up in the morning and as my elder daughter is coming over tomorrow that huge job of washing all the panels will get easier. Still got to do the finishing touchs to the MTTP's and get them into the box's so by the end of this weekend that 3.4Kw should be all working. Cheers Bryan |
||||
| Bryan1 Guru Joined: 22/02/2006 Location: AustraliaPosts: 1210 |
Well the 1.9Kw array is on the roof and all mounted, got 2 in series then 5 strings so got the wiring to do and it will be going to a terminal box. I did get 4 clamps for each mounting and I'm going to put another one on each leg as there is a bit of sag on the frame. Then when I go back in to get the panel clamps I can order more mounting leg clamps. Found out this morning M&M didn't include the panel clamps for the other array  and I'm pretty sure they will be closed for the weekend so the 1.5Kw array will have to wait. and I'm pretty sure they will be closed for the weekend so the 1.5Kw array will have to wait.So got the job of getting one of the MTTP's finished and got the lcd and brain board off my first attempt so it can be reused. I did notice an update to the software so I'll program that in. I did use my cheap DMM and the open circuit of 2 panels is 102 volts so it will be interesting to see the gain of MTTP at 24 volts. Cheers Bryan |
||||
| rogerdw Guru Joined: 22/10/2019 Location: AustraliaPosts: 799 |
Pleased to hear you're making progress Bryan. Did your previous software version work okay on your first one? It may just be me but I loaded the latest version on all of mine but they were not doing what I expected they should. I thought it was my system and layout and lack of understanding etc ... but eventually I went back to an earlier version ... and then everything worked just like I understood it should from all the info posted. The version I now use is from one of Poida's posts on 3-5-23 and it's been working great for at least three weeks now. Before that I was becoming a little disallusioned because it was all over the place. Some of the problems included it never going onto float because it would get to Absorb ... but then after a while drop back to MPPT .. and then when it got back into Absorb again it would reset often ... so the three hour timing was reset each time. Of course that meant the battery was boiling all the time etc I tried lots of different settings and widened the ranges etc ... but still no better. After I loaded the earlier version ... wonderful ... like chalk and cheese. I was going to raise it in the main thread but wanted to be sure that there wasn't some other issue ... but seeing you're about to get yours going ... maybe use the earlier version or same one you used before in case you see the same problems I saw. If it turns out I'm wrong, it's still easy enough to load the latest software later on. Good luck. I've just wound a choke for my 4th one and am in the process of wiring it up today as well. Cheers, Roger |
||||
| Bryan1 Guru Joined: 22/02/2006 Location: AustraliaPosts: 1210 |
Thanks for that info Roger, I do have an earlier version already loaded and off memory it was the one when D2 is grounded it shows the weekly totals. So I'll use that for the first tests and see how it goes I'm off to the shed now to make the manifold box and the ones I bought yesterday are big enough to fit 10 cable glands on a single side, so 5x2 arrangement. I do have a heap of 32 amp 3 phase cable so from the manifold to the MTTP and circuit breaker I'll go 2 inhand so it can take the input current. Now looking at the setup from ground level there is a sag on the array so in the morning when it's cool 2 extra foot clamps are going on so it will take the pressure off the rails. Regards Bryan |
||||
| Godoh Guru Joined: 26/09/2020 Location: AustraliaPosts: 379 |
Hi Bryan, just wondering how far apart you have the feet on your solar racks. We get a lot of wind where I live so I usually put the feet no more than 1 metre apart. For the racks to sag I am guessing that yours are a lot further than that apart. You definitely don't want the racks to lift off the roof in a big wind. Hopefully your roof battens are screwed to the rafters too Have fun Pete |
||||
| Bryan1 Guru Joined: 22/02/2006 Location: AustraliaPosts: 1210 |
Hi Pete The solar rails are 4.7 metres long and I used 2 of them in line and with the 10 off 190 watt panels there is onlt about a metre left. In hindsight I should of used more and as I still need the panel clamps I'll use the feet off them to put and extra one in the middle of each rail. Now as those 250 watt panels will be heavier I know now so I'll use extra feet for them. Each foot screw does go thru the roof purlin and they did supply some 3/8" drive tek screws for the job. Now a month or so ago I did buy a uH meter from Altronics and got it out of the box today so I could measure the chokes I made. Now the one I made for that first MTTP measured 39uH and that other one only measured 3 uH so it got NFG written on the top of it so I don't use it again.As I do have a heap of those small toriod rings I'll make a new choke for the second MTTP using them and now I have that meter I can check. Now I did think about measuring that dual choke I made for my inverter but my longneck was just about empty so called it a day. Had a look at at my MTTP's and all I need to do is put that earth link on and install the fet driver chip then they are ready for testing. So in the morning the first job is fix the feet and break open my MC-4 crimping tool and make all the cables. I have drilled and installed the 10 cable glands on the terminal box and I still had just enough brass earth bar left to cut in half so 6x2 termination holes for both rails. I do need to drill/tap some M3 in the back of them so I can mount them on some fiberglass sheet. I have cutout the face plate on one grid tie box for the lcd and rather than making a solid mount for it I reckon some hot glue will do to keep it in place. As this grid tie box did use clamps on the heat sink I'll use them them to secure the circuit board rather than use screws as the hole placement of the diodes doesn't match the holes on the pcb. I do have a nice thick set of wires that I used for my 175 watt panels I put up 20 years ago and as they are already on the cable tray to the shed I'll use them for this 190 watt array. Now before I get ahead of myself I still need to make that earth busbar and I will tell the wife to go out so I can isolate the system when I install it. So once this 1.9Kw array is up I can finally show the wife those kaneka panels are well past the usebuy date as at best they only put 3Kw hours in a day. Then I reckon by ditching them our 60 amp outback MTTP can get some of those new panels put in as a replacement. But I do need to get on and find a new manual for it as it still programmed for those old sealed batteries. That SA32 Selectronic inverter has powered our home for the last 20 years and is still going strong so for now it will still keep going. I did test out those 2 off 175 watt panels I got via Foot(RIP) all those years and they are still outputting whats on the plate close to 5 amps each panel under full sun. These are Sharp panels and they will go on the 250 watt array as I will have space to put them in parallel as they will be great for charging that lithium pack when it turns up. Our house has been running off a 24 volt 600AH forklift I got for free that was close to brandnew in 2012 and with all this added solar I do think like my shed battery that got those free 6 190 watt panels it reformed the battery. I am going to price up a 48 volt 1000AH forklift battery as when I do get to make Mike's inverter it is time for us to upgrade to 48 volts and I reckon just hiring a reach truck to land the battery outside the shed will be the go so the battery can live outside under a lean-too. Where the SA32 can do the house load Mike's inverter can do the heavy lifting off aircons in summer and my wood work I've had in storage for over 20 years. Got a Elu spindle router that cost my Dad back in the day 3K and got a heap of gauge plate here to make new dies. As we have a heap of redgum here it will nice to finally get back into wood. Cheers Bryan |
||||
| Bryan1 Guru Joined: 22/02/2006 Location: AustraliaPosts: 1210 |
G'Day Guy's, Well finally got those panels wired up and just on finishing off the wiring to the shed, now as this 4mm cable I got was a pair so 2x4 I decided to use both and while I was there put in the wire for the 1.5Kw array. I did use 25mm conduit and getting 4 pairs of that 4mm wire thru was a bit of fun. I needed a T-piece so went into the big green shed only to find like normal they didn't have one so just grabbed 3 off 25mm x 1.2"bsp fittings and I found by drilling a 25mm hole with a holesaw lets one screw the fitting in for a nice tight fit So just made a terminal box above the main solar wire box so everything is nice and rigid when finished.So getting there slowly and hopefully by tomorrow this first array should up and going. |
||||
| Godoh Guru Joined: 26/09/2020 Location: AustraliaPosts: 379 |
Squeezing 4 pairs of 4mm twin solar cable would be tight in 25mm conduit. I used 32mm conduit for my underground runs from my panels to the shed. I put 2 x 6mm twin cables in each conduit. That was enough. Good luck with getting the setup running, soon you will be able to sell buckets of sparks to the neighbours during blackouts Pete |
||||
| Bryan1 Guru Joined: 22/02/2006 Location: AustraliaPosts: 1210 |
Well finally got the wiring in the shed and the extra feet put on the rails now as it has been that long I do need to do a search to remember the setting up steps for the MTTP.I now have a laptop with win 10 pro on it and I downloaded the arduino software but yet to use it yet so that will be a bit of fun to get going. A bit later I'll go up the shed and work on mounting the MTTP and still need to put in the rails to hold the grid tie box's, they both did come with mounting plates and I did buy some 40x5 ali flat bar as I was going to make my own clamps so I can use that for the rails. Still got those old batteries against the wall where the MTTP's are going and my trials at trying to save them hit a brick wall. I saw they were sitting on 2.7 volts and I put a load on until they were dead flat 1.6 volts. then when I put my 8 amp 24 volt charger on they went straight back to 2.7 volts. So they are off to the scrap yard and thats another job to do. |
||||
| Bryan1 Guru Joined: 22/02/2006 Location: AustraliaPosts: 1210 |
Well it has been a long day working on this project, now as they are predicting rain tomorrow all I got left to do is install the 10K NTC's and mount the grid tie box then hopefully this MTTP will come to life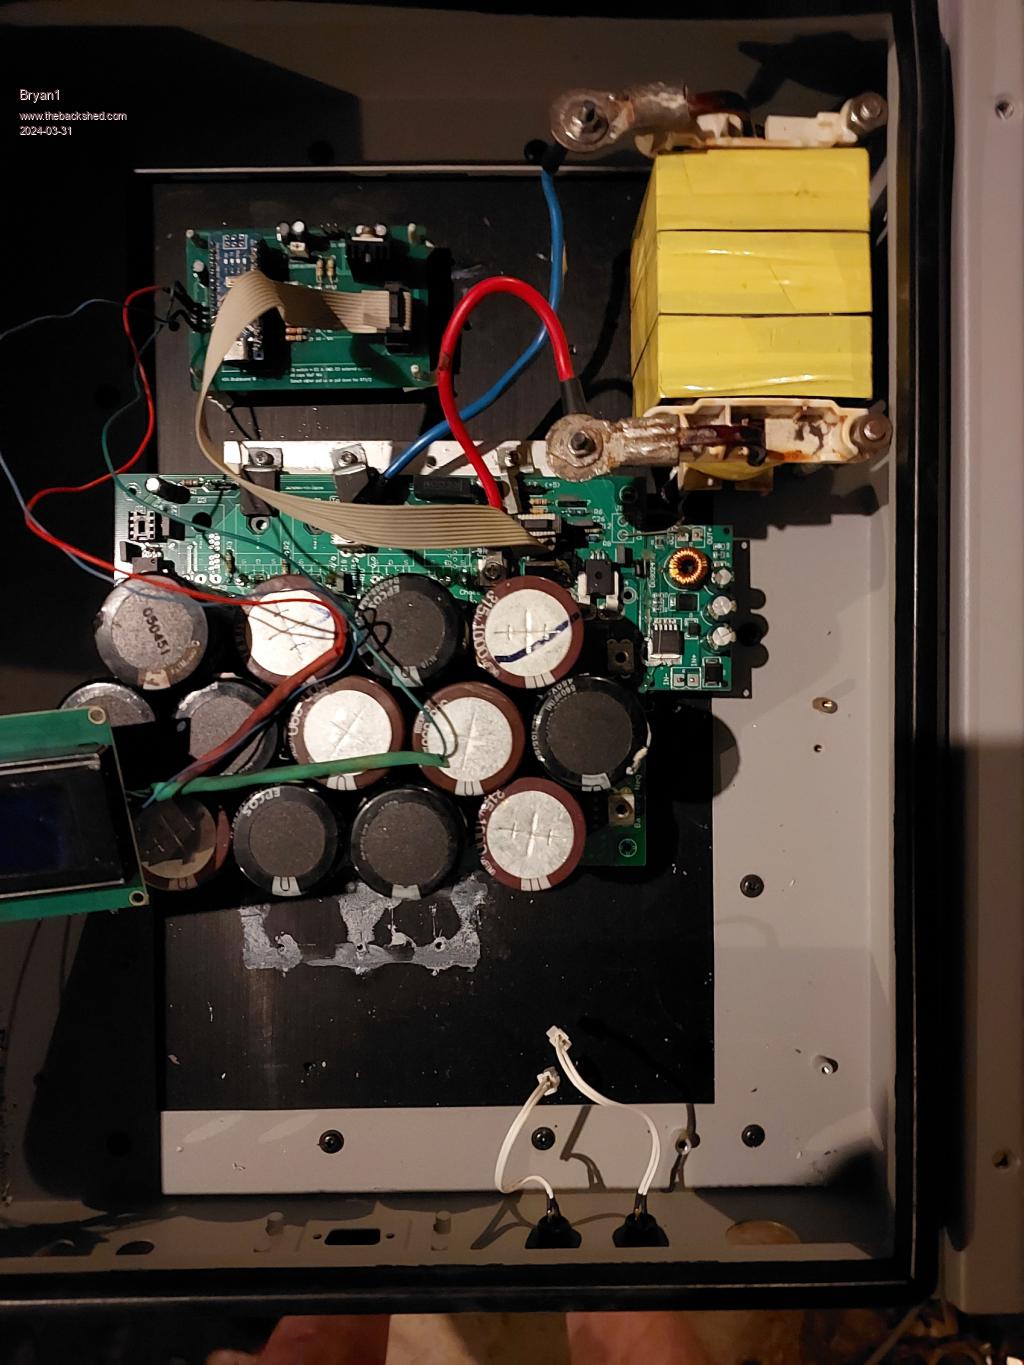 As one can see I clamped the board to that heatsink using clamps and I did have to cut one thinner to fit the board and the board is now held nice and firm with the fets and diodes well clamped to the heatsink. Now you can just see on left the plastic sheet used as the isolation sheet and I did put the last of my heat paste as the bloody mice had eaten a hole and when I noticed my finger was white the rest of the tube went on there. With that little power board on the side I hot glued it on then soldered the wires on so it does sit nicely beside the main board. I am going to have to make longer wires for the LCD as when taking the cover off there does need some wire slack to undo the wires from the main brain board. Now the brain board and the LCD are already programmed so it should just fire up when I connect it. Also I'm going to fit a push button so the weekly totals can be shown with just one push. Now as these 190 watt panels are 5 amp panels and with 10 of them it going to be interesting to see the input current and to find the correct wires once I got both sets in the shed it was showing 95 volts open circuit so it should in theory be close the max of this design but eh thats why we do build these things to so we can push them to the max. With the other MTTP borad I did notice one by pass cap had a burn mark off the soldering iron and I will check with my fluke 865 to see if I did destroy it but I do have some spares if it is gone.Cheers Bryan Edited 2024-03-31 19:10 by Bryan1 |
||||
