|
|
|
Site Navigation
Projects & Information
»General Information»Wind turbine Projects »The F&P Smartdrive »Electronic projects »Microcontroller projects »Miscellaneous Kits & Parts
»Basicly Natural Pty Ltd»PVC & Aluminium blades »Scale model farm windmills »Price Watch Discussion Forums
Handy Links
»Wind»Solar »Electric Vehicles »Electronics »Micro Controllers »General Interrest About TheBackShed Getting Started Privacy Policy |
Building Your First Compost Bin Easily and Quickly
Composting is one of the most important factors of a healthy and happy garden. Yet for one reason or another many gardeners ignore the art of composting. It might have to do with the time involved or perhaps the cost of a new compost bin. However, you can get involved in composting with very little money and time! Your vegetables and environment are going to be appreciative of the fact! If you have not been composting it is time to start! Composting will get rid of your waste and give you a bountiful crop during the growing season. This guide is going to help you get started building a compost bin from beginning to end. So grab some lumber, tools, and compost material and we’ll get going. First Steps In Placing Your Compost Bin The first step in setting up your compost bin is scouting out a spot in the yard where your compost is going to thrive. The majority of homeowners will find a sunny spot in the backyard and set the bin there. The problem is the bin will be receiving more sun than is needed. The additional sun will dehydrate the organic matter sooner than you are ready for it. Try to place the bin in a shady part of the yard for the best results. It is best to think about the smell that a compost bin in the backyard might produce. You will want to consider your nostrils as well as your neighbors. Keeping the bin far away from your home and others is one of the most polite gestures a home gardener can make. Likewise you will want to consider line of sight and the position of the bin. Is it going to obstruct a favorite view that you and your neighbors enjoy? The third and final consideration for you revolves around your own convenience. The compost bin should be placed near the house for winter runs. No one wants to take the household scraps on a half mile walk to dump them in the bin. You will also want to try to place the bin near a waterline as water will need to be used to moisten the pile from time to time. Once you can find a spot in the yard that will fill the criteria of all these needs you are almost ready to start building. If your yard is unable to fill all of the prerequisites try to fill in only the most important to you. Building A Simplistic Compost Bin When you are working with compost you are going to hear very few home gardeners looking for the latest innovations or state of the art equipment. In fact, most of us just want what is going to work and hope that it is in our budget. The following plans are best suited for newcomers and those that just want a bin that is going to work. For the purpose of the article we will look at building an all-purpose compost bin for your yard. The most important part of building your own compost bin is selecting the right type of materials. Home gardeners use woods, cement blocks, and even old wood pallets to build their bins. It is all going to come down to a personal preference as to what would work best for your gardening needs. The truth of the matter is most materials will work the same and produce beautiful, rich compost. Untreated Woods vs Treated Woods My particular favorite material to use for building a home compost bin in untreated woods, red cedar to be more precise. I have found that this type of wood lasts long and actually looks rather nice in the backyard. I do not use treated woods and would recommend that you stay away from them as well. Many of the chemicals that can be used to treat this wood are not ones you will want coming into direct contact with your compost. What worries me is the lack of information that is available to the public about such effects, and I have just decided to err on the side of caution. Three Bins For Optimal Performance The model I like to use to get the most out of my composting efforts focuses on having a total of three bins in the yard. The first bin is used to hold all the organic matter, while the second bin hold material that has been processed or is processing. Your third bin is used to hold soil that will be used to cover the materials in the active bin. While this may be the optimal method it is not necessary and using one bin will work just fine. Gathering Your Materials
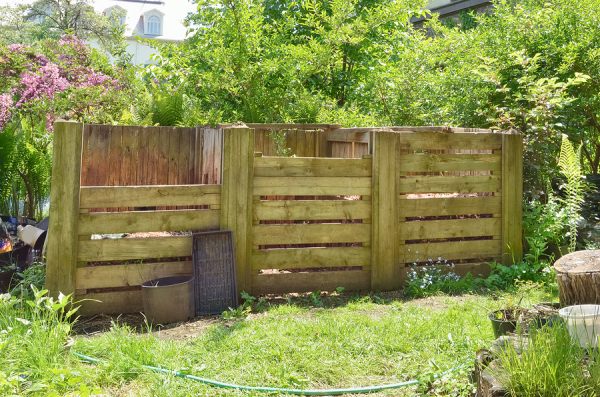
Begin Compost Bin Construction With the materials laid out on a flat surface it is time to begin. Start by nailing a 2 x 6 board across two of the 4 x 4s. Your 4 x 4s should have been measure 3 feet apart so the 2 x 6 is a perfect fit. As long as the 2 x 6 has a plumb fit, nail it into place. Your next step is to create a ladder of such continuing up the 4 x 4s. As you nail additional 2 x 6s to the 4 x 4s there should be spaces within the boards so the compost material can breathe. It can be a personal decision as to what you think looks best, just keep all the spaces the same size so the bin looks good when completed. I typically have always used one inch between the boards and found that very little material gets out and few critters get in. For the next step you will need to create a mirror image of the wall you just created. Follow the same steps and use the same measurements. Your next step will begin the actual formation of the bin. If you can herd in a helper or two for this part of the process your life will become just a little easier, if not construction can still be completed. You will want to take two of the walls and lean them together. Using a 2 x 6 begin to connect the two walls together. It is important to offset the nails as you drive them in so they do not collide with previous entries. Your last step is going to be a repeat of the last. With your final 2 x 6s you can compete the front of the compost bin. Once you have the wood on the front of the unit you are ready to place the cover on top. This can be either a wooden cover that you build or buy. If funds are short at the time a large tarp can also be used although it is not as efficient in retaining heat in the unit. Once the lid has been finished you are done! All that needs to be done is to start filling the unit with the proper organic material for rich full compost. This project should only take an hour or two to complete from start to finish. Construction costs will vary depending on the type of wood you buy and where you get it from. It should also be noted that this plan can also be used to make larger compost bins if you have the need for one. It is important to remember that composting is not an overnight chore. It will take at least 2 to 3 months before you will be able to use any of the compost from your bin. Depending on the weather it can even be a bit longer. However, patience is truly a virtue with compost and you will be rewarded with gorgeous soil that can be used in a variety of gardening situation. About the Author Jonathan Leger is a sponsored member of the Garden Writer's Association and a gardening enthusiast. He runs a small site dedicated to the history, education and care of a variety of roses at CabbageRoses.net.
|