 |
|
|
|
Site Navigation
Projects & Information
»General Information»Wind turbine Projects »The F&P Smartdrive »Electronic projects »Microcontroller projects »Miscellaneous Kits & Parts
»Basicly Natural Pty Ltd»PVC & Aluminium blades »Scale model farm windmills »Price Watch Discussion Forums
Handy Links
»Wind»Solar »Electric Vehicles »Electronics »Micro Controllers »General Interrest About TheBackShed Getting Started Privacy Policy |
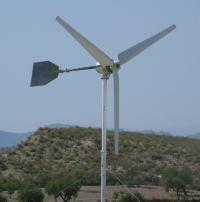
In Len's words. Just a bit of background as to why I started on this wind turbine in the first place. We moved to Spain almost 10 years ago now, got fed up with the coast and moved inland after a few years, unfortunately was conned into buying an illegal house. Within a few months the builder was threatening to cut of the water and electricity, the water went first, so I decided to make plans for when the electric got cut off. Bought batteries and Inverters and generator!! Soon realise gen was costing a fortune in diesel, hence the turbine idea, this was some time ago when solar panels were far more expensive than at present. So I ordered a turbine from the far east, just a 1KW model to charge the batteries. That was just the beginning!! Turbine soon went wrong and needed repairing which I managed myself. After some more problems with it, and also the realisation that we needed a much bigger turbine I decided to build my own , using a commercially made alternator and blades, sounded simple enough. At this point I had a choice of the output voltage, but as the standard one was 700 euros cheaper, I chose that, its output is 230 volt phase to phase. I need to charge the battery bank which is 48 volt, so I intended to use some redundant transformers to bring down the voltage to the correct level. Before I could begin the work of building I needed to purchase a Lathe to do all the turning, and make a shed to house the lathe, and welder, drill etc. The alternator needed two end plates to support the bearings and shaft which had to be machined to .020 or better to align the rotor correctly, the end plates were 403mm diameter which was at the limit of my lathe capacity, and this proved to be the most difficult bit of machining to do ( it did not help that I had never used a lathe before!) I made the rotor shaft 65mm diameter, its very solid never going to bend, but also heavy, I guess it would do just as well if only 50mm. To attach the shaft and rotor I made a taper fit sleeve which pulls up on the plain shaft and grips both the outside and inside . Its similar to the commercial keyless bushing idea. Next I got a very large piece of tube 350 mm dia X 400 mm long X 10mm wall thickness, and made two holes top and bottom to take the bearings holders so that the complete assembly could rotate with the wind. Next up was to make the post to carry the slip rings for the three phase out put, and also a spare three slip rings for the control wiring. The post needed to be a tube so that the wiring for the slip rings could pass out of the bottom of the post. I purchased the slip rings ready made, and used some spare brushes that I had to save money.The flange for the post was 220mm diameter and 20mm thick with webs welded between the bolt holes(18mm bolts). So now I had the alternator attachted to the main body of the turbine and turning on the post. When I assembled the rotor and shaft it all turned nicely, phew that was a relief, on shorting out the three phases it was very hard to turn the shaft, which is as it should be. In practise this had some disadvantages because if there was little wind the dog vane would stick in one place causing the turbine to continuously rotate. It needed something to make sure it returned to the centre to prevent this, in the end a weight on the tail of the dog vane and sloping the whole thing backwards solved that problem . I put another dog vane box at right angles to the first, all wired in, the purpose was to take the turbine out of the wind in strong gusts. This was activated by a wind switch when the wind exceeded a certain speed. By this time the inside of the turbine housing was looking very complicated, with relays everywhere, but it all worked, that is until the chain connecting the post to the drive motor came off. After replacing it twice I finally realised that one of the drive sprokets was slightly oval causing the chain to get tight and the loose as it went round, the other disadvantage was that it was constantly driving the motor as the wind changed, very good for tracking the wind, but I did not think the motor would last too long like this. During all the testing for various direction controls, I also noticed one other major problem. Noise from the turbine , especially when giving lots of power, two sounds, one a loud hum, the other a very loud sort of rattle noise, hard to describe but very annoying, this noise only occurs when you rectify the three phase output, I tried it on a resistive load and inductive load, no noise, so its got to be something to do with the rectifiers. The manufacture said its caused by harmonics and something in my build is wrong, so far I have not been able to cure it. At the start I also put a mechanical brake on the shaft, a brake drum with two brake shoes, activated by a motor (24 volt cordless drill ). This could be used at ground level manually. By sending current to the motor. In strong winds the power of the Turbine blades is scary!! The final control system is somewhat different, it now has a Tail to keep it into the wind and this tail can rotate from vertical to horizontal, this will allow it to turn out of the wind when it gets too windy, all controlled by the wind switch, you can select from eight different speeds by dip switches. If anyone wants more detail please get in touch for a full explanation of the various things I have related. Because of the noise issue it now resides at my friends Finca as he has a lot more space and the noise is not a problem for him. In the End it does do what I first intended, that is,it makes a useable amount of power in a modest breeze, but it did not come cheap, but then on the other hand 4KW turbines don’t come cheap where ever you buy them. The Alternator I purchased from Alxion, you can access their web site www.alxion.com. I chose the 400STK 2M model its 400 mm in diameter. The blades sourced from China Dezhou Aerosa Composite, www.aerofrp.com. I used their 3-5 kw model, which are 4.4meter dia. The power output is very good, as per specs, I get 200-300 watts in a 8-10 mph breeze, which rapidly increases to 1-2 kw when the wind speed is in the 12 -15 mph range, the average compared to my 1kw turbine is by a factor of four or more depending on weather conditions. Measuring the potential output over 24 hours depends on what your batteries can take and how much you are using over the same period, which will vary by different set ups. In conclusion it does what I set out to do, that is gives a usable amount of power in very moderate winds. My only problem is the alternator noise, which I am told is to do with my particular design of the various parts. I have contacted other companies which use this same alternator and they do not have the same problem, so I can only assume it is part of my total design which causes the harmonics.
Thanks Len. |
||
 I chose a 4.2kw Alternator kit, it comes in two parts, the winding, and a separate rotor assembly with the magnets glued in place.( Ist Pic is the rotor assembly after bolting two ali plates back and front to support it on the shaft)
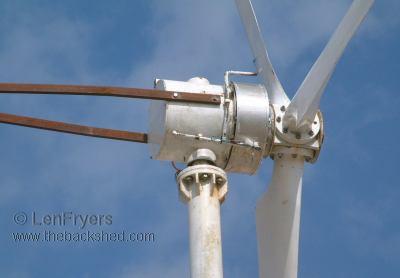 I now needed some way of turning it into the wind, there are lots of ways to do this and at first I used a motor to drive the main shaft (post), it needs a very low gearing as the forces acting on it when the blades are turning are big. I then used some reed switches and a small dog vane to drive the motor either left or right, this was all housed in a plastic box on top of the turbine , power being fed to the motor from the slip rings (seperate12 volt supply)
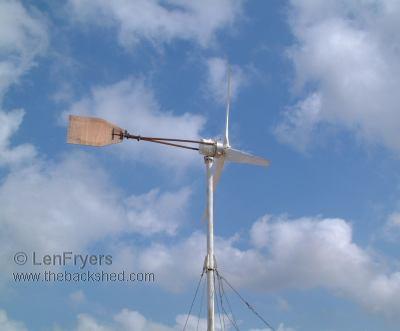 I have used a Battery voltage sensor to stop the turbine from overcharging the batteries, this was supplied by Thomson Technologies in Canada. You can use it to either short the turbine windings to stop it, or turn it out of the wind, or bring in a dump load, or a combination of all three.