
|
|
Forum Index : Electronics : A newbie ozinverter build
| Author | Message | ||||
Madness Guru Joined: 08/10/2011 Location: AustraliaPosts: 2498 |
Hard to get my head around american measurements. There are only 10 types of people in the world: those who understand binary, and those who don't. |
||||
| Tinker Guru Joined: 07/11/2007 Location: AustraliaPosts: 1904 |
That would make you a young fellow  . .I had my apprenticeship in Europe, a metric country. Then, coming to Australia in the late 60's I had to learn all that English (inch, pound etc.) stuff. Then they decided Australia is going metric..... Now I often mark things mechanical out in metric and check that in converted inches  . My PCB's are laid out on a .1" grid since many parts have that footprint dimensions. . My PCB's are laid out on a .1" grid since many parts have that footprint dimensions.Got to be careful with metric spacing connectors, 5mm is not the same as .2" and if many are in a row the holes won't line up with all pins. Klaus |
||||
| Tinker Guru Joined: 07/11/2007 Location: AustraliaPosts: 1904 |
Ah yes, I started out with such a drawing on my first toroid rewind. Sadly, theoretical space and practical space for the wires are *not* the same. You will find it just about impossible (winding by hand) to lay the wires neatly along each other in the toroid hole. A winding machine with terriffic wire tension and controlled advance 'could' do that, your hands cannot. The layers will also build up more than shown in your drawing, especially if you fit tape insulation between layers. So, plan for perhaps 5-10% less turns per layer than theoretically possible and space them accordingly. If you find, for example, you 'could' fit 100 turns try for 90 per layer. If this looks like a winding layer will not complete a full circle of the toroid, perhaps only 3/4 of the way around, space all turns on this layer so they are evenly distributed around the toroid circumference. I would recommend to wind *one* layer at a time of your secondary, then coat it with epoxy resin, let it harden, then continue. Yes, this takes a 'lot' longer but you end up with a silent toroid. Individual turns moving against each other in strong magnetic fields is 'not' good. They will move since hand winding does lot lock them in place sufficiently, especially with thicker wire, >1mm diameter perhaps. Klaus |
||||
| Madness Guru Joined: 08/10/2011 Location: AustraliaPosts: 2498 |
I believe only usa and liberia use the old imperial system now. Maybe little rocket man will convince trump to go metric tomorrow morning. I was in my last year I think of primary school when Metric came in, as a fitter and turner in my early working life I had to use imperial for most things. Metric is so much simpler, even nasa cocked up some of their Mars Orbitor trying to use metric and Lockheed Martin was using imperial. There are only 10 types of people in the world: those who understand binary, and those who don't. |
||||
| tinyt Guru Joined: 12/11/2017 Location: United StatesPosts: 431 |
Thanks Klaus for the warning. In my sketch, even though I made provisions for the tape layers and the array of wires for the two layers turned out to be the needed 115 wires, you are correct that it is only theoretical.  I will find out when I wind the first added layer. The original inner layer that I kept which probably were machine wound did not have any varnish. I did not have epoxy resin but I have left over polyurethane varnish, so that is what I used on this layer. Will buy and use epoxy resin for my hand wound layers. |
||||
| tinyt Guru Joined: 12/11/2017 Location: United StatesPosts: 431 |
When I was immigrating to America, everybody were converting to metric. So I thought that America is also metric, so my weight and height were in metric in my first resume. Did not get a job here until I changed them to imperial. But medical measurements here are in metric. |
||||
| Boppa Guru Joined: 08/11/2016 Location: AustraliaPosts: 814 |
What confuses many people here is that the US imperial system isnt even the same as everyone elses old imperial system, so even if you grew up using inches etc in Australia, they dont translate directly into US versions (well inches and feet do, but gallons etc are different) 1 us gallon is 0.832674 imperial gallons |
||||
| Madness Guru Joined: 08/10/2011 Location: AustraliaPosts: 2498 |
Many scientists in us use metric, lots of confusion about names. I used to play around with wood gas, an american was saying how his vehicle was running on gas but what he actually meant was it was running on liquid fuel. There are only 10 types of people in the world: those who understand binary, and those who don't. |
||||
| Warpspeed Guru Joined: 09/08/2007 Location: AustraliaPosts: 4406 |
Getting back to the toroid winding thing... Circles are amazing things, and building up multi stranded cables is similar in concept to winding a toroid, but in reverse. With a multistranded cable you start out with one strand right in the middle. The first layer to go over that has six strands which fit perfectly around the middle strand (giving 6+1 = 7 wires) Now if you fit another layer around all that, twelve more strands fit perfectly around your seven existing strands (giving 1+6+12 = 19 wires) The amazing thing though, is that every new layer adds exactly six more strands than the layer immediately underneath to the total. The next layer would be 1+6+12+18 = 37 total wires) The significance of this for toroid winding, is that whatever fits on a particular layer, the next layer to go over that, is only going to theoretically have enough room for six fewer turns than the layer immediately underneath. And that six turn deficit holds for every additional new layer, as the hole area dramatically shrinks. All that assumes perfectly placed turns and no insulation between layers. In the real world it might be closer to seven, eight, or nine fewer turns per layer depending on how neatly the whole thing can be made. But its a handy trick to know when estimating what might possibly fit when a particular winding is going to take up multiple layers. Cheers, �Tony. |
||||
| tinyt Guru Joined: 12/11/2017 Location: United StatesPosts: 431 |
Thanks for the tip Tony. I am a visual guy, so: 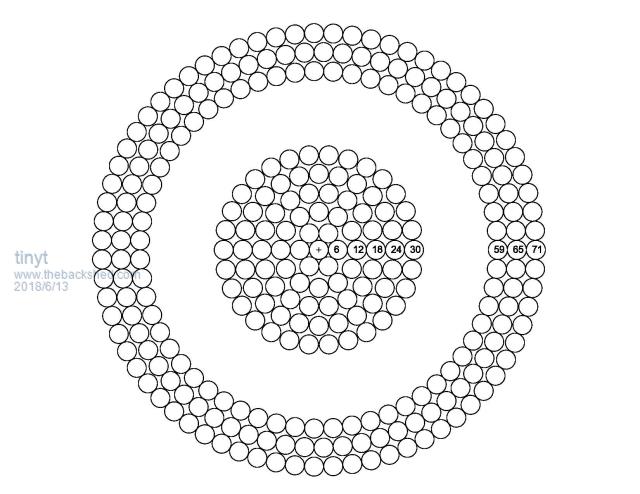 |
||||
| Tinker Guru Joined: 07/11/2007 Location: AustraliaPosts: 1904 |
And there is myself, picturing you sitting there and drawing all those tiny circles one by one.... Is it fun?  Klaus |
||||
| Warpspeed Guru Joined: 09/08/2007 Location: AustraliaPosts: 4406 |
Drawing circles is a hell of a lot easier than doing it with real wire ! Great effort there Tinyt. I sometimes have dreams about this stuff, and I already knew about the six turns per layer rule with bundled cables. Then one day it suddenly hit me in a flash of inspiration that it must also apply to toroids as well, and it does... It never works out quite so perfect in practice, but with a bit of an additional safety fudge factor, it definitely gives a very useful insight. Cheers, �Tony. |
||||
| tinyt Guru Joined: 12/11/2017 Location: United StatesPosts: 431 |
Only one of the circles shown were drawn in autocad: click on circle icon, click on drawing window location, select radius or diameter, key in diameter. The rest were polar arrays of copies of the drawn circle. Was fun to see the 'rithmetic automagically drawn. Back on the toroid winding. If the polyurethane varnish is not good enough, what type of epoxy resin do you guys use: like what set time (5-minutes, 120-minutes, etc.), is it thin or thick, etc. Do you have brand name, part number? |
||||
| Tinker Guru Joined: 07/11/2007 Location: AustraliaPosts: 1904 |
Ah Autocad, wish I were smart enough to play with that. I tried a freeby program years ago when I was still working but never got any good with that. I suppose it requires lots of practice.. Varnish is more used to seal windings from moisture etc. I'm not sure how hard this dries. I use a locally made boat building epoxy (in your country "West System Epoxy" would be an equivalent. This stuff does set hard but not 'rock hard', which would make it brittle. Is a bit like honey when mixed up, thin enough to seep into gaps but not so thin that all runs out at the bottom. BTW, do this on top of a plastic sheet or your toroid becomes a permanent workbench fixture . So, use it sparingly, you do not want hardened lumps on the bottom. Should this happen use a heat gun (not hotter than 200 degrees C)to warm the 'lump' and some flat bit of material (I use a PCB offcut) to scrape it off without damaging the wire enamel. This works best the next day, not 3 days later, as the epoxy keeps hardening for at least 24 hours.5 min epoxy goes off too fast but sometimes useful to lock wire end in place at the beginning of the wind. If you are new to epoxy do read the safety sheet with regard to skin contact. There is little by way of dangerous fumes, having used almost 200Kg (boat building) the smell never bothered me. You can, of course, get epoxy especially formulated for magnet wire windings but that often requires baking to harden, its expensive too as its likely rated for higher temperatures than the 120 deg. C where my epoxy softens again. I leave the epoxy overnight to harden (this depends on temperature and hardener type), the fingers usually can do with a ddecent rest anyway after winding a full circle onto the core. Enjoy. Klaus |
||||
| Madness Guru Joined: 08/10/2011 Location: AustraliaPosts: 2498 |
I have been playing a bit with FreeCad it is free open source and works very well. Does 2-dimensional drawing well but really comes into it's own for 3D, will be handy for when I get around to getting a 3D printer. There are only 10 types of people in the world: those who understand binary, and those who don't. |
||||
| tinyt Guru Joined: 12/11/2017 Location: United StatesPosts: 431 |
Thanks Klaus on the epoxy tutorial. I do most of my online shopping at amazon and found "west system epoxy" to be a bit expensive. Amazon also shows similar products from other manufacturers, "Totalboat Epoxy" offers less expensive products and kits. To confuse me more, they have 5:1, 3:1, and 2:1 mix ratios. I am doing the toroid winding after work. My tiny rheumatoid hands can do only 10 turns at a time, they also suffer tremors, so the wires become crooked as I wind them. still trying my best. Will show picture of first layer when completed. |
||||
| Madness Guru Joined: 08/10/2011 Location: AustraliaPosts: 2498 |
I have used high-temperature epoxy that is used by motor winders now. The ones I know here don't bother will dipping and baking windings now, they just mix the epoxy and pour it on. It works really well, it finds its way in between all the windings and does not drip off unless you put too much on. Downside is that it is not cheap. There are only 10 types of people in the world: those who understand binary, and those who don't. |
||||
| Warpspeed Guru Joined: 09/08/2007 Location: AustraliaPosts: 4406 |
Agree that epoxy is definitely far superior than dipping for things such as motors or toroids. But for very deep multilayer windings on large E and I transformer cores, dipping is still used commercially for normal transformer fabrication. That is what I am used to, but it looks like this old dog is going to have to learn some new epoxy tricks... So keep the information coming guys. Cheers, �Tony. |
||||
| Tinker Guru Joined: 07/11/2007 Location: AustraliaPosts: 1904 |
Yes, epoxy *is* expensive. The west system type is 5:1 mix from memory, a bit of a pain IMO unless one purchases the special pumps that replace the epoxy container lid. Pumps need the bigger containers (~1 liter). The epoxy I use is 2: 1 mix, very easy. I do have pumps since I buy it in a 1.5 liter pack (1 liter epoxy, 1/2 liter hardener) but the minimum pump (one stroke) quantity is often too much for really small jobs. So I weigh it on a little gram scale, not 100% correct mix, since the stuff is measured in volume, but close enough for what I want and had no failures. The nice thing with this epoxy is, with some filler powder, it makes an excellent glue for wood and even metal if this has rough surfaces. You might have seen my chokes, these were epoxied onto a plywood base. Even if you do not buy the 'west' epoxy its worth while to get their excellent application brochures, essential for a beginner to understand how epoxy works and how to use it. Klaus |
||||
| tinyt Guru Joined: 12/11/2017 Location: United StatesPosts: 431 |
Partial winding of added 115vac section. Because the existing machine wound layer underneath has overlapping turns in several places, I was not able to place all wires inside the toroid side by side. And that is my excuse,haha. 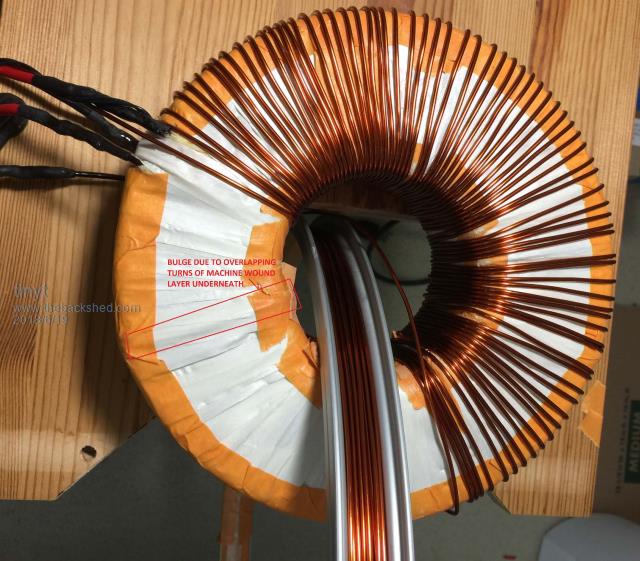 |
||||
