
|
|
Forum Index : Electronics : 6Kw Ozinverter build
| Author | Message | ||||
| wiseguy Guru Joined: 21/06/2018 Location: AustraliaPosts: 998 |
The whole transformer is very neat & the shield looks good. Do you plan to ground the shields & if so how do you plan to connect to the shield ? Where do you get the mylar from & what thickness & width mylar do you use ? If at first you dont succeed, I suggest you avoid sky diving.... Cheers Mike |
||||
renewableMark Guru Joined: 09/12/2017 Location: AustraliaPosts: 1678 |
Thanks, I was just going to flare out some thin stranded copper and solder it to the flashing. The mylar is recovered from the unwinding from the Aerosharp cores. It is prob 10-12mm wide. Cheers Caveman Mark Off grid eastern Melb |
||||
| renewableMark Guru Joined: 09/12/2017 Location: AustraliaPosts: 1678 |
Well that's not working, solder doesn't want to take to the flashing. Wonder if using a big paper clip would be enough of a connection? Cheers Caveman Mark Off grid eastern Melb |
||||
| renewableMark Guru Joined: 09/12/2017 Location: AustraliaPosts: 1678 |
Might switch to this copper sheet, that will solder easily. Cheers Caveman Mark Off grid eastern Melb |
||||
| renewableMark Guru Joined: 09/12/2017 Location: AustraliaPosts: 1678 |
Well I remembered there were some al brazing rods in the shed. It's hard stuff to work with as the melting temp of the material and the rods are very close. I took the sleeve and top hat off to braze them together. You can see a circled area where it got too hot in one section. Tricky stuff to work with. 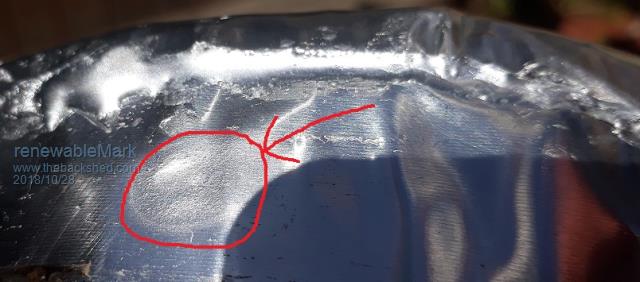 Of course this can't be done on the toroid. Thinking if there are two sleeves with hats brased together off the toroid, they could each have a small bolt brazed to the top hat section, then each side slid on the toroid and a connection could be made through the centre to each top hat section, thus completing one turn. Cheers Caveman Mark Off grid eastern Melb |
||||
| johnmc Senior Member Joined: 21/01/2011 Location: AustraliaPosts: 282 |
Nice work Mark, what is the advantage for this shielding, is it much of a improvement for a inverter that is already has a metal shield wrapped around the outer rim between the secondary and primary windings. Also the complete inverter is in a steel housing with filters on the secondary output windings. cheers john johnmc |
||||
| renewableMark Guru Joined: 09/12/2017 Location: AustraliaPosts: 1678 |
If you do 1 turn with a slight (insulated) overlap it is meant to remove the little blip at the zero crossing, a lot better than the continuous copper tape that aerosharp used. I'm only doing it because I have the time to do it, this is just a backup unit. The unit that is running the house now has a small blip from memory, but nothing bad, so it's really unnecessary, it's more of an experiment. I honestly haven't checked my unit since it got put on the wall, I really should do that with a few different loads, looks like my latest test was on P65 and that looks perfect, it wouldn't be with every different load though. Cheers Caveman Mark Off grid eastern Melb |
||||
| renewableMark Guru Joined: 09/12/2017 Location: AustraliaPosts: 1678 |
This time I used welding wire 70mm, but removed the outer orange insulation. Frigg, soooooo much easier than using the recovered wire twisted together. I know Mad will be rolling his eyes, as it's not as good at cooling, but this will be a backup unit. Start to finish winding primary was 20 min!!!! AND it slotted in just perfectly. 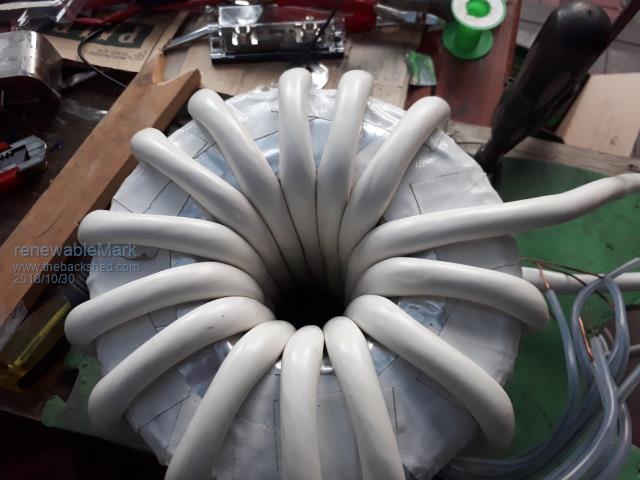 So if you have moderate loads and don't plan to give the unit real curry this is a bloody easy option. Cheers Caveman Mark Off grid eastern Melb |
||||
| brac321 Regular Member Joined: 30/11/2016 Location: SloveniaPosts: 54 |
Is this an original wire insulation? OffGrid 24/7: 250w black mono solar panels 6.4kWp, 1x Midnite Classic 150, 1x MorningStar MPPT 60, battery bank 840 Ah @ 48v, modified LF-8K inverter, DC/DC, hot water harvesting, etc. |
||||
| renewableMark Guru Joined: 09/12/2017 Location: AustraliaPosts: 1678 |
I'm not quite understanding you mate. To run through it though. I recovered the wire from unwinding two x 3kw aerosharp cores. Stuck two cores together Used recovered wire for 4 x secondary windings Used 70mm welding wire for primary, but removed the outer orange insulation to make it easier to wind and less bulky. Cheers Caveman Mark Off grid eastern Melb |
||||
| brac321 Regular Member Joined: 30/11/2016 Location: SloveniaPosts: 54 |
Sorry for my English... My question was about primary. So, you removed the outer insulation. Looks like down under you got welding wire with double layer of insulation? Here at my place we can get only those with single layer insulation. I need to figure out what and how to put on "naked" primary wire, to be voltage and temperature resistant ... Maybe some kind of adhesive tape, like this one? OffGrid 24/7: 250w black mono solar panels 6.4kWp, 1x Midnite Classic 150, 1x MorningStar MPPT 60, battery bank 840 Ah @ 48v, modified LF-8K inverter, DC/DC, hot water harvesting, etc. |
||||
| renewableMark Guru Joined: 09/12/2017 Location: AustraliaPosts: 1678 |
Ah, OK, the first toroid made had the recovered wire. Many strands were twisted together to form around 70mm2. I just used 2 layers of duct tape, the wire is already enameled and it's insulated against the secondary with the mylar. Some use shrink tube, but your tape suggestion would be better than what I have done. Yes our welding wire here has two layers of insulation, we're probably a lot harder on tools down here. Our stuff looks like this Cheers Caveman Mark Off grid eastern Melb |
||||
| renewableMark Guru Joined: 09/12/2017 Location: AustraliaPosts: 1678 |
Well the new toroid ended up nice and compact so it will fit ok in the standard aerosharp case without modifying it like the last one. Keeping the top washer bolt as low as possible is still a bugger, but remembered the plate that holds in a spare tyre is often concave. So went down to the wreckers and found this one that came from a late model mazda 6 wagon, don't know what other cars have this same one. Anyway it will keep the profile low and away from the lid once assembled. 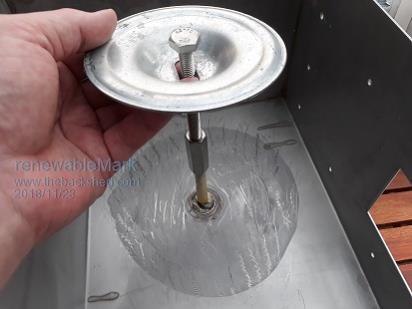  Needs a rubber sheet under the washer still. Cheers Caveman Mark Off grid eastern Melb |
||||
| gaspo Regular Member Joined: 25/06/2018 Location: AustraliaPosts: 61 |
Mark, how much wire fits on that fishing line spool? How many times did you have to extend the wire on that 128 turns per layer? |
||||
| renewableMark Guru Joined: 09/12/2017 Location: AustraliaPosts: 1678 |
As you get more wire on, the hole in the middle gets smaller and you have to trim down the spool to fit. I can't remember exactly but I think it had one join at the start and as the spool had to be trimmed smaller for the later winds I think it had two joins. Take your time, get the wire nice and strait first, and pull tight as you wind. Cheers Caveman Mark Off grid eastern Melb |
||||
| renewableMark Guru Joined: 09/12/2017 Location: AustraliaPosts: 1678 |
Finished the heatsinks for no 2 inverter, so basically just needs to be assembled now. All the hard bits are done, only pain in the ass thing left is winding the double 3kw aerosharp choke. 35c here today, so I left the AC going in the house. Came back to find the torroid had got to it's highest temp so far @50c, fans were winding up and down, depending on it's temp, actually that was the first time I saw them run. 3 months on, 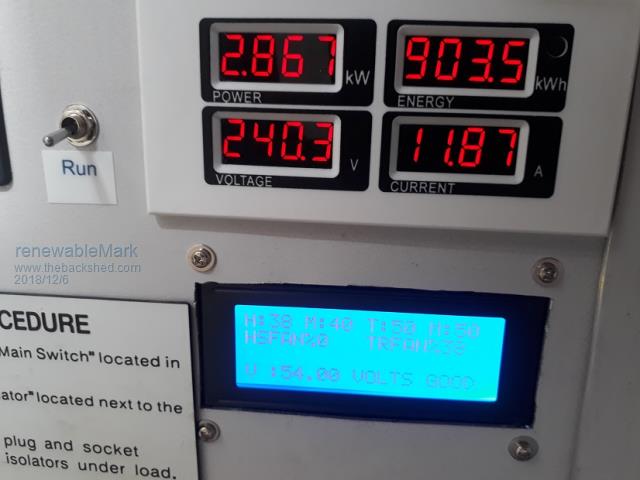 and all ticking along nicely. Cheers Caveman Mark Off grid eastern Melb |
||||
Ralph2k6 Senior Member Joined: 24/09/2017 Location: AustraliaPosts: 129 |
Nice looking setup. Glad to see your hard work is paying off.  Ralph |
||||
| johnmc Senior Member Joined: 21/01/2011 Location: AustraliaPosts: 282 |
Well done mark, I have been watching your progress. What does all the procedure sign say? cheers john johnmc |
||||
| renewableMark Guru Joined: 09/12/2017 Location: AustraliaPosts: 1678 |
Thanks Ralph and John, the system has been awesome, it survived the mini heatwave we had here in Melb recently. Battery coped running the AC at night for a couple of hour stints. I suspected the gen may be needed to top up batteries a tad with the 1000w charger, but wasn't actually needed, it would be great to have 3000-4000w charger to make running the gen worth while. I haven't bothered doing that yet as 1000w seems like a waste of time to run a gen, and honestly the panels have coped really well even in cloudy days. I'm still amazed how much they produce in cloudy conditions. Currently 8750w on the roof, just put up railings today to fit another 1000w N facing. My roof is a total pain, lots of angles and triangle sections, which means way more tile hooks and inefficient use of rails etc. Oh well sucks to be me hey? Looking forward to see Poida's arduino based control board running with gen sync, that will eliminate the need for a bigger charger. John, that sign is just a std solar procedure sign. I am planning to number all components with big letterbox numbers and write up a procedure list, in case I am away then the wife has some hope of handling it herself. The second inverter is planned to be running at idle with an auto transfer switch connecting the two. Probably no need while I am around, but would like to have a backup if I'm not there, if that is implemented then the wife will not have to worry about a thing ever hopefully, even if I'm gone for a few days. Cheers Caveman Mark Off grid eastern Melb |
||||
| renewableMark Guru Joined: 09/12/2017 Location: AustraliaPosts: 1678 |
I tried the new torroid to compare, sine is about as clean as you could probably get with the metal screen between secondaries and primary winding. 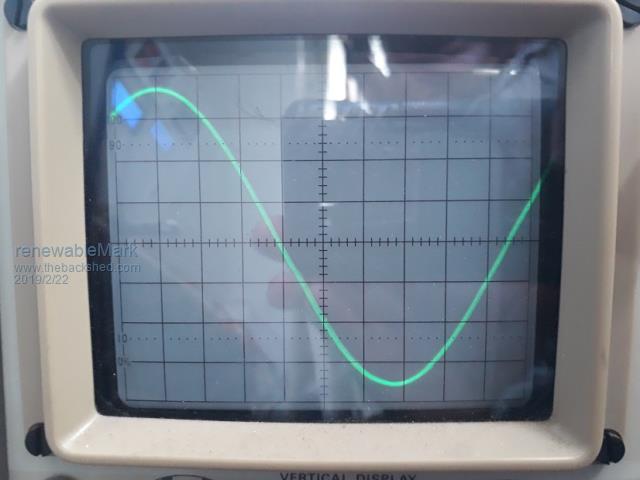 Previous sine from other toroid is on p65 BTW thanks for the idea Tony, I know Tinker had some idea about using straps to do the screen, but my implementation ended up pretty easy, but it did need that sh*tty al welding material/method which is pretty fiddly. Using copper that can be soldered easily would be the way I would do it if needed again. Cheers Caveman Mark Off grid eastern Melb |
||||
