|
|
|
|
Site Navigation
Projects & Information
»General Information»Wind turbine Projects »The F&P Smartdrive »Electronic projects »Microcontroller projects »Miscellaneous Kits & Parts
»Basicly Natural Pty Ltd»PVC & Aluminium blades »Scale model farm windmills »Price Watch Discussion Forums
Handy Links
»Wind»Solar »Electric Vehicles »Electronics »Micro Controllers »General Interrest About TheBackShed Getting Started Privacy Policy |
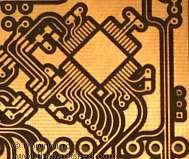
I remember making my first circuit board when I was a teenager. It was a simple full bridge rectifier circuit with smoothing capacitor, about 30mm square. I used a acid resist ink pen to draw the layout, and ferric chloride to etch the copper away. Using a ink pen to draw the circuit is great for simple circuits, but a nitemare for anything over a dozen or so components. A better approach is to use the UV-resist boards, and Pete has put together this article on how he makes his own curcuit boards using this method. Making Photo resist PCB’S By Pete. There is many methods of how to go about fabricating a printed circuit board. In many ways it’s a black art of linking little electronic bits together that actually preforms a task, and it works!! (well! we hope) I have used many different methods over the years, from hand drawing direct onto the copper (not pretty) , strips of finely cut masking tape stuck to the copper, (Hmmm) Direct iron down laser printer toner ink. (not so bad??) (photocopies also work, same ink) All worked, but the effort required and the inability to repeat a board, or to make a circuit change convinced me to move forward with my methods. When I started to use the pre-coated positive resist board many years ago, I would lay up the circuit on clear overhead projection sheet using Transfer, dots and ic footprints etc. then join the pads with different size pin stripes for the tracks. It gave good results but time taking.
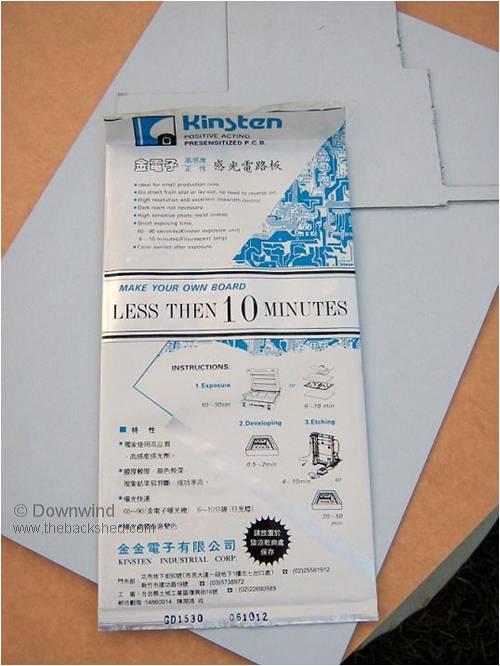
Then computers, printers and the internet with free software downloads come along. This had ability to do all the artwork and print out a copy. Even a computer illiterate person like me could do this? Great! But what I inspired to archive was to reproduce what I seen on the computer screen onto the PCB with repeatable consistent results. This has taken me to the method I have adapted to work for myself and hopefully others find it helpful to their PCB fabrication. Positive resist pre-coated board is what’s used, and it gives good results for a not over expensive cost and is not difficult to work with. One supplier is HERE I have never dealt with them, but the prices are about right and the product is a consistent quality. (Kinsten) There is a lot of boards in a sheet 300x450mm and works out cheap per board. I have only used this brand once or twice and it worked well. This sheet of double sided board is opened but not used. ( too hard ds.board) The sheets of board in the background is what I use.
The process uses Uv light to expose the positive resist film on the board. The areas that receive exposure to Uv light will develop away and the area without Uv light exposure will remain to protect the copper during etching. The developing solution is 5 grams of caustic soda in 1 litre of water, or about a teaspoon full in 1 litre of water. Don’t try to mix any less amount, as the ratio is to hard to measure, and you may well completely strip the board if mixed to strongly. I recommend you do a test strip when you mix a new batch of developer to check the strength. (see test strip at the bottom) Basic procedure.
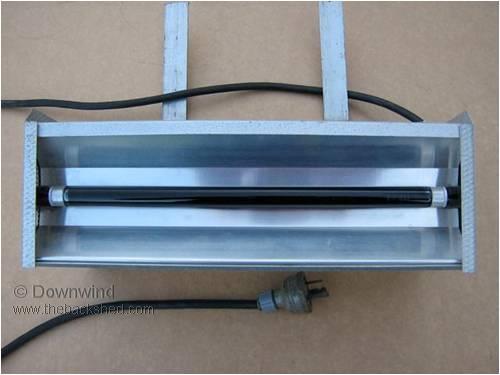
Easy Ha! Sunlight exposure will also work and some fluros to at close proximity will work to some degree (if you can wait an half hour or more) I used an old bug zapper uv fluro I had found in council road kill rubbish for a long time (15-20 min exposure)
Since trying UV leds have not used the zapper fluro again.
|
||