|
Handy Link.....
Sun Tracker.
A tool by SunEarthTools.com to
calculate the sun angles for your
location at different times of the
day and season. |
| Make your own Solar Panels! |
Page 1 | 2 | 3 | 4 | 5 |
By Oztules
 It's something I said I would never do..... but now I have. It's something I said I would never do..... but now I have.
If you have no value on your time, and want to do your own DIY solar cells, then it has always been possible to cobble some cells together, stick them to a surface, and place plastic or glass over them, measure the output..... and generally feel good.
A fancy frame helps with the karma... but you know in the end it is only temporary.
As the water vapour creeps into the sealed wooden framed ones, or the window glass you scrounged up...breaks because of the heat/cold and localized heating in particular cells, and it all falls in a heap. It can get pretty sad for a lot of devotees that have tried.
There are plenty of youtube stories and how too's...... but all (but the ones using sylgard (or whatever it's called)) are doomed to failure)...... except those who have tried to use EVA (ethylene vinyl actetate).
I viewed a few treatments on the youtube sites, and none of them inspired a great deal of comfort. They all revolved around using a heat gun and a heap of good luck to melt the EVA around the cells, and onto the glass.........
Why I thought, did they make solar cells 30 years or more ago, and still basically the same today...and yet the amature panel maker comes up with lots of bad ways to do it??
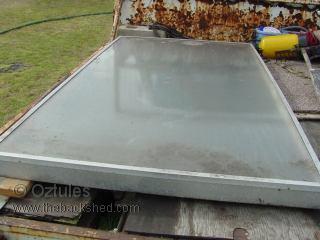
I pondered this for a while, and in the meantime, a plumber friend turned up with a few solar hot water panels..... also 25 or more years old..... they were stuffed..... but they did use tempered glass, and it was iron free glass.... and it was free glass ( this was the clincher).
 So I sat and looked at a few 2 sq meter panels (1x2m).......... yep, had to have a go too.... but it cant be cut! So I sat and looked at a few 2 sq meter panels (1x2m).......... yep, had to have a go too.... but it cant be cut!
This is where I decided to look around the world at the current state of play. This was sobering, no real effort at making proper panels like the big boys built without the big boys price tags... why not?
It appears that folks thought you needed a laminator style of machine, which were very expensive, and a barrier to making your own. But if you look at what needs to be achieved, it is really only a few simple steps.... so lets look at the how and why.
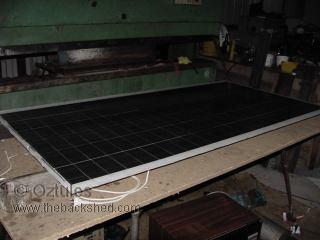
Traditionally they use a sheet of glass (iron free tempered if you can get it), a sheet of EVA, the cells themselves, another sheet of EVA, and whatever your having yourself. After the last EVA sheet, you only really need to put something there that will not wick, and will give you something for the very very sticky EVA to bond to that is not your "jig" It can be painted later if you want more protection. Usually they use tedlar, but really any inert permanently waterproof material will do for protection.
The simple theory of what we are trying to achieve is this:
We need to get the cells fully encapsulated in a UV stable envelope, that resists water and air from denaturing the cells. It must allow for differential expansion rates to occur between the silicon wafers, the glass and the medium itself....... and no bubbles.
Ethelyene vinyl acetate is a plastic sheet .5mm thick. It is soft plastic in texture and seems innocuous enough....... however, when it gets to only 65 degres C, it melts. This means that we need not get to very high temperatures to get something to happen.
I'll bet there are plenty of hopefuls ( like me for instance) that grabbed some EVA, some glass, and the wifes oven, and made a prototype cell......but it is filled with bubbles!..... It does stick to the glass and, it envelops the cells well, but it is useless because of the bubble population.
It is at this point that you start to get a bit anxious about where to get a laminator...... but you don't really need one. We just need to emulate what it does.
Next thing we look at is what happens when it melts. To get the EVA to be useful, we need to get enough energy into the stuff to cross link the molecules. It changes the way the material behaves, and increases the melt point considerably as well. At low temp (65C-80C) it melts to itself very well, but is only slowly converted into the final product, so we have to keep it at these temperatures for long periods..... but as we increase temp, things happen a whole lot faster, and 5 mins may be enough at 145C to get it to cross link, and stick very strongly to the glass and the cell itself.
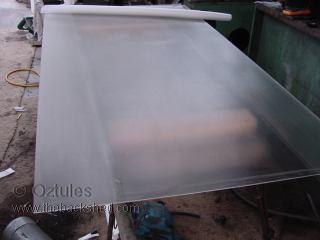
It also needs some encouragement from pressure..... or a vacuum perhaps, and use the air pressure to do the job of supplying the pressing force.
Now we know it works perfectly well without vacuum, but you will have myriads of fine bubbles.... blocking out the sunlight.... well, not so perfect after all.
So we need a vacuum pump. Ideally one that can draw a near perfect vacuum. The vacuum you can achieve sort of directly relates to the bubbles you will get left with. High vacuum.... no bubbles. It's that simple. The vacuum will also press the cells very firmly (200 plus pounds per cell for the 6x3 ones) against the glass, and this will help the glass bond, and make for a very flat cell, with no voids in the plastic envelope.............as always there is a but:... you must have NO leaks at all, or you will get uneven vacuum in the sheets, and you will get bubbles forming.... probably in the inter cell space, but bubbles all the same.
The heating profile I will use is like this:
15 mins at around 50C with full vacuum
15 mins at 65C with full vacuum
70-80 mins at 100C-120C (or hopefully more) with full vacuum
This last bit is dependent on the EVA you get. Low temp EVA is used for window lamination, where electronic components may be incorporated into the glass matrix....
For “normal” EVA if we can get the temp to rise some more.... then good. Even if the containment bag (ok garbage bag) fails at this point, it's work is done for all practical purposes... better if it does'nt.......but we get what we can.
So all in all.......it looks doable.
First step for me was a BIG oven.
An oven that would handle the 2 meter by one meter panes of glass that came from out of the solar water panels. (it turns out that for some quirk of history, there are plenty of these old solarhart type panels laying around over here).
|
 |
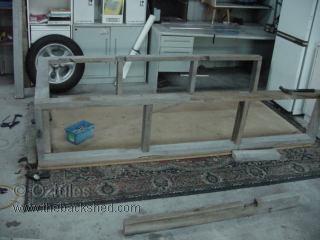
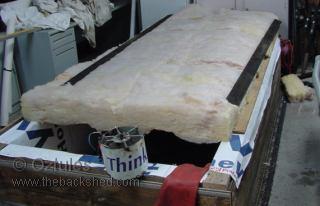
We know that the temperatures involved are not terribly high in order to achieve the bonding and cross linking that is required to get the cells to be protected, and pressed against the glass without any bubbles..... so I started with a wooden construction..... yes for an oven.
I had recently pulled down a wool shed for a fellow, and I was given the wood.... lots of old 4x2 hardwood.... so this was to be the frame
It looks like this >>
|
 |
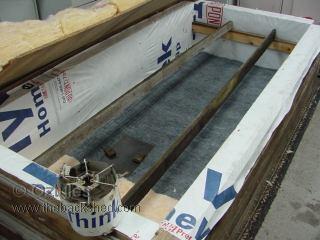
I was also given some packing material in 8x4 foot sheets of low grade 3/4" pineboard.(someones kitchen apparently turned up in them). These would serve for the bottom and lid of the oven. For the sides I just used some of the old floor boards from the shearing stand.....
The whole thing is lined with ceiling roof bats insulation and then all held in the walls with a sheet of TYVEC building wrap material.... could be anything really.... even paper. |
 |
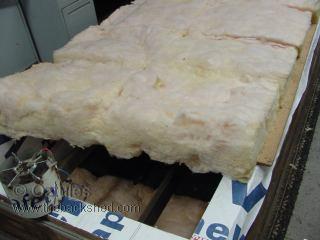
| Ok, that gets us the oven walls and floor, and the lid was just a sheet of the 8x4 pineboard with insulation laying on the top.... Now we have an insulated container that will take our panel. |
 |
 |
What this means to the 60watt panel builder.....is that even an insulated cardboard box will do for an oven (I used one with a fan heater blowing from in front for the initial trial, with blankets and dooners for the insulation...... perfectly good for a 60 watt panel)
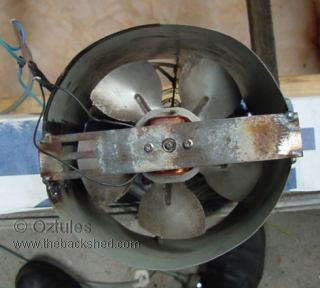
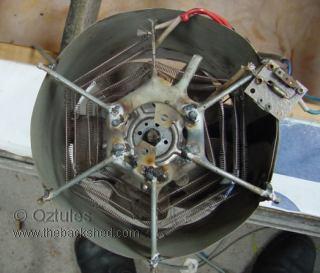
Next step is a heating element.
This was simply solved by destroying a fan heater/radiator. These things draw about 2000 watts and incorporate a fan and a nichrome heating coil. They spill out a fair stream of not too hot air, so are unlikely to melt our plastic bags (comes later) when we bring the oven up to temperature.
I built the heater body out of a "think safety" sign (ironic really), which housed the heating element at one end, and the fan motor at the other. The fan blades were plastic, and would melt in this environment (proximity to the glowing element), so I stole the aluminium blades from my big MIG welder, and put the plastic ones back in that.
This gives us a 2000w heater that blows warm air..... but not too hot,and will allow us to gently heat the oven up to about 100-120 degrees, without any cunning trickery required to temp control it. Because the oven is so well insulated...... we just keep adding watts from the heater until we get to where we want.
Finished it looks like this:
 |
 |
| Perhaps finished was too strong a word to use...... but it does work. |
 |
Page 2  |